






Blogs
Improve in CS:GO: Lock Down B on Inferno
Inferno is known for its incredibly close and exciting games. The high number of crucial chokepoints leading to Bombsites and leading to actual map control that is important to winning a round in a more elaborate way, like A-long for a B-split, make for a climax-heavy play style of said map from a spectator and player perspective. However, due to this chokepoint-heavy style that Inferno fosters, you need to make sure that you play your Bombsites correctly by deploying your utility in a manner that makes sense and delays or hinders the opposition in their quest to a bomb plant.
To give you an introduction to Inferno and how it plays out for you as a CT, I want to point out that Inferno has a steadily increasing amount of bomb plants over time in a round, due to how the later in the round it gets the more likely the Ts will have gathered enough map control, almost by default, to execute in the near future. Except for the initial B-rush danger, the chance of a B bomb plant is steadily climbing, albeit in an up and down movement cycle, ending in a dip.
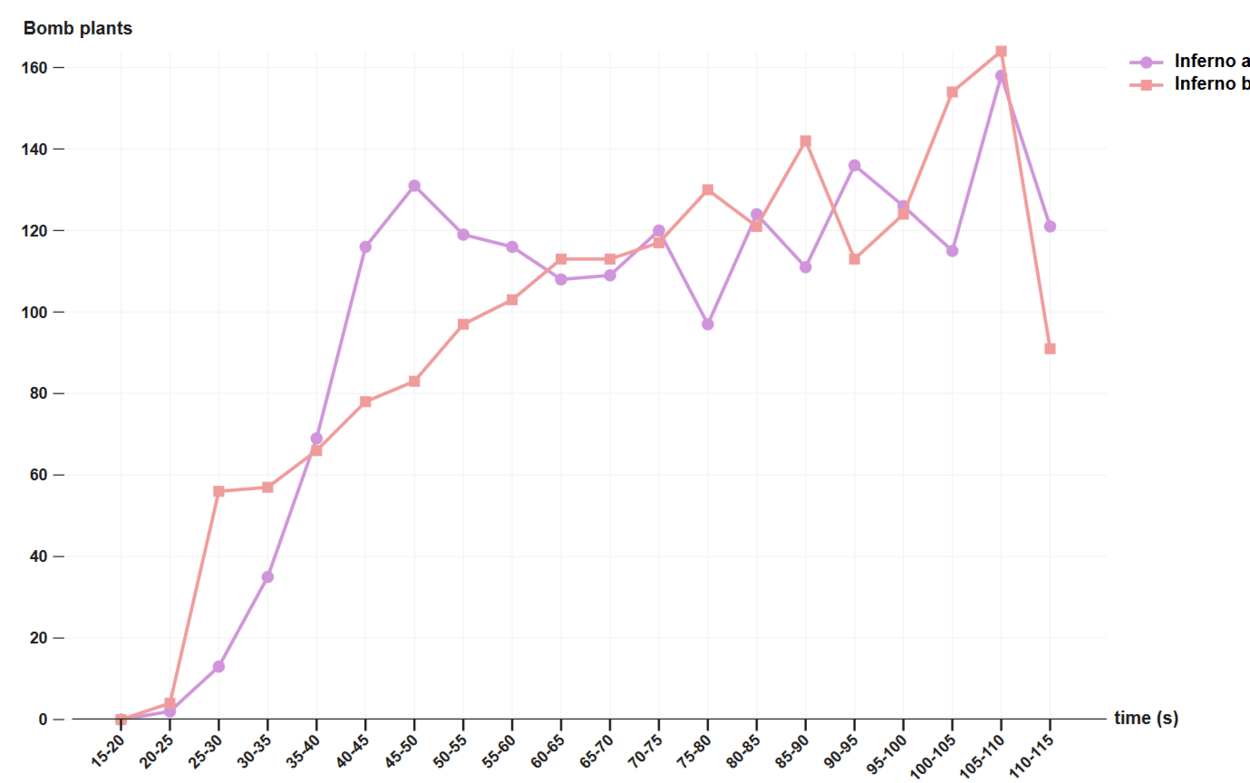
Image courtesy of stayinpit.gg
This means that the longer the round goes on, the more crucial your deployment of grenades become, as they carry more and more weight and are more likely to stop the real, full out B execute. At the same time, the increase of chance of a B plant the longer the round goes on stems from a bit of utility usage early and mid-round, not allowing the enemy to execute and therefore plant earlier. So you should be willing to deploy a smoke and/or a flash if you see indicators of clear aggression earlier in the round.
Roles
Like with every CT-side, you should play B with specific roles in mind, allowing you to clearly split the workload on each other, not accidentally putting all the pressure on one player. This makes your CT side less likely to fail since everyone will have specific jobs to do in general situations that occur in almost every round. Although full teams tend to have these roles split up among their players in a clear and set way, they can change during or at the start of a round due to special circumstances, like limited nade availability or an early round hit on the opposite side of the map, so be sure to always be willing to change your role, especially in PUGs.
How to Play the Rotator
The Rotator, like the name suggests, has the responsibility to get to A reasonably fast, not allowing the Ts easy entry onto A once one or more players fall on A, or at least deny them easy CT control by positioning himself accordingly. Although this can be considered the biggest job of the Rotator, we will concentrate on rotations later in the article, in order to talk about holding B first, which this article mainly is about.
Since the Rotator will be the first one to leave the B-Bombsite, he should also be the one responsible for the first deployment of utility. What does this mean? As we have discussed earlier, the chance of a B plant increases with the time that has passed in a round. Part of the reason for this is that the CTs tend to use a bit of utility early and mid-round, not allowing the Ts to find an easy opening. So, in case you come across a few angry Ts looking for a pick in Banana, it'd be wise to use a bit of utility, like a smoke and a flash, to keep them at bay, delay them, and maybe make them rotate off. This is exactly the role of the Rotator, including using early utility in case the Ts have shown to love early B takes and rushes, not allowing them to do that easily in the coming rounds. Also, in case you plan on taking Banana control, he should be the one using the most utility, leaving a bit of utility on the other B player to keep Banana control later in the round, since the Rotator will most likely rotate to A if you have complete Banana control.
The Rotator should also be willing to play bait and switch set-ups with his partner, where he draws the attention of the enemy and tries to lure them into the crosshair of his buddy. The reason for this is that, if played correctly, the Rotator should be the only one who has a chance of being killed, albeit a very slim one, by peeking or prefiring. Since he is more likely to get killed without getting a (few) kill(s) or shutting down the round, he will lose the rest of his utility. Since he is the one responsible for early- and mid-round utility usage, the team will lose less utility by losing him, allowing for the Anchor to concentrate on farming kills in the bait and switch set-up and using utility afterwards, not allowing retaliation by the Ts.
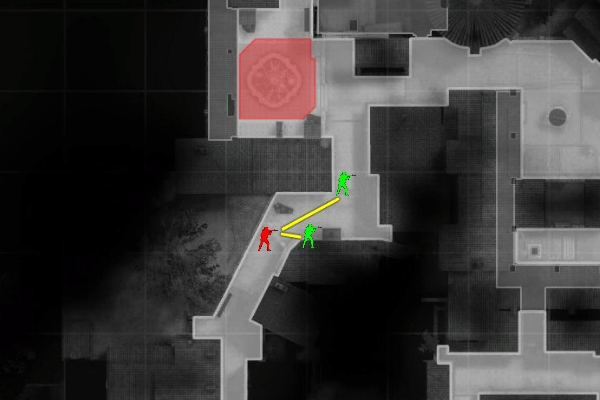
One example of a bait and switch set-up: The Rotator peeks the corner and the Anchor will stand right next to Wallbang, allowing for him to
farm enemies coming out of Banana to hunt the Rotator, who should repeek after the Anchor makes contact.
(Graphic created on gametactic.org)
On a similar note, the Rotator should also be the one peeking for info and pushing a bit if you feel like your CT side needs that right now, maybe because you have lost a non-traded player. Once again, this is because he will most likely have less utility to use.
How to Play the Anchor
The Anchor is the CT who is supposed to hold B until he gets overrun/absolutely has to fall back for a retake or rotate when completely necessary, like A being completely lost. Sometimes, depending on your enemies, this role can be incredibly hard to play right and leave you without many kills, if they ignore B, for example.
The Anchor has the responsibility to stop the mid- to late-round hits with his utility, obviously chiming in with his grenades if there is an early round rush, too. However, he should learn to hold onto his utility, since he will be the last player on B and he is supposed to stay alive or get a favourable two for one trade, at least. Learning to use utility correctly, timing a flash with the intended peek of the Ts and dropping incendiaries only if absolutely necessary, will allow you to further delay and put pressure on the Ts, who are increasingly running dry in utility and have the pressure of time running out on them, too.
So, all in all, he should be the one holding the Ts off for longer, allowing for his mates to rotate, and play dynamically in order to not to be read, allowing him to position him favourably and taking two or more kills with the usage of utility, like smokes limiting the available entrances to B or mollies and flashes. Since the utility is so important at holding back a full push, sometimes completely alone, you should think twice about using utility early.
In order to do this correctly, he also needs to know how to position himself. Playing a one and done spot just doesn't cut it. If he's alone on the Bombsite, it may be good to play Newbox or Dark, where he can keep peeking and use flashes to his advantage. Alternatively, he can play Casket, allowing for him to take one or two kills and fall back, waiting for the retake to commence. Sometimes it is more than enough to concentrate on delaying, allowing your teammates to take favourable positions during their flank, like Banana, before trying to peek them together with the incoming back up.
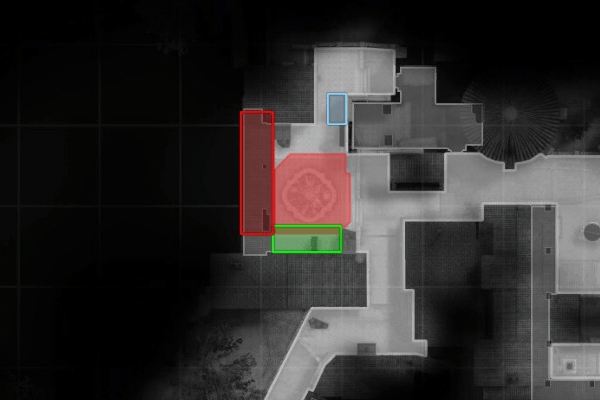
The most common spots on B to play as an Anchor: Green is most effective with one or two flashes,
red with a smoke, since you may get mollied, and blue is most fit for a retake-heavy approach.
(Graphic created on gametactic.org)
A Video to Help You with a Few Grenade Line-Ups
This video intends to help the B players to throw utility from mostly safe positions in order to retake map control, retake the Bombsite, or significantly hinder the Bombsite take.
Set-Ups
Regardless of how you play as an Anchor in a solo setting, both the Anchor and Rotator should be able to set-up properly to stop a solo situation from happening. In order to do this, their positioning should fulfil at least a few of the following characteristics:
- At least one player should be in a position to fall back in case the set-up doesn't work as intended. In a bait and switch that would most likely be the Rotator, so if you have problems making the bait and switch work you should consider making the Rotator the one getting baited in, in order to keep the utility player (Anchor) alive
- The players should be able to take turns peeking, confusing the enemy and splitting the attention the Ts give you
- A flash should be at hand in order to repeek into formerly lost map control. Ideally, you would be able to peek together or have a perfect popflash available
- In a more passive setting, be sure that you cover each other's entrances into your positions so that no one will be suddenly overrun by a few Ts jumping around the corner
A few visual examples of good and popular set-ups:
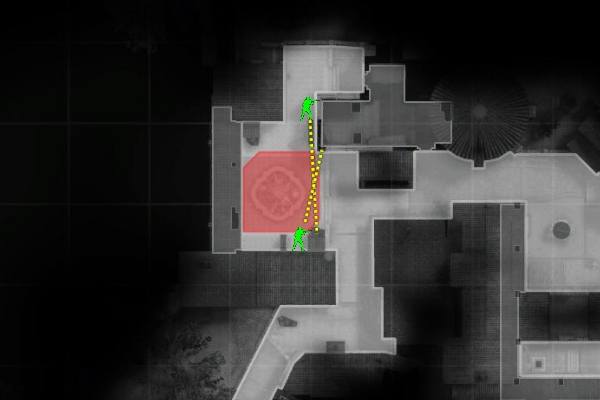
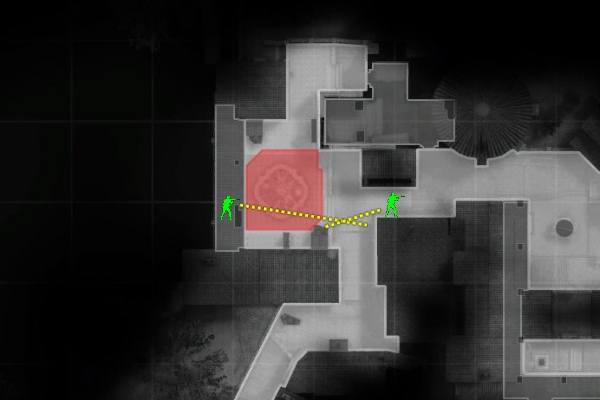
On the first example, on the left, you can see a rather passive set-up that relies on the crossfire from Firstbox and Casket. The Casket player can fall back if needed, and the Firstbox player should know a flash to repeek into Pit and in front of B, giving you the potential to retake a bit of map control after things have cooled down on B or to peek and take one T down during a Bombsite take. On the right, you can see one of the most classic set-ups, where a boosted CT player will take down a T running in carelessly, not being able to check every position like he should and the Newbox player can peek and repeek at will until he gets mollied. In this set-up, the CT player is also able to quickly drop and get to safety behind the smoke that is most likely blocking off CT.
When to Rotate
Although it does sound a bit weird, part of playing B correctly is also knowing when you are able to leave the Bombsite in order to rotate to A and reinforce the defence there or retake A early. Basically, you need to look for patterns in the Terrorists' play. Do they announce where they go? Maybe they go to A every time after they get denied Top Banana control. Maybe they like to fake B with a Casket smoke and then go to A. If you spot these patterns, you will have a lot of power. Obviously, since the Ts can change their game plan, be sure to only rotate one player to A, the Rotator, in case they turn to B after all. Also, be aware that you can play deep into CT and watch the cross from Banana to Pool if the Ts tend to play A a lot, leaving the Anchor alone on the spot but still giving him a bit of support and an instant reaction once the smoke blocks off CT with you rotating back to B, probably through Construction.
A few situations where it is good to rotate one player, although it highly depends on the enemy and their patterns:
- Action on A and the bomb is spotted
- A player falls on A
- You have Banana control and there is a bit of noise on A or you have no info on A
- Enemy hits A more often than B (Best to go deep into CT instead of committing to A)
When to Call for Rotates
As much a part of playing B correctly as everything else in this article, calling for rotates can decide over victory and failure. Once again, it is important to look for patterns in the play style of the Ts. on top of this, be aware that you can also call a guy from A to go into CT in order to watch the cross from Banana to Pool, allowing for the Anchor to play Onspot and the Rotator to play on Casket, while the CT guy has a fast reaction time to A and B.
Here are a few situations that can legitimize a call for back up:
- Action and/or utility and/or noise on B
- You've lost Car control early to a bunch of Ts, rotating A player to CT is enough
- You've lost a player early
Conclusion
On B it is all about delaying the Bombsite take in order to allow for back up to arrive and to trap the Ts in Banana or in front of B. Instead of going for peeks after already losing a player, be sure to hide and harass the enemies with grenades, such as flashes and incendiaries. As a Rotator, be ready to use utility earlier than your anchor, but be sure to also concentrate on your crossfires. As an Anchor, be ready to hold onto your utility until the very last moment in order to increase the pressure. Dare to go aggressive in Banana every now and then, too, especially if the Ts rarely play B. Keep up a healthy communication with A in order to know when to rotate and when you can expect back up.
Got a comment? Be sure to head over to our #digscord and share your thoughts with the writers, management and players!