






News
How to take Banana as a CT like Team Dignitas

Inferno is known for its amazing matches and moments and has seen a remake that stayed pretty true to the original, emphasising map control in Banana and the Apartments on A. This map balance makes it important for CTs to find every opening and as much map control they can get in order to delay the Ts for as long as possible, since rotations take rather long compared to other maps, which is why I decided to show you how Team Dignitas takes Banana on CT-Side.
This article will show you why you should take Banana, when you should do it as well as how to do it, giving you a few helpful graphics and a video summarising Team Dignitas doing exactly what I am trying to teach you through this article.
Why should I take Banana control as a CT?
Allowing the Ts to get easy access right up to the gates to the B-Site is risky since you will have almost no information about how many Ts are waiting for their execute to commence, if at all, once you get pushed out of Banana. Leaving the rotations to chance is a bad idea in CS:GO. In general, since the basic take of Banana takes almost no resources, allowing the Ts to have Banana control again and again, especially when you have an AWP to safely guard almost all of Banana, is unnecessary since the payoff is often way higher than the risk you take.
Once you have taken Banana, the Ts will have to make sure that they're not getting flanked a few seconds into their A-execute, since a CT could be right at the edge of Banana, waiting to backstab the Ts. If the Ts decide to go back to Banana after losing full control of it, they will need to check every corner and slow down in order to stay safe, giving you more time to rotate players over to B.
When should I take Banana control as a CT?
You could take Banana control if you need an extra body on A when the Ts are playing an A heavy game since you will only need one player to guard Banana if you had full control over it. It is also offering itself if you have an AWP who will then have full visual control over Banana with and without the smoke. If the Ts are doing late B-takes again and again, you could try this take in order to ensure more time for help to arrive at B.
How to take Banana control
You will need two players to execute this strategy. One player will be the support or rotator, the other one will be the anchor, staying at B until you are sure that an A-execute commences or until the end of the round. The minimum of grenades required will be one smoke grenade if you do not intend to deny the B-rush. If you want to deny the rush, I'd suggest at least one incendiary grenade and one high-explosive grenade on top of your smoke grenade.
Step 1: Be prepared for or deny the B-rush
B is a common target for low-economy as well as high-economy rushes from the Ts, which is why you should either be ready for the rush or deny it completely.
To be ready for a rush with two automatic rifles you could place one player at Sandbags and one at the corner behind Car.
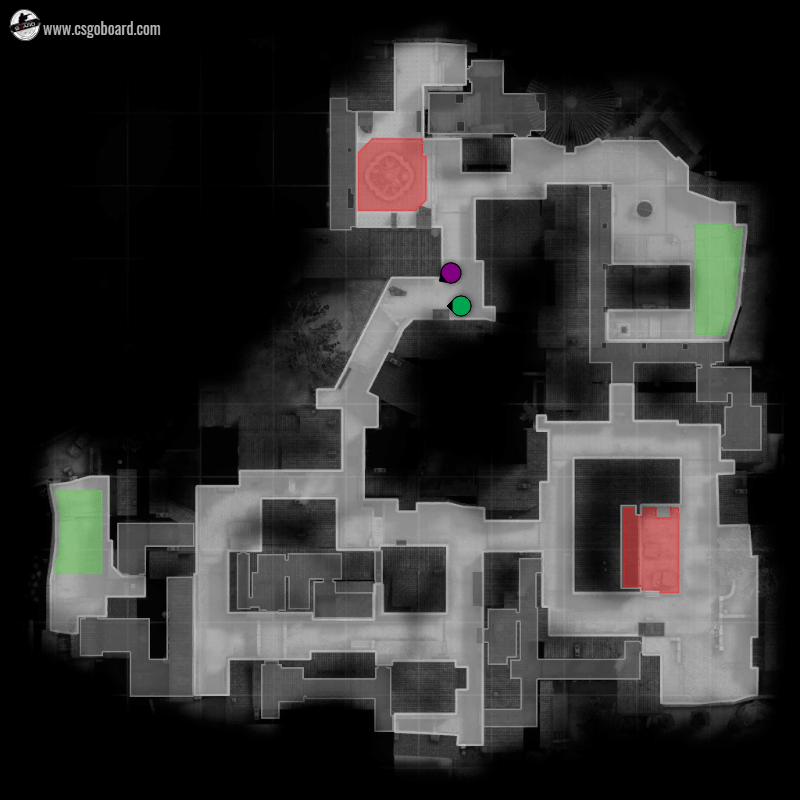
This set-up can be quite risky, especially considering that Sandbags is one of the most popular molotov spots, leaving you to die in the flames or rushing out of cover, but it can also work out like a charm if you know what you're up against. Purple could take the first frag once they are in front of Car and green could frag the next player(s), with purple repeeking once all of the attention is on Green. The really important part of this is the crossfire (no T can easily reach the position of the CTs if they are behind cover without exposing themselves to the other CT) and the bait-and-switch potential, so if you want to change this set-up you should ensure that both of those things are still present.
If you want to deny the rush then there are multiple things you could do. The easiest is to throw an incendiary into the middle part of the Banana by bouncing the grenade off the right wall. This will ensure that no matter the spawn, the Ts will have to pass the flames to reach the end of Banana. This will be a complete deny after the other player throws a high-explosive grenade to damage players who will have at best 10 HP after going through the flames. If you want to be safer then you could throw two grenades deeper into the Banana and throw an incendiary at the top of Banana, leaving the damaged Ts no option other than waiting out the flames. Keep in mind that quick-thinking Ts will extinguish the flames with a smoke grenade, which is why you should always have your rifles ready.
Step two: Smoke off lower Banana and ensure that Banana is clear
After you have ensured that you will not get rushed down, you will need to smoke off lower Banana and then confirm that Banana is clear. Common hiding spots are Tree and the small nook on the opposite of the wall, shown in the graphic below.
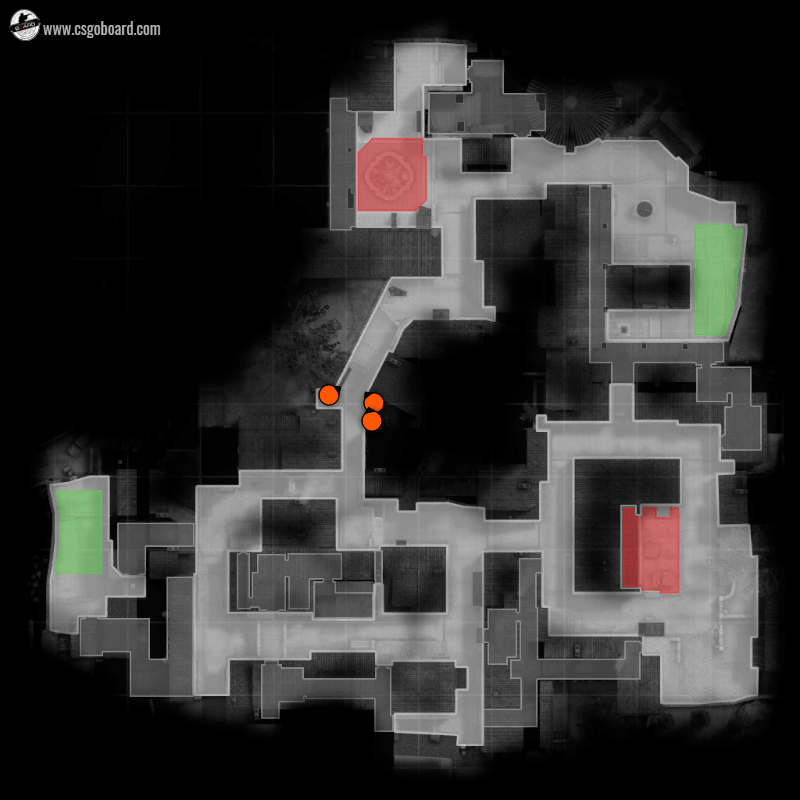
It is really important to be sure that no Ts are left in Banana since you don't want to misjudge your safety in Banana or timings once you fall back to a different position or B. The anchor can check Banana manually (with the support player, if you like) or you could use incendiary grenades if you still have any left. If you have a good spawn you could also preaim the entrance into the Tree position, making sure that no T can enter Tree.
After this step, you should evaluate your situation to make sure that the support/rotate is where he is needed, either in Banana or at A.
Step three: Take (defensive) position, wait and react
Depending on your playstyle, dominance on the map and similar factors, you can play around with aggressive or defensive positioning. Just keep in mind that defensive positions will almost always leave you room to spot enemies early, fall back and delay until help arrives. Aggressive positions, however, will almost always grant you at least one kill, which is OK if you have a man advantage already.
Depending on the situation on all of the other parts of the map you may need to push Banana, abandon it, fall back or simply stay there, so be sure to not to lose track of the happenings all over the map.
Examples of aggressive positions include Tree and the nook. Examples of defensive positions include on Wallbang (either self or normal boost), jumpspotting behind Wallbang, beside Wallbang and at Car.
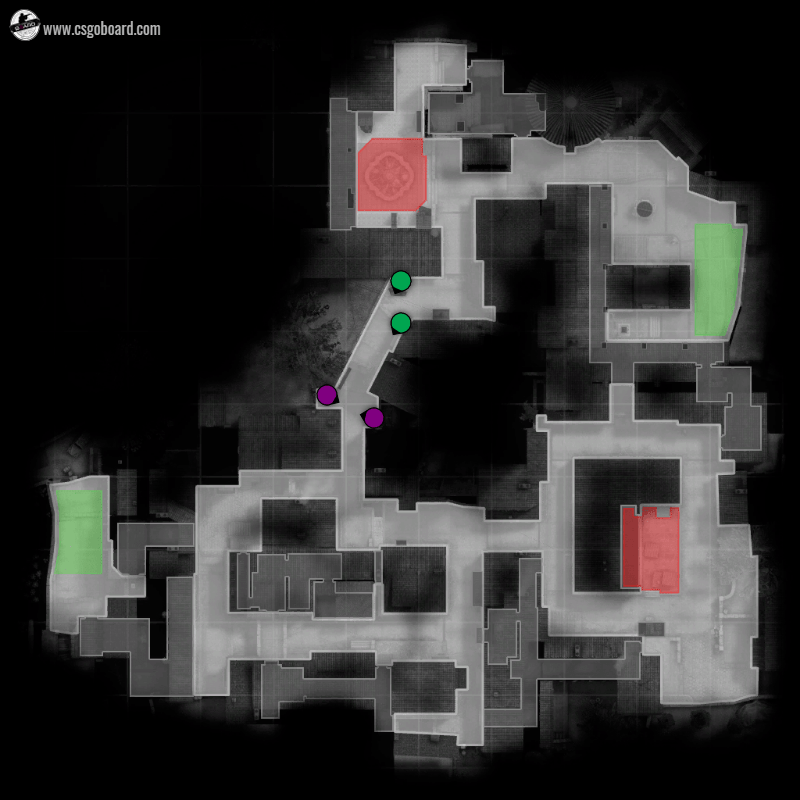 Purple = Aggressive, Green = Defensive
Visual example from a Team Dignitas official match
Visual example of a safe smoke:
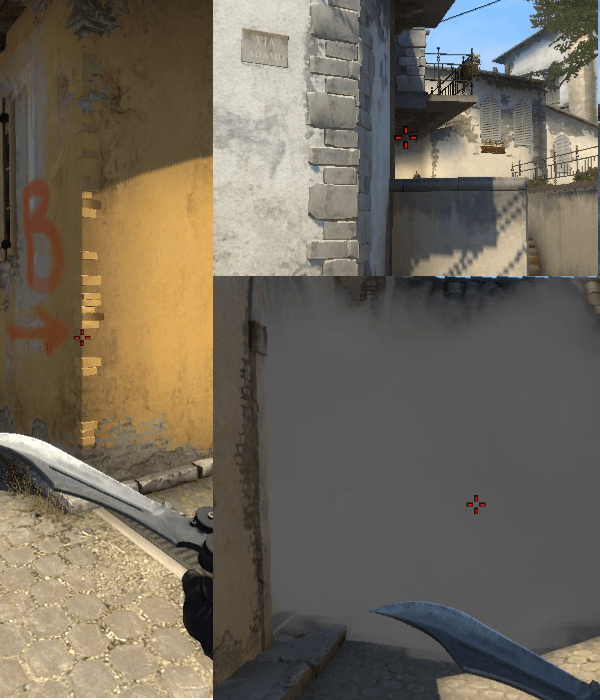
Just stand at the corner of the yellow building behind Car and aim centered below the far end of the floor of the balcony over Banana and now either run or walk and throw. This Smoke will block off the full entrance to Banana.