Blogs
Miramar Looting Routes - What Should You Keep in Mind?

Since Miramar was released on the live servers on the 20th of December, the map has gone through its changes environmentally to balance the game since it's still in a weak spot from a competitive standpoint. Miramar is still all about safety while looting due to the natural layout of a desert map, requiring you to use cover as efficiently as possible and making the cover that you can play with a lot more important than on Erangel. We'll be going over all the upsides and downsides of each looting route and what makes that looting route ideal. With that being said, let's get into the first part of this guide, which asks "What makes a looting route on Miramar good?"

Key features of a good looting route
Let's go through these quick, since they don't need extensive explanation
Some of the key features are:
• Safety
• Longevity
• Number of loot spawns (Loot is always random, so don't assume you'll always have the same quality and/or amount of loot)
• Is the route viable with the location of the play zone?
• Consider how hard rotations will be when traveling from the end of your looting route
• Possibility of vehicles spawning
Water Treatment
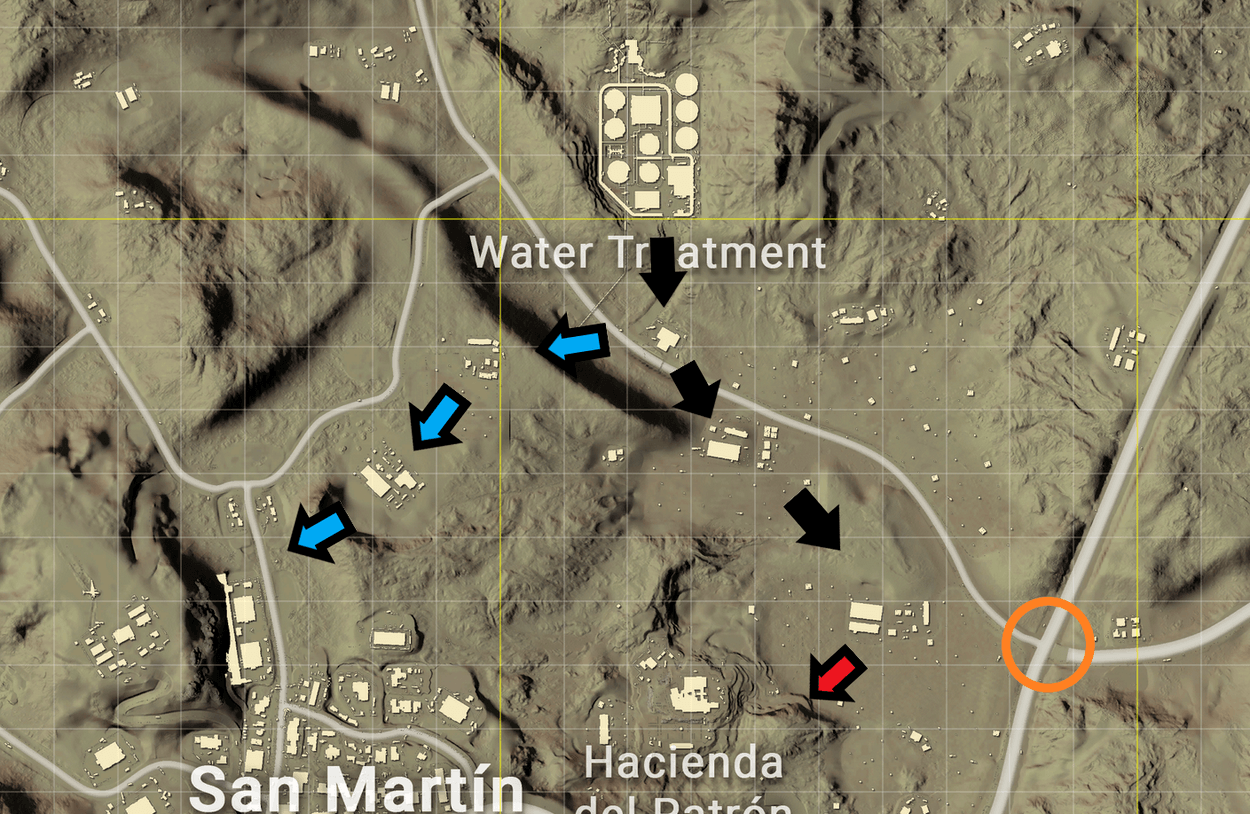
Water Treatment is quite the popular looting spot to start at, but still, even in squads you'll see three squads drop here at most, including your own. This is because Water Treatment itself has enough loot for around three to four players max. The problem with Water Treatment is that every side except for the south side is covered with hills/mountains making it hard to leave in that direction for extra loot or with a vehicle.
The southern side is a lot more open but makes up for it by having a lot of paths that you could follow. Always start by walking towards the gas station and decide where to go from there. The southeastern path offers a route with two farms towards Hacienda del Patron and an intersection located just east of the second farm with a high chance of a vehicle spawning there. You could also go straight into Hacienda del Patron but they'll most likely have high-level gear.
The other path goes in the southwestern direction and has some great grey construction buildings on the road that hold a large amount of loot. This path is a lot safer due to the number of hills and the option to enter San Martin and hold a compound there.
Mines South of Los Leones
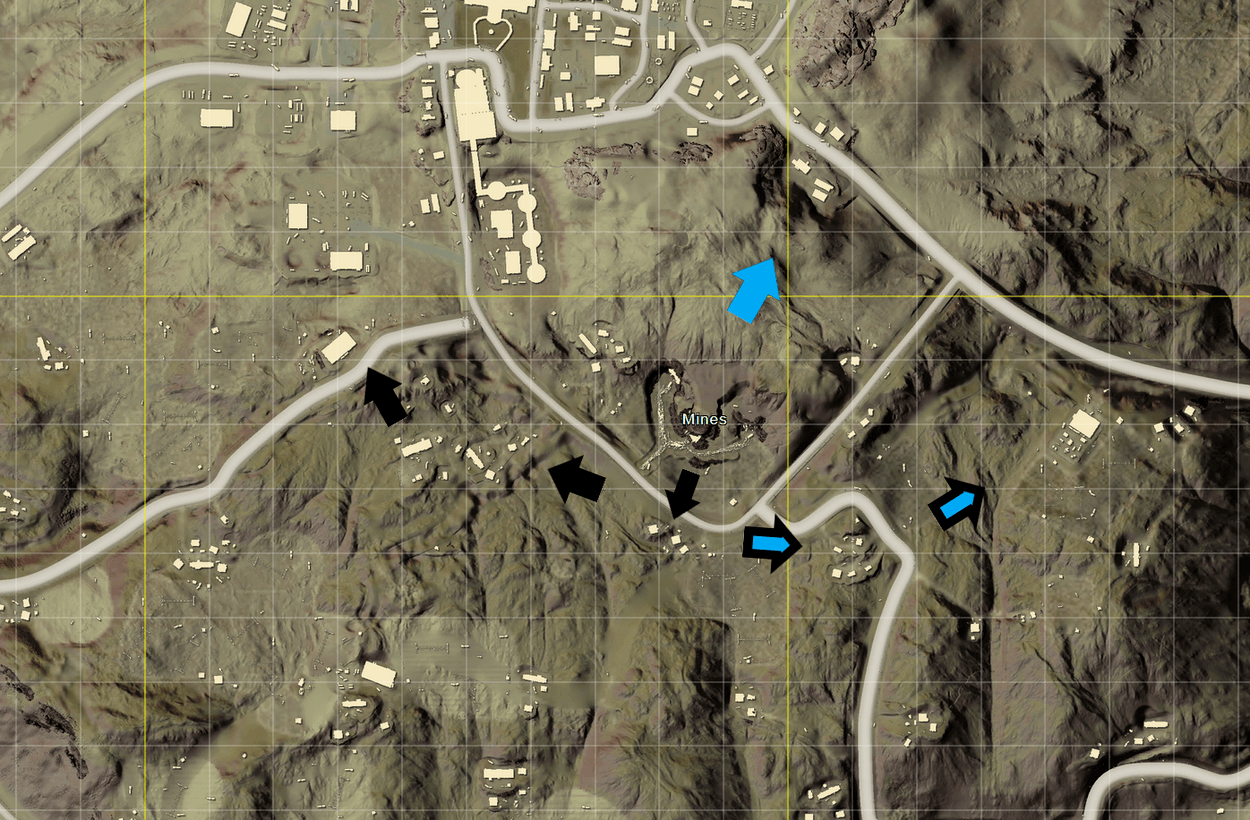
Mines is a relatively unknown looting spot that yields enough loot for at least two players and the looting routes are really straightforward.
The first looting route to cover is the route indicated with black arrows. This route has long roads next to it with a lot of vehicle spawns and leads up to the farm and factory buildings southwest of Los Leones. These buildings hold a lot of loot but should be looted with a vehicle due to the buildings being quite far away from each other.
The blue/black arrowed path is a path that goes in the eastern direction towards the coastal city of Puerto Paraiso. This route is extremely safe, as almost no players drop here and there's often a lot of loot left in Puerto Paraiso.
The northeastern path indicated with the blue arrow is a route you should take if no other route mentioned above is available. After going to the four construction buildings, you should enter Los Leones from the South-Eastern side. Avoid the tall construction sites that are located in Los Leones. These are just death traps.
Crater Fields
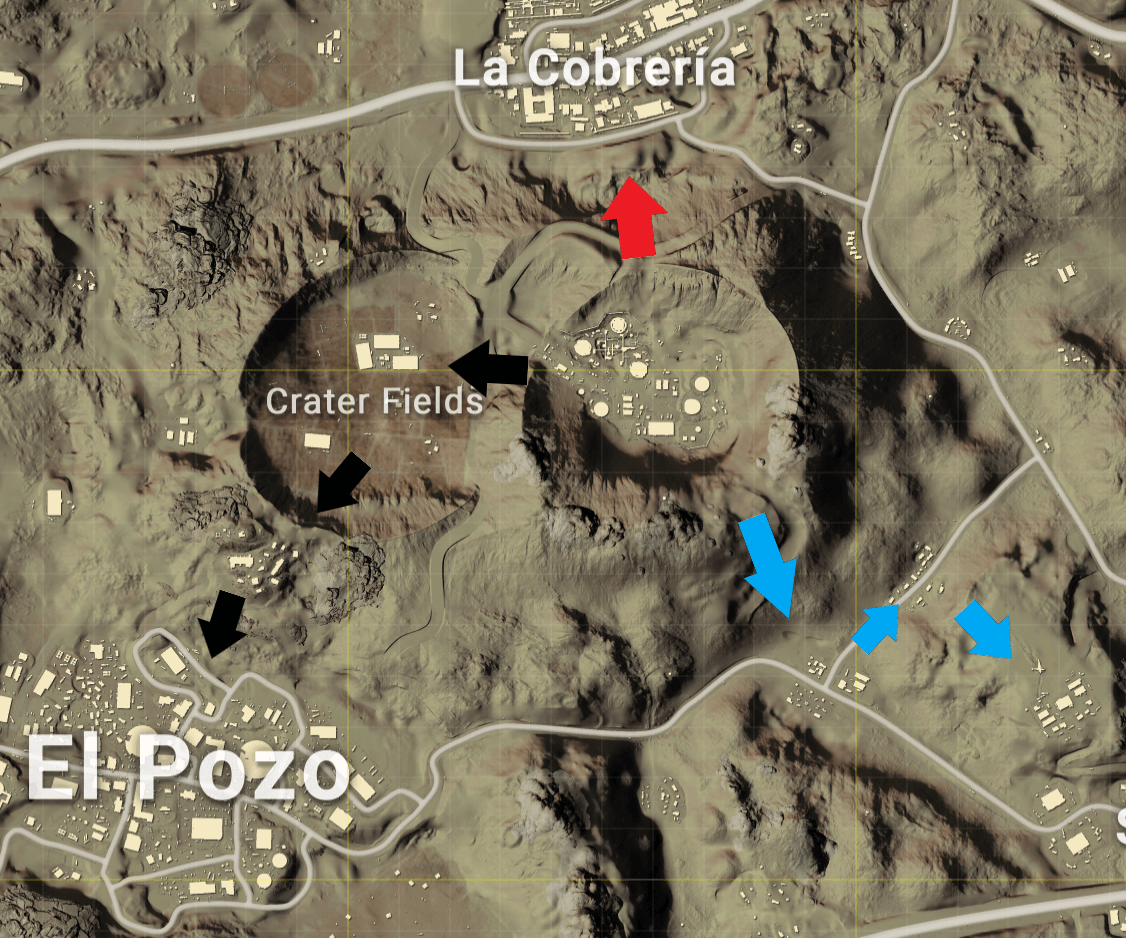
Crater Fields is a less safe spot to land than the other entries in this guide, but it has so many routes that you can take that literally every game at least one of these three routes won't be taken and will be a good choice.
The natural choice would be to move from the right to the left Crater Field or vice versa, but the black and blue arrow path are actually really safe choices with quite a lot of loot. The black arrowed path leads you in the direction of El Pozo, which is a city that isn't very populated in most games. El Pozo is filled with loot so most squads that directly go to El Pozo will usually leave some loot behind.
When you go southeast and take the mountain road down to the general direction of San Martin, you'll be surprised how much loot there is in the construction buildings and compounds next to the road. Nobody drops here at all and it yields enough loot for at least three players.
Dropping at Crater Field can be nice, but if it's too crowded the best route to take is to go straight north towards La Cobreria. This town is really good but it is populated almost every single game where the plane passes anywhere close to it. This can also be vice versa but isn't really a route, it's more like a plan B in case the original plan goes south. You can also loot Crater Field first and then immediately cross over to La Cobreria and kill the remaining players after they've looted and killed other players that landed there.
Los Leones
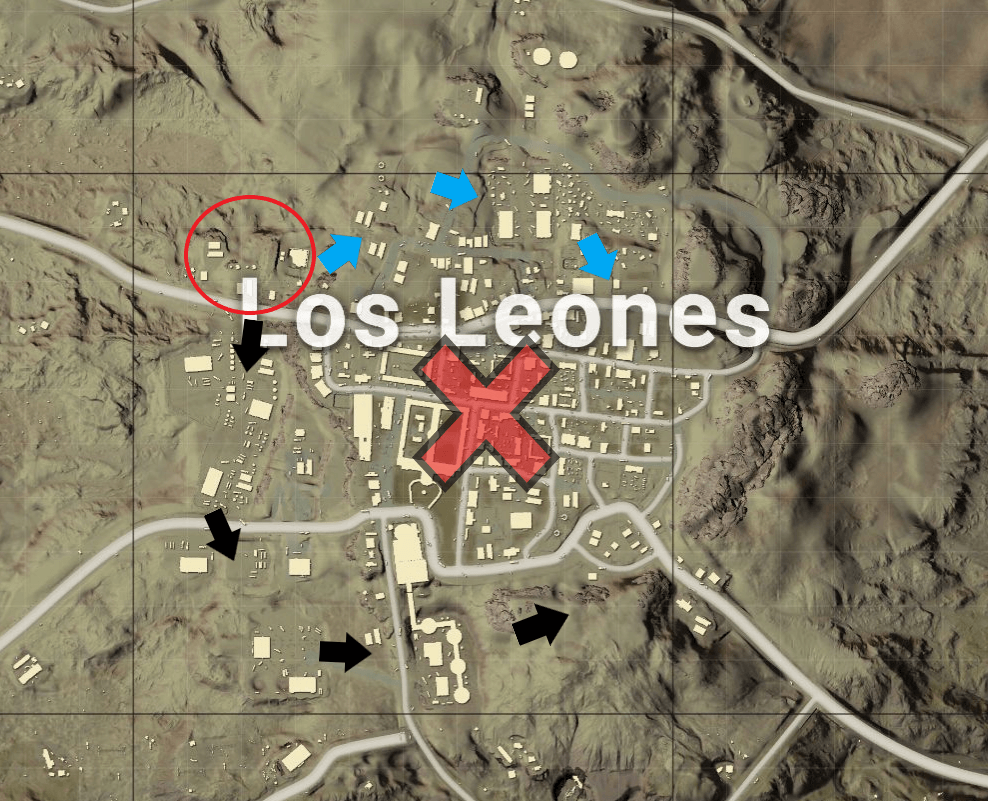
There are also looting routes located within cities. While most players just randomly go from building to building, there are certain strategies to apply to large city looting. Los Leones is the largest city on either map, but it's still relatively easy to loot.
You should start by landing somewhere west. My recommendation is to start looting in the northwestern part of Los Leones since there's good loot to be found immediately after landing. It offers the two best looting routes that'll keep you busy for four minutes or more and it's a lot safer than the middle of Los Leones.
Most squads like to play the centre of the city to solidify their position within the city for possibly very advantageous kills due to having the high ground and small windows where you can peek from rendering you almost invisible while shooting other players. If you're looking for a looting route that's safe, you should absolutely avoid the center of the city since it's hard to escape once you're in there.
The main route I take is the route with the black arrows. This route benefits a lot from having a vehicle but has so much loot that it's hard to pass up. While everybody's busy killing each other you can just loot up, find a vehicle, and go from there and not involve yourself in any unnecessary fights.
The alternative route is marked with blue arrows. This route has a lot of warehouses and construction buildings to loot and is completely open when you want to walk in the north or northwestern direction which doesn't make moving to the next play zone hard at all.
Conclusion
These aren't all of the looting routes at all, and maybe not even the best ones either. These are both unknown and safe at the same time and it's most important to adapt yourself to make your own looting routes at every possible location you can land at. I hope these routes have given you insight and will possibly help you in your future games!
Like our content? Support us by getting our merchandise in our shop