






Blogs
Dota Hero guide: Lyralei, the Windrunner

Windrunner is one of the most versatile and well-rounded heroes in the game. Although she is considered a Support hero, she is good at so many other things as well such as pushing, initiating, and ganking. She is good in every stage of the game and she can be a game changer with her Shackleshot ability. Here I will guide you on how to play Windrunner effectively, including mastering her elusive Shackleshot.
First, let’s look at her abilities.
 Shackleshot:
Shackles the target to an enemy unit or tree in a line directly behind it. If no unit or tree is present, the stun duration is reduced to 0.75.
Stun Duration: 1.5/2.25/3/3.75 seconds (0.75 seconds if it does not latch to another unit or tree)
Cast Range: 600
Latching Range: 500
Mana Cost: 90/100/110/120
Cooldown: 12 seconds
Windrunner’s most powerful spell, albeit the most difficult to use. Shackle shot is considered to be one of the most powerful spells in the game, as stunning two heroes for almost four seconds can turn an even team fight into a completely one sided one. It is also a great ganking tool, as its long stun duration will almost guarantee a successful kill.
.png) Powershot:
Powershot:
Windrunner charges her bow for up to 1 second for a single powerful shot. The arrow deals damage to enemy units and destroys trees in its path. Damage is greatest on first target, and reduces by 10%% for each target it pierces thereafter. If the channeling is cancelled early, the shot will still occur but deal less damage.
Damage: 120/200/280/360 (Magic Damage)
Range: 1825
Mana Cost: 90/100/110/120
Cooldown: 9 seconds
Notes: This spell also destroys trees.
Can be cancelled early, which will result in less damage. Will still destroy trees when cancelled early.
Powershot acts as a very powerful long range nuke. At level 4 it can almost destroy an entire creep wave on its own, making it a very powerful pushing and anti-pushing tool. With its relatively low cooldown and mana cost, it can also be a very powerful harassment and team fight tool, as you will be able to spam it with a few mana regeneration items.
 Windrun:
Increases movement speed and adds evasion from all physical attacks, while slowing movement of nearby enemies.
Duration: 2.75/3.5/4.25/5 seconds
Bonus Movement Speed: 50%
Enemy Slow: 8%/16%/24%/30%
Mana Cost: 100
Cooldown: 15 seconds
Note: Attacks initiated before you activate Windrun will ignore the evasion and still hurt you. You will only evade attacks that were initiated during your Windrun. All spells ignore evasion and thus will still hurt you during Windrun.
Windrun gives Windrunner an incredible amount of survivability, as her bonus movement speed allows her to run away from her enemies while also evading all of their attacks. It is also a great chasing mechanic, as the bonus speed will allow you to catch up to your enemy while slowing them down in the process.
 Focus Fire:
Windrunner channels the wind, gaining maximum attack speed on the enemy unit or structure, although with reduced damage, including damage from unique attack modifiers and item effects. Once Windrunner switches targets, the speed is lost. Lasts 20 seconds.
Duration: 20 seconds
Damage Reduction: 50%/40%/30%
Mana Cost: 200/300/400
Cooldown: 60 seconds
Scepter Upgrade: Reduces Cooldown to 15 seconds and will remove the damage penalty from unique attack modifiers and item effects.
Note: Can target buildings and magic immune units.
Focus Fire is great for, well, focusing down one unit! Using it on a tower will help you kill it a lot faster, while using it on a stunned opponent will drop them in seconds. This spell does have a high mana cost, however, so use it wisely. Although the cooldown is short, it is best to not use it every time it is up. Simply wait for the opportune moment and then unleash your fury.
Let’s look at how to skill up a Windrunner.
|
Level 1 – Windrun |
Level 10 – Windrun .png) |
Level 2 – Powershot .png) |
Level 11 – Windrun |
Level 3 – Shackleshot .png) |
Level 12 – Windrun |
| Level 4 – Powershot |
Level 13 – Focus Fire .png) |
| Level 5 – Powershot |
Level 14 – Focus Fire |
| Level 6 – Shackleshot |
Level 15- Stats  |
| Level 7 – Powershot |
Level 16 – Focus Fire |
| Level 8 – Shackleshot |
Level 17-25 – Stats |
| Level 9 – Shackleshot |
The reasoning behind this skill order is very simple. At level one, take Windrun, as it will give you that survivability you need early game, which will allow you to stay in lane longer and last hit more. You then alternate between Powershot and Shackleshot, while giving the higher priority to Powershot.
You want Powershot to be leveled up as fast as possible, as it is a very good early-mid game nuke and can kill a lot of enemies very quickly. Shackleshot is very important as well, which is why you will max that out next. You do not need to further level up your Windrun until Powershot and Shackleshot are leveled because of the fact that it already gives you enough survivability at level 1, and because of the fact that your stun and nuke are way more important.
After Powershot and Shackleshot are finished, finish up Windrun. The reason for skipping your ultimate until level 13 is because of the fact that your other 3 spells are just so much better during the early and mid-game, and leveling them up first will dramatically increase your effectiveness. Your ultimate, while good, costs a lot of mana and requires that you have decently high attack damage for it to have any effect. This is why you save it for later, as you will have the mana to support all of your abilities and the damage to make up for the damage reduction debuff of the spell.
Now let’s look at what items Windrunner should get.
Starting Items:
Animal Courier:  One Healing Salve:
One Clarity Potion:  One Set of Tangos:
One Mantle of Intelligence:  One Ironwood Branch:
If your team already has a courier, then get:
Observer Wards:  One Healing Salve:
One Clarity Potion: One Set of Tangos:
One Mantle of Intelligence:
If your team has both, then get:
One Healing Salve: One Clarity Potion:
One Set of Tangos: One Mantle of Intelligence:
One Ring of Protection: 
As a support, getting a courier/wards is pretty standard to help your team out in the beginning. Getting the healing salve, tangos, and clarities also helps you keep your health and mana high, and is quite necessary if you are going to be a long lane solo. The mantle and branches will provide you with some extra stats, and the ring of protection will give you even more armor to survive, while also making you one step closer to your ring of basilius.
Mid-Game Items:
Ring of Basilius: 
Phase Boots:  OR Arcane Boots:
Mekansm:  AND/OR Pipe of Insight:
Force Staff: 
Ring of Basilius should be the first item you get after the game starts, as it gives you and your team a nice +2 armor boost and a bit of mana regeneration. After that, you need to start working on your boots. Phase boots are generally the preferential type of boots to get, as they give you a good amount of damage as well as additional mobility through its active ability, which can allow you to get good shackles in. If your team is in desperate need of mana, however, then get Arcane Boots instead.
After the boots, you will then have to check with the other support hero to see what he is getting. If he is getting a Mekansm himself, then work your way up to a Force staff and then a Pipe of Insight. However, if he is not getting a Mekansm, then get it yourself along with your force staff. At that point, if no one is going to get a Pipe of Insight, then get that as well.
Force staff is a great item on Windrunner, as it gives a good amount of damage, attack speed, and intelligence, and it also gives you the ability to push anyone forward. The forward boost can allow you to catch up to other heroes and get great shackles off, or it can be used to help yourself or your teammates escape.
Mekansm and Pipe of Insight are necessary to have in any game, so you should be getting them as you are the support hero. Mekansm provides a great 250 AOE (Area of effect) heal as well as a +2 armor buff, while Pipe of Insight provides an AOE spell shield that will absorb 400 magic damage. These are great for team fights and will help your team survive for a lot longer, allowing your team to possibly win a lot of team fights. The passive magic resistance and the bonus HP regeneration you gain from these items will also improve your own survivability by a lot, allowing you to aid your team and shackle tons of people.
End Game Items:
Scythe of Vyse: 
Vladmir's Offering: 
Scythe of Vyse is an amazing item, as it gives you a lot of mana, mana regeneration, health, and the almighty sheep ability. The high amount of mana and mana regeneration it gives you will allow you to spam all of your abilities with no worries at all, while the sheep ability will give you yet another disable, essentially allowing you to disable three heroes at the same time. If you are able to pull that off, you will be such a badass and can quite possibly win the game with that single fight.
Vladmir’s Offering should be your very last item, as it is not really necessary to have, but will help you quite a lot. It will give all of your melee teammates lifesteal, provide a +5 armor aura, a +0.8 mana regeneration aura, and most importantly a +15% damage aura. Even if you don’t have any melee teammates, get this item! The +5 armor aura is really nice to have, and the +15% damage bonus is absolutely amazing. Vladmir’s Offering is very cheap for all the bonuses it provides, so get it and watch your team own.
(Please note that all skill/item builds are simply guidelines. There is no real skill/item build for any hero, as everything depends on the current game situation. Use these suggestions as a starting idea and then work them to your liking as your game progresses.)
Now that we’ve gone over all of the skill and item builds, let’s see how to play her.
Windrunner's basic combo:
The basic combo for Windrunner is to first use your Shackleshot to stun one or two heroes, and then use your Powershot to pierce through them. When you are about to attempt a Shackleshot, try to hook the carry if you can so that your team can focus them down, removing a huge source of damage from the team fight. If you start to get attacked, use your Windrun to get away. If you need to chase a hero down, however, use it to catch up to them and slow them down so you can bring them down. If you have your focus fire, you can use it to take down towers really fast or to help bring down heroes really fast.
Let’s look at what she needs to do during the three main stages of the game.
Laning (0-15 minutes):
Windrunner is generally seen in the long lane (Radiant: Top Lane, Dire: Bottom Lane) since she has high survivability with her escape mechanism Windrun, the ability to harass and last hit from afar with her Powershot, and the ability to help set up ganks with her Shackleshot. In theory, she is the most perfect side lane solo in the game. During the laning phase, do your best to last hit and deny. Use your Powershot from afar to gain multiple last hits at once while also hurting the enemy heroes. If they start to harass you, just pop off your Windrun and run back to tower, use your consumables, and then get back in there. As a solo laner, you will level much faster than all of the other heroes, so your Powershot will become that much more deadly. Do not be afraid to abuse your Powershot as well, as after getting a ring of basilius you will have plenty of mana to spam it.
Mid-Game (15-30 minutes):
If you’ve laned successfully, you should now have a Ring of Basilius, Arcane/Phase Boots, and have your Force Staff/Mekansm done. Your role now is to help support your other teammates, push lanes, and help set-up ganks with your Shackleshot. With a level 4 Shackleshot and a level 4 Powershot, you are a very scary force and can easily kill two heroes at a time with a bit of help.
You can also push towers really easily by spamming out your Powershot and healing your creep and allies with your Mekansm. Also remember to keep buying wards, as having map vision is great for your team and will give all of you a greater sense of security and control.
Late-game (30+ minutes):
You should now have your core supporting items and be working up to your Scythe of Vyse. You will really be a force to be reckoned with when you get this item, as you can essentially disable three people, making your team fights turn into a 5v2. Try to stay alive for as long as you can during these fights, as getting 2-3 two hero shackles will easily win you the fight. The goals you have for the late game is to stay with your team, support your team, buy wards, survive, and kill off anyone who gets in your way.
Extra Tips:
- Cancelling your Powershot early is a great way to quickly finish off an enemy with low health.
- Since Powershot destroys trees, you can use it to create a line that will serve as a shortcut for you and your team when you are trying to gank someone.
- Can also use the cancel Powershot trick to create an escape route when you are fleeing for your life.
Mastering the Shackleshot
Although Shackleshot is one of the most powerful spells in the game, it is hard to land due to the fact that it relies on good positioning. There is no real way to teach you how to effectively shackle other than having you practice, though. I will, however, give you a few tips on how to set up for a successful shackle while also showing you a cute little trick that you can do that will catch a lot of people off guard.
Shackleshot can latch onto someone or something up to 500 range away, and although it says the target has to be directly behind it, that is not really the case. In reality, there is a small area in which you can hit targets. This area is demonstrated in the picture below.

Approximate area in which a Shackleshot will latch.
Although this picture may not be 100% accurate, it gives you an idea of how far you can stretch your shackles. Hitting shackles is all about positioning, but thankfully you have a lot of tools in your arsenal that help manipulate that. Your Windrun ability is very good at setting up shackles, as your increased movement speed and AOE slow can help you create openings that were not previously there. Force staff is also great, as you can propel yourself or an enemy forward, creating a nice line for you to shackle them.
The little trick you can do to catch an enemy off guard is to shackle a creep. People generally associate Shackleshot with being hooked to a tree or another teammate, but rarely do people realize that their own creep can be used against them. Use this to your advantage and target the creep that is in front of them, catching them off guard and snagging yourself an easy kill.
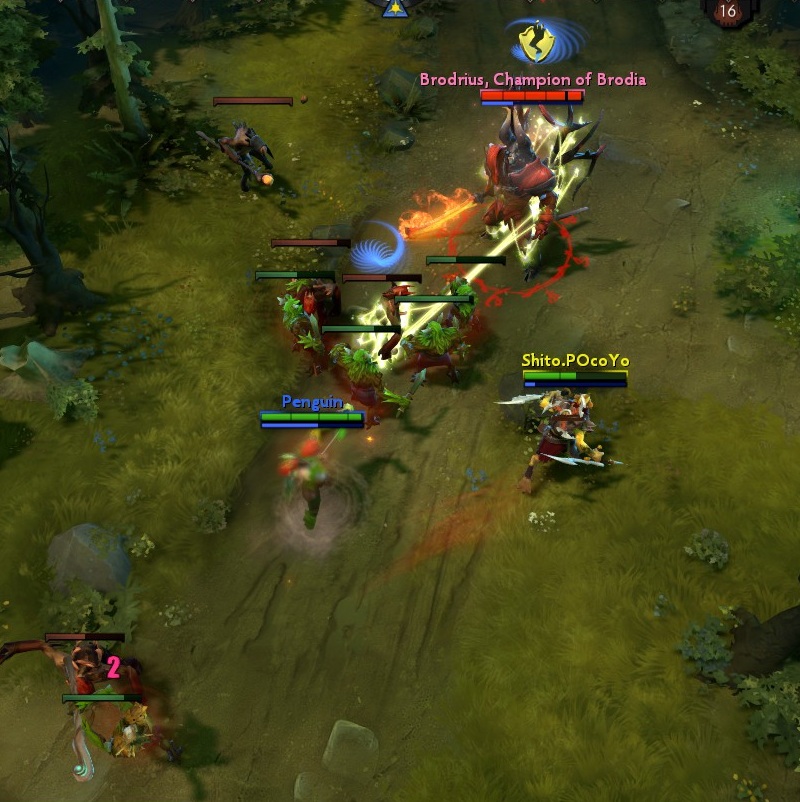
Shackling Doom to a creep caught him off guard, giving us enough time to kill him.
The biggest trick to effective shackling is reading your opponents movements. By reading their movements you can put yourself in a better position, creating an easy shackle opportunity. It will take a lot of time and effort until you will have this ability, but it will be well worth it once you do. Remember, practice makes perfect! Teaching yourself and learning how to play the hero through experience will do more than this guide ever will.
If you want to have a visual example of how to play Windrunner and how to land shackles, click here for a highlights video.
That’s it! I hope you learned a bit about Windrunner and I hope you go out and play her! She is an extremely fun hero to play, so go check her out and become a shackling master! Thank you so much for reading, and have a great day! :)