






Blogs
ZvZ - Stephano's Hatch First Response to viOLet's 10 Pool Analysis

KellRell
Fri 22nd Jun 2012 - 5:37pm
Zerg vs Zerg is a tricky match up to grasp and an even harder match up to analyze for most players given the drone vs. unit opportunity cost that is central to the Zerg philosophy, given the larvae mechanic. This concept is magnified when both players in a 1v1 face this timeless question for Zerg.
Consequently, aggressive one base openings have become standard in many situations in the ZvZ matchup, a type of opening virtually unseen in the ZvT and ZvP matchups, making ZvZ a more "volatile" matchup according to some, especially for lower level players
A second reason ZvZ has been traditionally viewed as a boring or uninspired matchup is the mass Roach strategy that dominates the midgame in most matches. This issue has been attenuated with the increased use of the infestor, new Roach/hydra compositions, and mutalisks, but Roach-centric midgame is standard for most Zerg players and can become a bit droll.
Fortunately, the foreign Zerg hope, Millenium's Stephano not only showcases a brilliant defense of those tough-to-hold 1 base plays, but follows up his macro-oriented 15 hatch opening with a refreshing upgraded Zergling midgame designed to deny viOLet's vital 3rd base, often the point of contention in any ZvZ that reaches the 10 minute mark. This game comes from Pool A play from Red Bull's Austin Battleground 2012, where Stephano went 3-0 in pool play.
The Opening
15 Hatch
16 Pool
16 Gas
16 Overlord
This is a very simple opening used by Stephano that aims for an economic advantage. However, Stephano opted to cancel his gas as it was being constructed once he scouted the early Zergling pressure. The bulk of this article will be analyzing Stephano's transition after taking moderate damage from this early 10 pool attack.
The Early Zergling Engagement

The key to holding off any early pool is to delay until you can get your Zerglings out or until you can force a favorable engagement by using the mineral walk trick with your drones to surround the enemy combatants, as Stephano does above. Additionally, and critically, Stephano cancels his gas geyser for an extra drone and additional resources for when the attack hits to bolster his defense as well as secure a platform with which to transition.
There are additional things to take note of. Since Stephano has 2 hatcheries up so early in the game, he can devote all of his resources to drones because he has additional larvae. Since he doesn't need to invest in a queen, he has more resources to reinforce his drone count. A decision that is vital to his success later in this game. He does eventually get queens, but only two, and only after he's successfully restored some of his drone count.
Dealing With Follow-up Aggression
ViOLet follows up his 10 pool opening with an equally aggressive 1 base baneling push. Stephano scouts that viOLet has yet to expand and responds by positioning his queens on the ramp, adding 3 additional spine crawlers (he placed one spine crawler at the naturally as a precaution, initially), placed in key locations, and building a few Zerglings for defense. Note: ViOLet is just now getting his hatchery up if you look at the production tab.

The Transition to the Zergling-centric Midgame & Preparing the Push to Deny the Third
After successfully holding the 1 base baneling push, Stephano adds his first gas geyser at around 7:00, or, more importantly, due to the early attack, 27 supply. He follows with a second gas 25 seconds later at 30 supply, continuing to use his queens to block the ramp and only inject when safe or necessary. Zergling speed is upgraded with his first 100 gas at 36 supply at 8:30, which coincides with the addition of 2 evolution chambers for double upgrades, this is the beginning of Stephano's Zergling-heavy midgame style.
Crucially, Stephano begins +1 Ground Carapace first, such that Zerglings can now survive a baneling detonation with 1 hp, at around 9:15, upon completion of the evo chamber, at about 50 supply. We also observe Stephano flooding lings to coincide with the completion of Zergling Speed to deny viOLet's 3rd base and to scout.
The 10 minute mark, about 51 supply, is where a lot goes on for Stephano. Firstly, he places his 3rd hatchery at the 3rd base, researches +1 Melee, starts his lair, and then adds the 3rd and 4th gases a few seconds later at his natural, all the while droning while his ling timing attack occupies viOLet on the frontline.

After this critical scout timing, Stephano can narrow this 2 base play down to some heavy tech option, either infestors or mutalisks, since he doesn't scout any Roach tech. Consequently, he brings his lings back to destroy the destructible rocks connecting his natural to his 3rd. He even uses an idle spine crawler to assist, a quick trick to utilize everything at his disposal. We also see Stephano's supply burgeon as his map control allows him to power drones. He begins flooding Zerglings again at 10:40/61 supply and places a macro hatch at 11:00/67 supply, followed by an infestor pit and a queen at his third upon its completion.
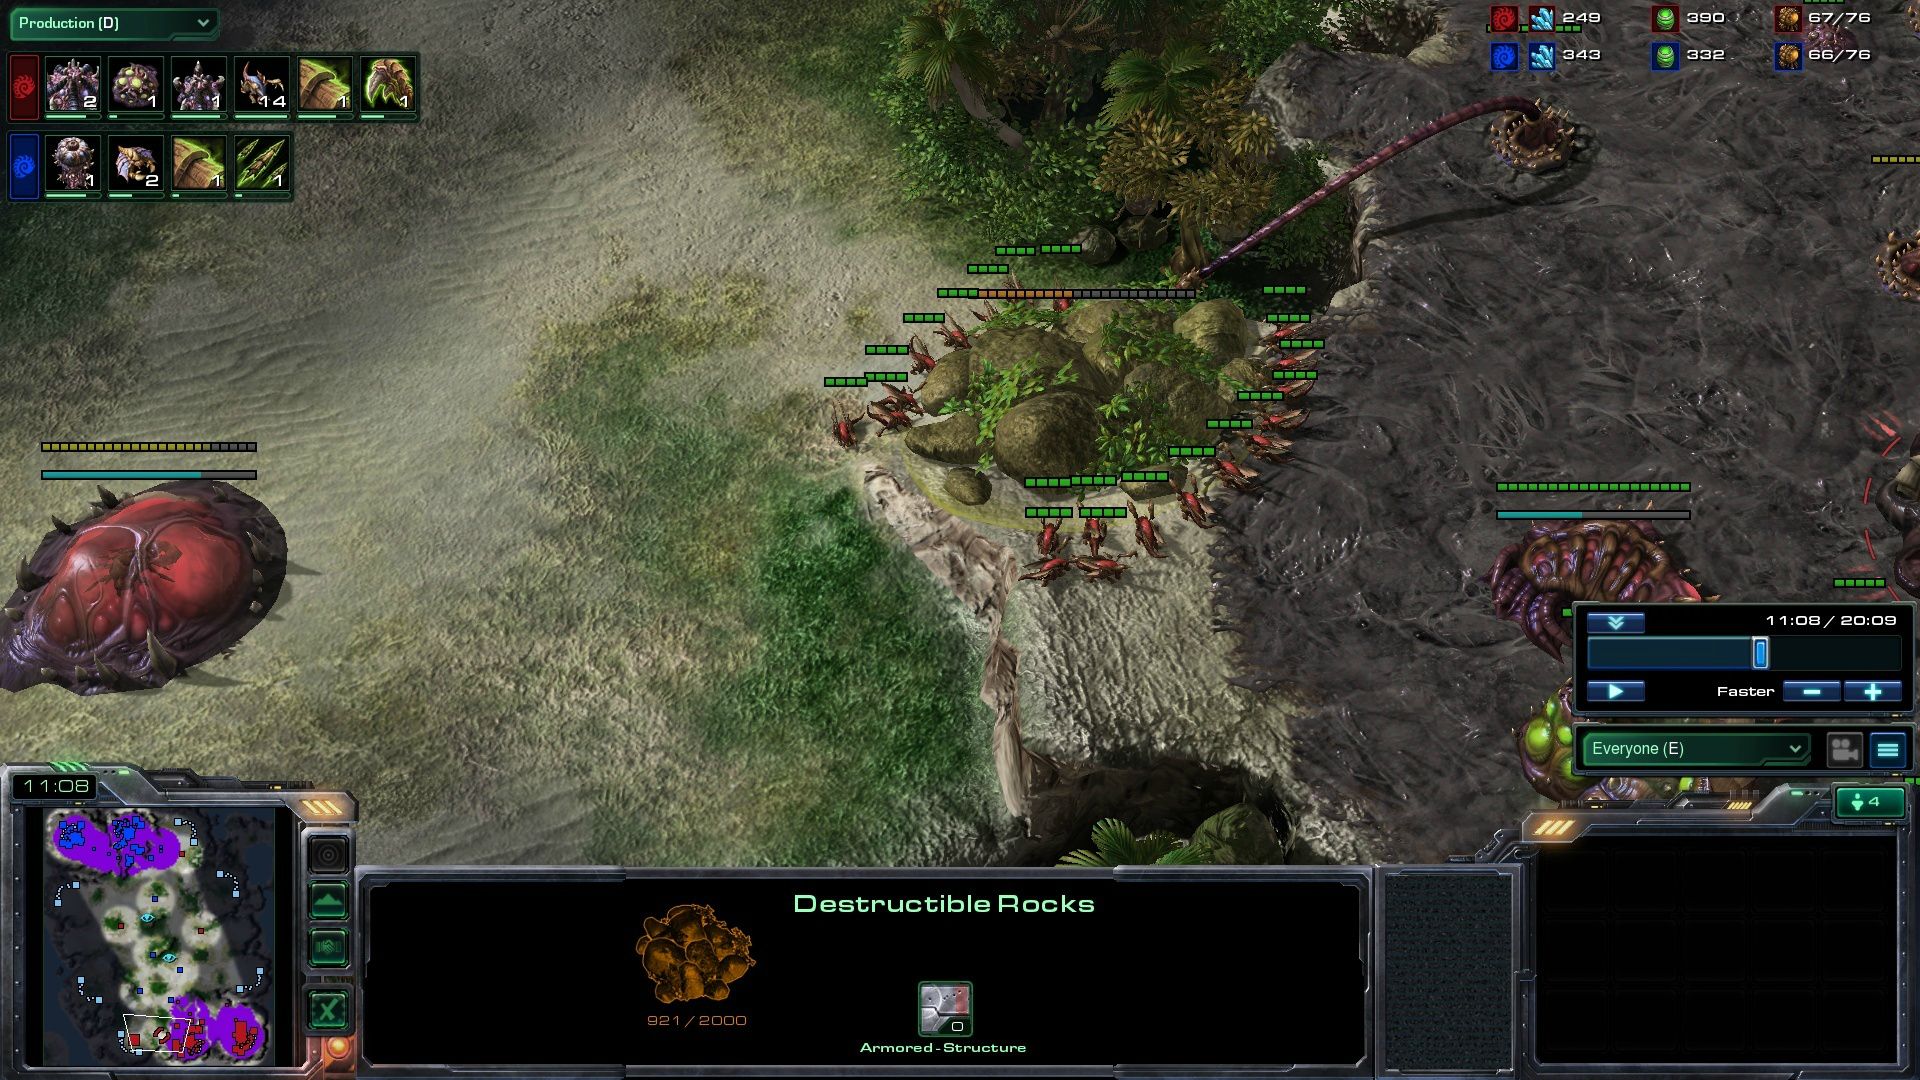
Denying the Third
The flood of lings is to stall the mutalisks and the completion of viOLet's third base, lining up with the completion of +1 Carapace to deal with any defensive banelings, and he immediately begins +2 Carapace at 12:00/78 supply. The engagement takes place at the third and the intial ling wave is thwarted, but Stephano's reinforcements clean up the defensive ling/baneling/muta composition, viOLet's 3rd base, and a few drones; the objective on this style is to deny the third, which Stephano successfully executes. Now, his goal is to transition to infestor/Roach/ling to end out the game. Note: notice in the screenshot that the +1 Carapace allows the Zergling to survive a baneling hit with 1 hp, vastly improving the efficiency of Zergling raids.

Setting up the Final Push & Saturation
Now that the third base has been decimated, viOLet's mutas go for the counterattack, which Stephano has prepared for by placing a spore crawler in every mineral line of every base, and positioning his infestors to receive the mutas when they become available. The additional queen at the macro hatch will also prove useful for defense. Stephano begins pathogen glands at 12:50/74 supply and begins +2 Melee immediately at 13:00.
Stephano's economy and saturation are key to the success of his strategy and the source of his diverse ling/Roach/infestor composition. He saturates 4 gas geysers and 3 mineral lines, optimally, that is, 16 drones for each mineral line. This discrepancy in saturation frees up extra minerals for Zerglings, diversifying his unit composition for the final push, which is an excellent way to follow up the +2/+2 Melee midgame.
At this point of optimum saturation for this strategy, Stephano dedicates all gas to infestors and all larvae to Zerglings in preparation for a counterattack until he throws down a Roach warren at 14:40, begins +1 Missile Attack immediately after +2 Carapace finishes, and banks resources to immediately create a large Roach flood as a backbone for his final push, augmenting his Roaches with Glial Reconstitution at 15:45.

The Final Push
He floods with overlords to max out his supply cap, begins to research Burrow, morphs an overseer, maxs out on Roaches, and attacks. Notice the income tab in the screenshot. Given Stephano's deliberate and special saturation pattern, he has a better economy than viOLet even though viOLet has more drones. Stephano utilizes his mineral income advantage with Zergling reinforcements. Stephano is set to attack for the rest of the game, assuming he blocks any raids or counterattacks by viOLet.
As with any Roach/infestor battle, positioning is crucial, as illustrated in this screenshot. Not only does the fungal growth damage the enemy Roaches, but it limits the attacking surface area of the enemy, favoring Stephano in the engagement position and solidifying his lead.
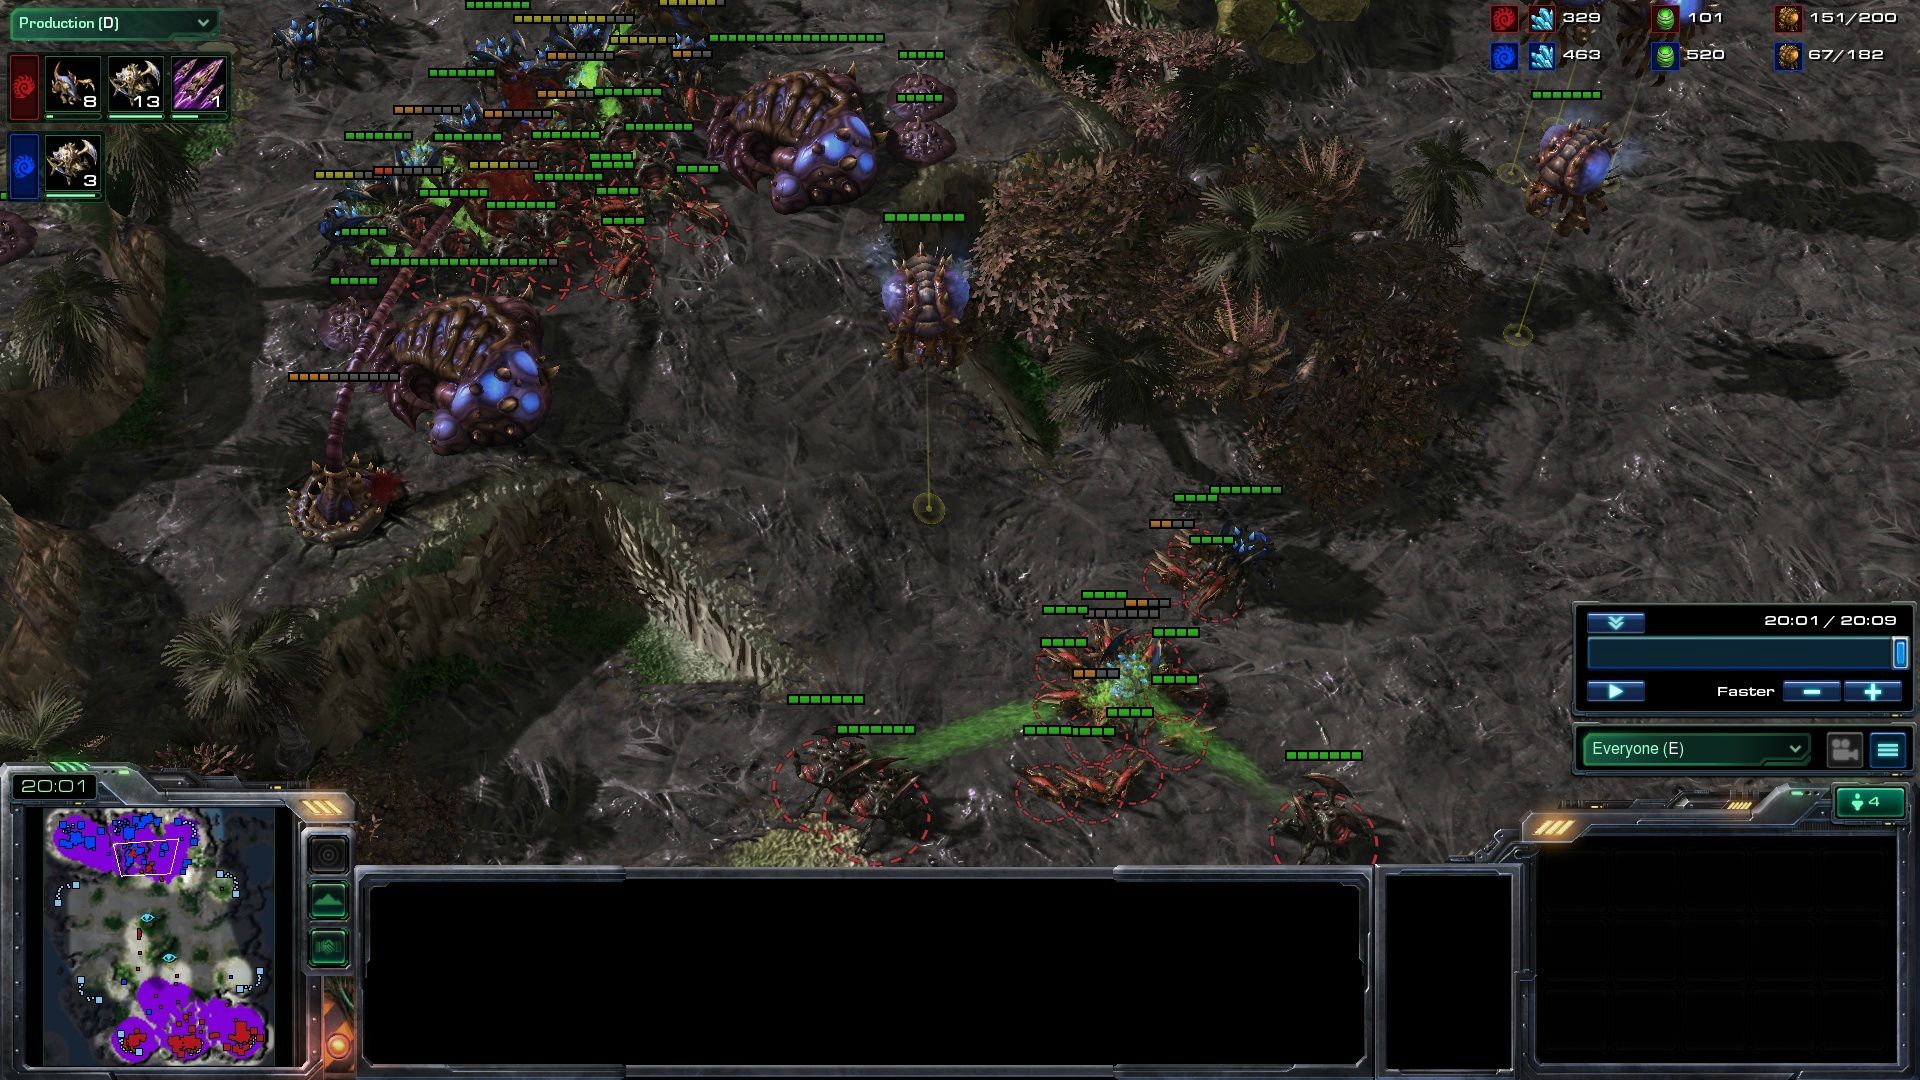
The only criticism of Stephano at this point is that he could have began +2 Missile Attack immediately upon the completion of +1, but that's it. He macros like a machine, keeping his money incredibly low and follows up with lots of Zerglings and Roaches. Notice how effective the Zerglings are in the screenshot, surrounding enemy Roaches and providing good DPS against the enemy Roaches, tanking the slow Roach attacks well for allied Roaches.
Let's hope this maturation of the metagame and macro-oriented opening catch on in ZvZ for more interesting, dynamic, and longer ZvZ matches for the enjoyment of all.
If you, the reader, have any questions, comments, concerns, criticisms, etc., look for a Reddit thread for this article on /r/starcraft. Thank you for reading and I hope this improves your game.