Blogs
Ultimate Smite Warding Guide for Season 3

With the SPL Fall Split right around the corner, it is time to learn when and where to ward at any point in a Conquest game. Take note that this guide is for the basic warding spots that are guaranteed to be in any mid to high level Conquest game.
Image legend
- Orange: Chaos side
- Blue: Order side
- Circles: regular wards
- Triangles: sentry wards
Level One
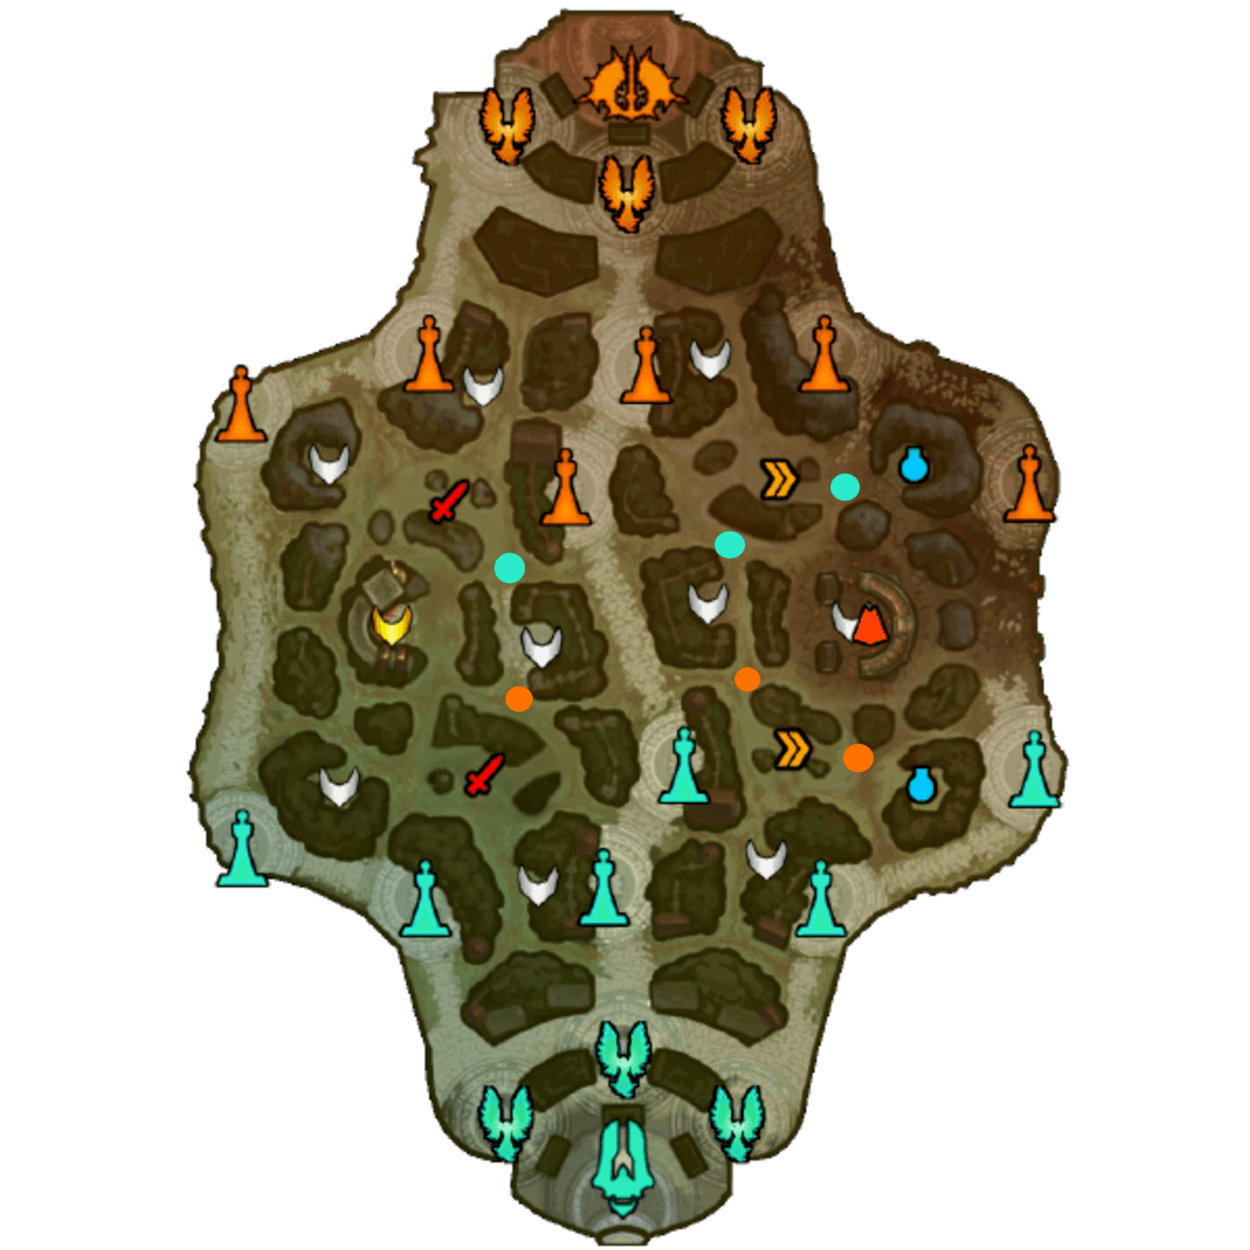
The level one wards are typically bought by the jungler and the support, they are only purchased if the team feels threatened by the enemy team’s invade during the first camp clears. The invade almost always happens on the solo side of the map so the jungler or solo laner can choose to place a ward in two different places. They can place one at the Mid camp if they feel the enemy will attempt to invade the Speed buff or they may choose to ward in between the enemy's Speed and Mana buffs if they feel the enemies will invade their Mana buff.
Early Game
The early game focuses on farming in the lanes and getting small advantages to snowball early leads, so the jungler will be looking for ganks around the map to get their team ahead. The middle lane wards are more than likely placed by the mid laner after their first back, these wards allow the team to see where a jungler is looking to gank once they leave the mid lane and prevents them from getting a quick kill in the process.
More than likely, the solo laner won’t need to buy any wards since junglers usually ignore solo lane due to its insignificance in the early game. However if the solo laner feels pressured they should purchase a regular ward and place it on their side of the lane to prevent the enemy jungler from getting behind them, allowing the enemy solo laner to begin snowballing.
In the duo lane, there are two options on where supports look to ward. They can ward near the Gold Fury pit or near the Boar camp. Both spots catch rotations, however the Gold Fury wards will not get spotted by early sentry wards at the Gold Fury or the Boar pit, whereas the wards at the boar pit can spot a character attempting to gank from the wall next to the lane if they decide to go around the Gold Fury pit.
Mid Game
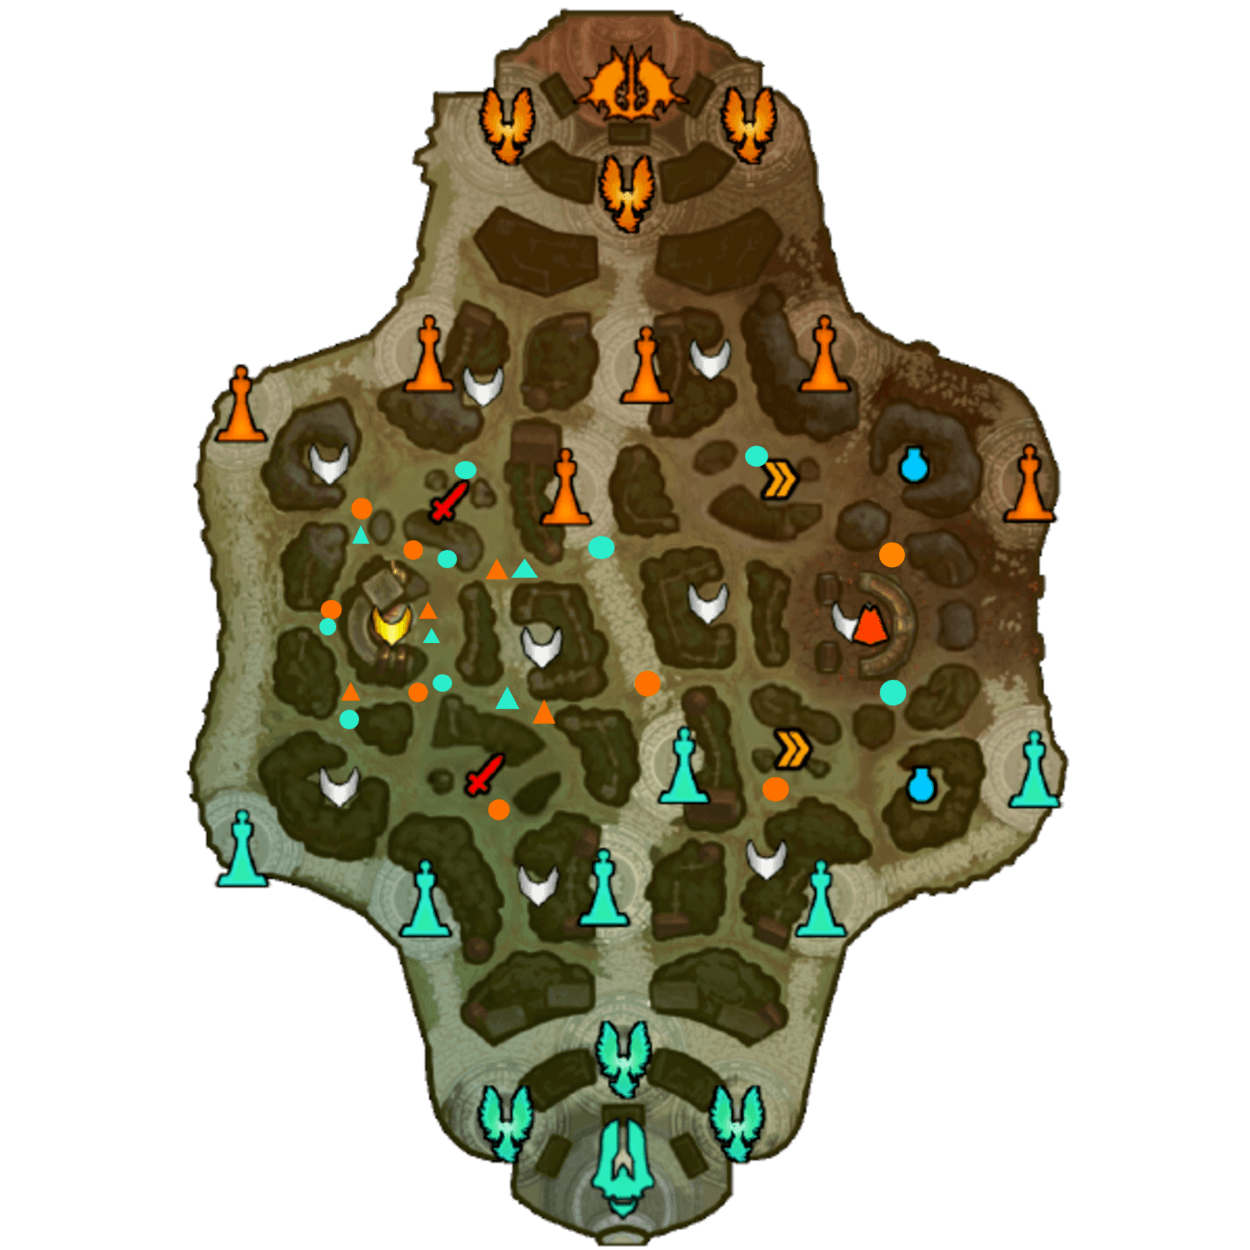
The mid game is centered around the Gold Fury. As such the warding habits of players revolve around the duo lane. The team that is ahead can usually afford the more expensive sentry wards and can place them around the map to deny vision and set up more ganks for the rest of their team. This means that the duo lane receives much more pressure from ganks so they must be more cautious than the solo laners.
However since there is so much focus on the duo lane, the solo laners or junglers can quickly invade buffs or gank the solo lane side without much contest, so it is still necessary to ward a few places on the solo side in order to capitalize on solo lane rotations and have a better fight at the Gold Fury.
By this point in the game, everyone on the team should be warding. Most of the early game wards can be placed by supports and junglers, but by the mid game there will be much more grouping up for objectives, so squishy targets like the hunters need to buy wards themselves since the rest of the team needs to roam the map together.
Late Game
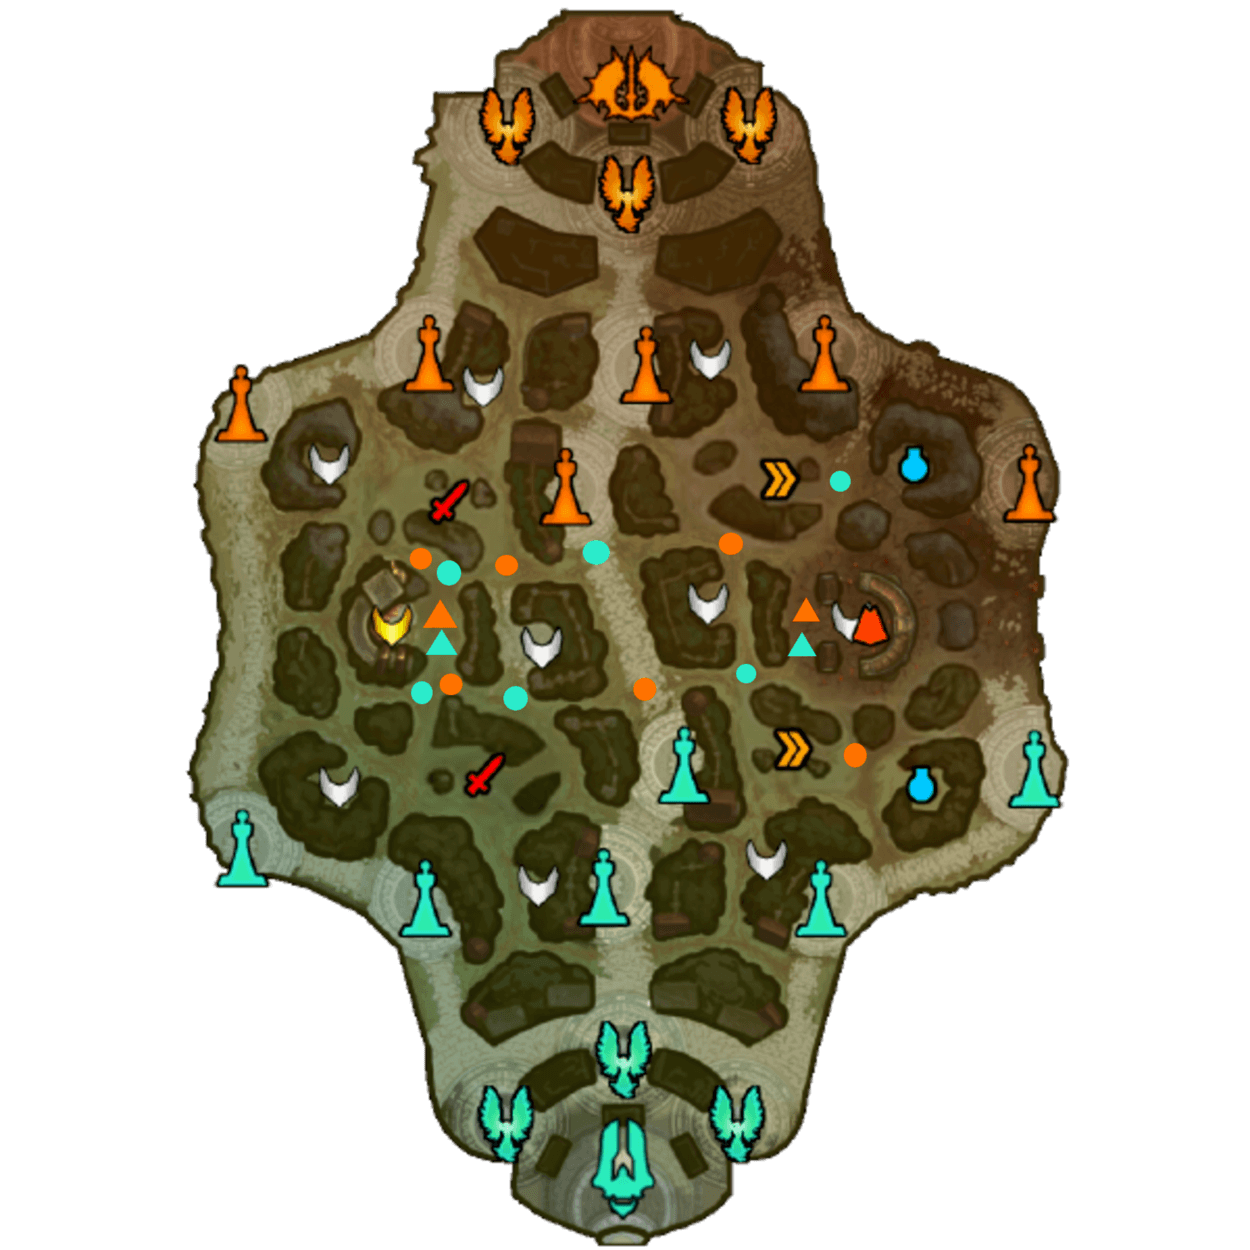
By the end of the mid game, most characters will have about four or five items done and will be attempting to do the Fire Giant or sieging towers, so there will be a larger focus on the solo side of the map than earlier stages in the game. Since most teams will be nearing level twenty and will have their core items completed, the Gold Fury begins to fall off, so the most coverage in the duo lane area will be centered around middle lane rather than duo.
Picks in the late game become crucial to a teamfight, so most teams will have three to four people grouped up with the carry continuing to farm for their late game power spikes. Since there are so many people grouped up, counter warding becomes much more dangerous since the respawn timers begin making a larger impact on the game. However, the wards around Fire Giant can be picked off easily by a group of people so it is more effective to place normal wards on non-key locations like the mid harpies as sentries will mostly be used on Fire Giant or the choke points near the pit.
End Game
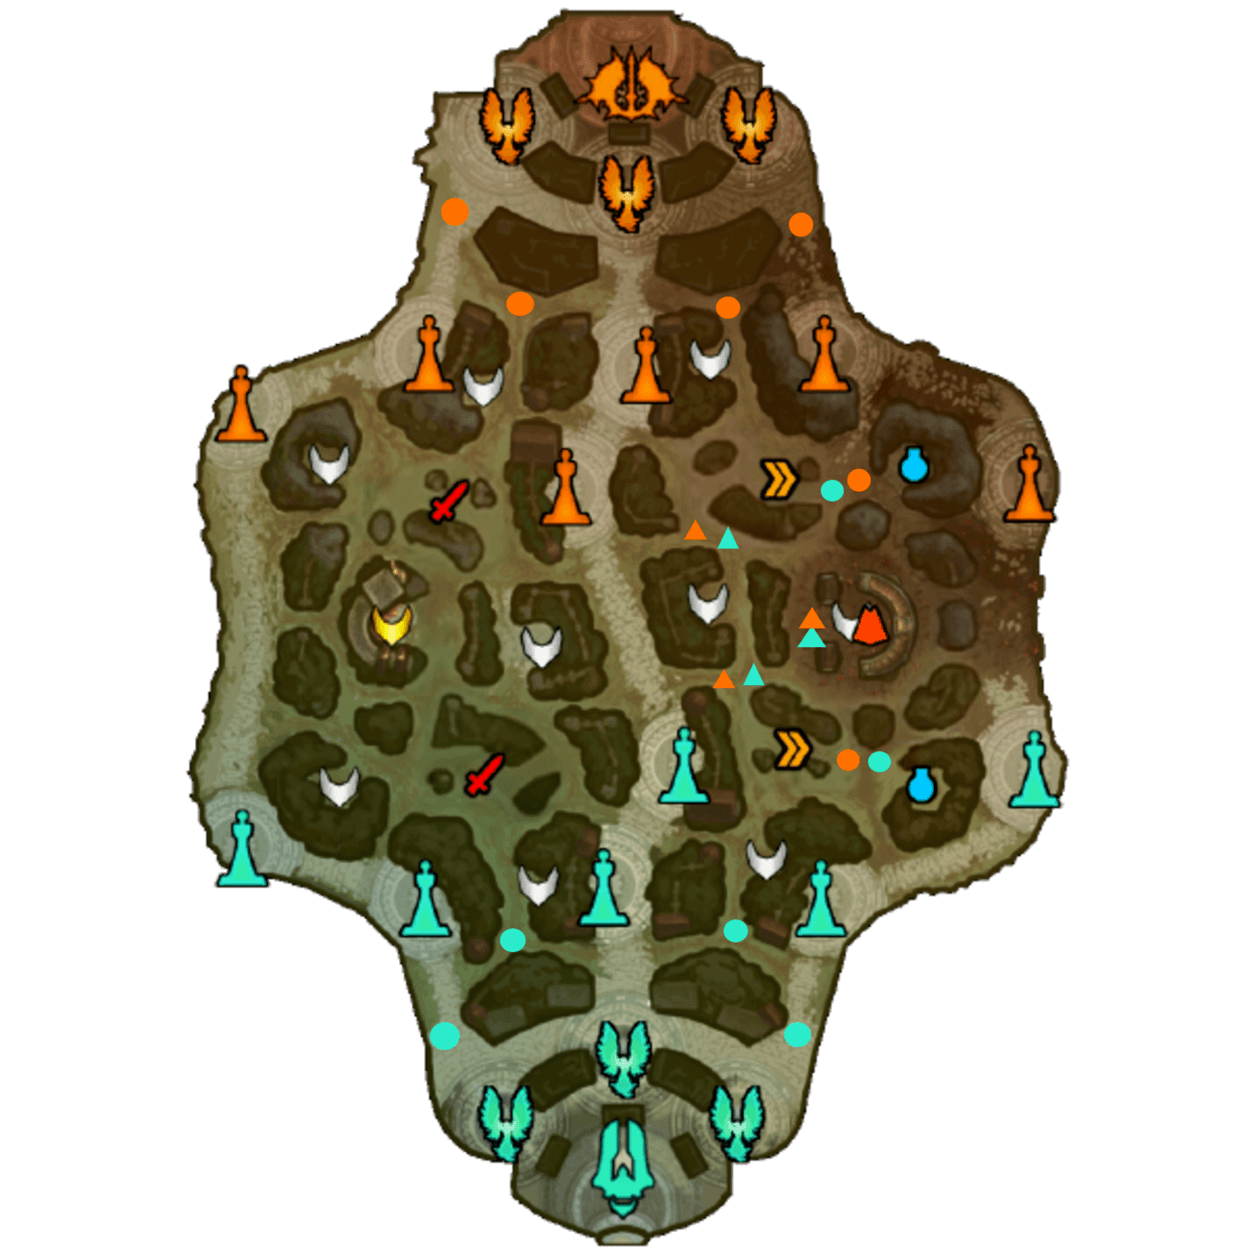
At this point most of the towers will be gone, the Gold Fury will be almost worthless and the only objectives which should be on player's mind will be the Fire Giant and the Titan. The wards around Fire Giant are the same, since positioning and picks will most likely end the game and you don’t want the enemy team to sneak a Fire Giant as it will almost certainly spell certain doom for the other team.
The wards at the bases, however, are meant to catch players off guard. Most team compositions should be able to take a phoenix at a moment's notice if left alone, so having wards near the base is more than likely the only way to set up ganks by the endgame. The wards also serve to end any split push or backdooring strategies the enemies could come up with. By this point, money shouldn't be an issue for anyone, leaving base without wards guarantees the enemy team has a vision advantage and can end the game.
Wards win games, Happy Hunting!
Get your own AKRacing Chair here and support our players, all profit goes towards the teams!