






Blogs
Divide and conquer: A guide to Jarvan IV Support
Evocati
Sun 12th Oct 2014 - 2:46pm

Jarvan, the Exemplar of Demacia
Jarvan IV is often played in either the jungle or top lane in a variety of styles, ranging from a burst assassin to a tank initiator. Jarvan's versatility and strong kit have allowed him to be a reliable pick throughout his existence in both casual and competitive play while also seeing pick/ban status as a jungler in Season 3 alongside Xin Zhao and Vi.
Drawing by zionenciel.
Jarvan has received various tweaks throughout his time, buffs and nerfs alike, as well many usability changes. The most recent of these made his ultimate, Cataclysm, finally function as tangible terrain, thereby allowing greater champion interaction, for example by acting as collision for Vayne's Condemn. The constant changes Jarvan has gone through have proved his timeless utility, and he is certainly a champion worth learning.
Why play Jarvan as a support?
From armour reduction to an attack speed buff, ranged poke to hard cc, Jarvan is bursting with utility. We all know of Jarvan's proficiency as a jungler and top laner, but what about as a support? Similar to Leona, Jarvan offers an aggressive all-in play style while in the bottom lane, focusing on lane control and smart initiation. His ability to boost his team's damage, lockdown multiple targets at a time and shutdown an opposing bot lane lead to an extremely satisfying experience that is not at all hard to achieve.
Runes and Masteries
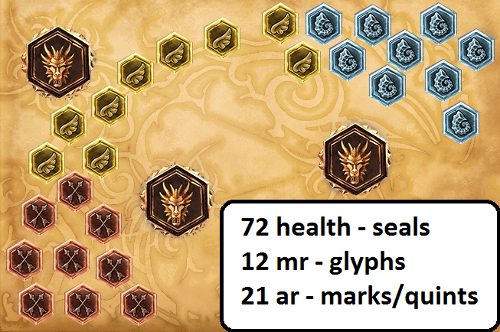
We take a defensive rune page in order to maximise our early game durability. This is important as it is essential that you gain control of the lane, so you are in a position to assert lane dominance. Having lane control alleviates some of the pressure on your marksman and allows them to farm more comfortably. As well as this, a fully defensive setup increases your all in potential and ability to survive ganks from the enemy jungler.
Another benefit of this setup is that on the off-chance things don’t happen to go well, you can withstand a great amount of poke and not be denied from as much experience and gold as you would with an offensive or hybrid rune page.
Flat health seals are taken as they provide the best defence in early levels from all types of damage (physical, magic and true) when compared to other seals. The early boost in health will allow you to take hits from the enemy bot lane without having to back off immediately and also allow you to take more minion damage than you would otherwise be able to.
Flat armour marks and quintessences are taken as they are effective in reducing damage from minions and the enemy marksman. Since damage from most supports you will meet is magic, magic resistance blues are key in reducing poke from champions such as Sona and burst from champions such as Annie. Even damage from Leona and Alistar in early levels is not be taken lightly and as such, magic resistance is a good choice.
A 0/16/14 mastery setup offers some durability while ensuring you can transition smoothly into later stages of the game. The choices in the defence tree are geared towards all in fights while also increasing lane survivability with tank stats and regeneration. The utility tree offers additional regeneration and an increased gold income, allowing you to persevere in lane and making sure you have your essential items by mid game.
Notable masteries include hardiness and Evasive which also increase your late game team fighting capability by further increasing your durability.
Summoner spells
Flash/Ignite or Flash/Exhaust
For summoner spells, you always want to take Flash. As a front line tank, flash allows you to initiate at a moment’s notice or escape from a losing battle where your E and Q would be on cooldown. When using flash to escape, it is best to flash over terrain such as a wall. This makes it so the enemies chasing you have to find another route or use their own flash or mobility spell to follow you directly. You can cover a large amount of distance by using flash and your E - Q combo in rapid succession. You can also close in on an enemy by using flash, E - Q and finally your ultimate.
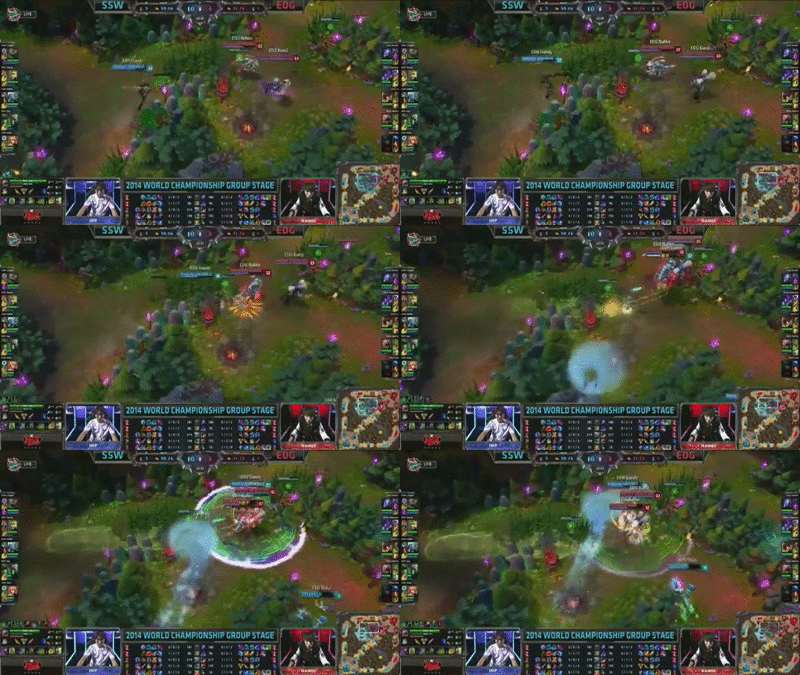
Another flash trick on Jarvan involves using flash just before the end of your E - Q animation. This can extend your knock up range if flash is used in the same direction as your Q, you can also flash to the sides and the knock up will follow the direction of your flash.
This technique is demonstrated by Samsung White's jungler Dandy during week one of the Season 4 world championship as shown below.
Exhaust vs ignite
Most of the time you would want to take ignite. This is useful in securing kills as in addition to dealing true damage, it also reduces healing effects by 50% which is useful against healing effects such as lifesteal. Use ignite just after engaging in order to limit the effectiveness of enemy health potions, lifesteal and any other heals they may have.
While exhaust slows and reduces enemy defense values, it is not as effective as the damage offered by ignite early game - which is the most critical period during the game for Jarvan support. However, when against assassins it is vital that you take exhaust as it severely limits their damage output and renders them near useless for the duration which in turn increases the likeliness of your marksman or any other carry on the team surviving.
Passive - Matrial Cadence

Jarvan IV's first basic attack on a target deals 10% of their current health as bonus physical damage (caps at 400 damage).
This effect cannot occur on the same target more than once every 10 / 8 / 6 seconds.
The recent change, making the damage at 10% of their health from the start, was a great buff for Jarvan in every position. This adds to your initial burst when engaging and can chunck for a lot of unexpected damage. When against a melee support, be sure to wack them everytime it's up - providing its safe to do so - to assert lane dominance. It is also worth to note that this makes last hitting with relic shield procs much easier.
Q - Dragon Strike

Extends Jarvan IV's lance dealing 70/115/160/205/250 (+110% bonus Attack Damage) physical damage and lowering the Armor of all enemies hit by 10/14/18/22/26% for 3 seconds.If the lance contacts Demacian Standard it will pull Jarvan IV to its location, knocking up enemies in his path.
The armour reduction alongside it's high base damage allows you to bring down enemy health bars quickly. Due to the range of the spell, you can use it on an entire minion wave to push the lane to either recall or apply pressure to the bottom side of the map. When used in conjuction with Jarvan's E, Demacian Standard, it knocks up champions, minions and jungle monsters along its path.
W - Golden Aegis

Temporarily gains a shield that absorbs up to 50/90/130/170/210 (+20/30/40/50/60 damage for each nearby enemy champion) damage for 5 seconds, and slows surrounding enemies by 15/20/25/30/35% for 2 seconds.
Early in the game, this ability should be used sparingly. The mana cost, although lowered to 40 at all ranks, doesn't justify the small shield and slow. In lane, it should only be used for its slow when escaping from - or chasing enemy champions. However, during teamfights, aim to slow as many targets as you can but be mindfull of your mana pool as your E and Q take priority.
E - Demacian Standard

Passive: Gains 10/13/16/19/22% Attack Speed and 10/13/16/19/22 Armor.
Active: Throws a Demacian Standard to a nearby area dealing 60/105/150/195/240 (+80% Ability Power) magic damage to enemies. The Standard lasts for 8 seconds and grants surrounding allied champions 10/13/16/19/22% Attack Speed.
The passive buffs from this ability make a world of difference during the lane phase. An additional 10 armour at level one is not something to be laughed at as it reduces a substantial amount of damage from minions and enemy auto harrass. Use this ability as much as you can to poke the enemy with its AoE magic damage while aiming to stay above 100 or so mana so that you have enough for an E - Q combo. When on the ground, it doubles the passive bonus for youself while granting nearby allies the standard attack speed buff.
R - Cataclysm

Heroically leaps to an enemy Champion dealing 200/325/450 (+150% bonus Attack Damage) physical damage and creating an arena of impassable terrain around them for 3.5 seconds.Activate again to collapse the terrain.
Jarvan's most well known and controversial ability. This can cause disaster for both teams, making tactical use of it paramount. Use it to divide an enemy team and make any trapped within it vulnerable but be cautious to not trap your own team and make them vulnerable. You can use this ability as an escape by using E on where you want to go, ulting, and then using Q on your flag to fly out.
Skill order
R > Q/E > W
Note: Level E first, Q second and get an early point into W. Then distribute skill points following the skill order.
As with all ultimates, max Cataclysm first. By maxing Cataclysm as such, we lower its cooldown and increase the abilities damage by a large margin.
We can max either Q or E second. Generally, if you find the enemy laners to be out of position often and/or you have built up a lead, you would want to max Q in order to increase your burst damage from your E - Q combo to further snowball your marksman.
Else, you would want to max E. This increases your poke cability, durability, waveclear and utility (AS buff).
W should always be maxed last. While leveling W increases its shield amount and slow, it is only by a small amount and the increase in utility and damage from leveling Q and E far outclass the benefits from leveling W.
Item build
You can start with four potions (they would be enhanced from the Culinary Master point taken in the utility tree) and either a relic shield or an ancient coin (always take a warding totem as you aren't starting with any wards). Relic shield provides a flat amount of health as well as health regeneration which is extremely beneficial in the early game. You can take ancient coin if you aren’t confident in the lane matchup and wish to just sit back and throw down E's. Upgrade whatever item you started and don't forget to keep a good supply of wards going until you get your sightstone.
If you are confident in your ability to play Jarvan support, and are in voice communication with your marksman, feel free to start with a Doran's shield and 2 health potions for a risky, but aggressive, opening.
After upgrading to either a Targons Brace or Nomad's Medallion (depending on which item you started with) you should aim to build a sightstone as soon as possible.
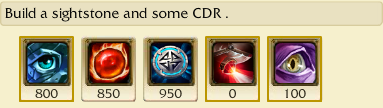
Afterwards, aim for CDR in either a kindle gem, glacial shroud or both. Jarvan, when played as a support, is extremely reliant on his abilities meaning you want them off cooldown as much as possible in order to provide as much utility as you can. Switch warding totem to sweeping lens as soon as you have a sightstone as warding totem becomes redundant and it is important to deny enemy vision.
Begin building to either a Randuins Omen or Aegis of the Legion, depending on whether the enemy team deals mainly magic or physical damage.
Aim to build tank items afterwards, such as Banshee's Veil and Frozen heart. Don't forget to keep a pink ward on you at all times.
Early game
Your primary objective during early game is to gain lane control and assert dominance. This maximises your marksman's farm and with careful play, can snowball them out of control.
- Push up the lane as soon as you arrive, using your E to harass, in order to reach level 2 first and gain access to your E-Q combo
- Immediately use your E - Q combo on the enemy by placing your E behind them, and using Q towards the flag. This will knock up the enemy and apply the damage and armour reduction of Q. This often results in first blood or at worst burns some of the enemies summoners making them extremely vulnerable to another E - Q combo.
- Make use of your passive to last hit for relic shield procs and to harrass the enemy support if they are in range.
- Use your flags as often as you can to poke the enemy and give your marksman an AS buff to harrass with.
- Gain control of lane bushes by moving through them and zoning out the enemy support. This applies a great deal of pressure onto the enemy laners as their movement in lane is restricted.
- Above all else, ward. During the laning phase, it is your responsibility to keep vision control around bottom lane as all gold your marksman has is to be funneled into damage.
Mid game
By mid game, you should be transitioning into a tank and focusing on securing vision control around key objectives that your team is going for. Keep in mind that due to your lack of damage, it is hard and unadvised to duel an enemy. Move around with some , if not all of your team, when going for vision control and objectives.
-By now, you should have a sightstone and some CDR. Use your wards in possible flanking paths and blind spots around the objective you are aiming for. Do not be afraid to use your E to scout an area before you move in to ward. It is better for your E to go on cooldown than for you to face check a bush and die.
-In teamfights, you should be looking to get a good initiation or peel for your carries. You can devastate a team by knocking them up with your E - Q combo and then splitting them apart with your ultimate.
-If laning phase did not go so well, make sure you get vision around where your marksman is so they can farm safely.
-Keep an eye on enemy movements and communicate this with your team via smart pings or by a few quick words in chat. If you notice that they have grouped up, they are most likely going for an objective. You can go and challenge them for the objective or concede it in turn for taking one or many objectives of your own.
Late game
Late game is essentially the same as mid game however teamfighting generally becomes the primary focus of the game. A lost teamfight usually results in the loss of map control and sometimes even the game. Because of this, it is paramount that you exercise extreme caution while moving around the map. Always move as a team and work together to gain vision control.
Lane synergies
While Jarvan can effectively work with any marksman, there are a few that compliment Jarvan much more than others. Here are some examples:
Graves

Of all marksmen, Graves works the best with Jarvan. He has the ability to follow up quickly on your engages in lane with his dash while also providing an immense amount of AoE damage and utility. The armour reduction from your Q increases the already insane burst from Graves and can completely shutdown an enemy lane. The attack speed buff from both of your E spells buff his attackspeed by a substantial amount, increasing his overall damage between ability casts. Graves can W into your ultimate, effectively disabling a champion for its duration.
Varus

Varus is the king of utility marksmen. His kit comes with a team-wide Snare and an AoE healing reduction slow along with poke and burst magic damage. Jarvan and Varus can CC multiple targets, making them a good combination for any team comp. Jarvan's E - Q combo also provides Varus with the time to apply and detonate his W stacks.
Miss Fortune

Similar to Varus, Miss Fortune comes with great poke, healing reduction and a slow. Jarvan can lockdown and group up enemy targets - which is perfect for Miss Fortune's AoE damage. Together, Jarvan and Miss Fortune form a destructive bottom lane duo to contend with while also being the perfect teamfight combination.
Closing thoughts
Jarvan support, while unconventional, is not to be underestimated. I firmly believe that Jarvan support is just as viable as any other and in some cases even better with his wide offering of utility and play making potential. Jarvan is a champion that can be enjoyed and played to a great effect by people of all skill levels and I hope that you are inspired to try Jarvan support in your own games. If you have any questions, please feel free to ask them in the comments below.