






Blogs
The Breakdown 5: Ashe, Caitlyn, Draven and Jinx


Introduction
As requested, I'll be running down some of the ADCs that I like to play and talk about things you can do with them.
Table of Contents
1. Ashe
2. Caitlyn
3. Draven
4. Jinx
Ashe
If you plan on fighting at level 1, you want to level her Frost Shot (Q) first, not Volley (W). This is because Ashe's Volley applies Frost Shot’s slow. So if your Frost Shot is level 0, Volley will not slow. If you are going to chase enemies, Frost Shot’s 15% slow at level 1 will be more helpful than a spell that deals 40 (+100% AD) damage every 16 seconds.
People often undershoot Hawkshot and do not use it to its fullest potential. Hawkshot, like Lux’s Lucent Singularity (E) will grants vision of its travel path for two seconds before granting vision of its destination for five seconds. Sometimes it’s necessary to undershoot to get that extended vision of a particular area, but otherwise, you should try to overshoot Hawkshot to gain vision of more than one area.
Caitlyn
Caitlyn can significantly increase her DPS if she attacks from a brush. I’ve turned around many bad situations into double kills by running into a brush and kiting from there. If you’re split pushing bot lane, you can slightly enhance your wave clear by attacking from a brush.
Caitlyn generally does not do well in extended trades. If an enemy tries to engage when you poke, use your 90 Caliber Net (E) to quickly disengage. Her E can be interrupted, so if you’re going to use it, use it quickly.
A good way to disengage and deal damage is to use her 90 Caliber net (E) and immediately use her Piltover Peacemaker (Q). By doing so, you can cast her Q during the channeling of her E. Otherwise just known as her EQ combo, the slow provided by her E can often guarantee that the Q hits for its full damage. Be careful not to spam this combo, because it costs a lot of mana.
Caitlyn can use her Yordle Snap Trap (W) during the channel of her E as well. You can do an E>Q combo or an E>W combo. You can also run through all of her abilities as well, totaling to a full combo of E>Q>W. This rarely comes in handy because of how much mana you burn. The only real situation when this full rotation is useful is when a faster enemy is almost within melee range of you. You can E the enemy to apply the slow, Q for damage and use W around 50 units ahead of the enemy. As a result, the slowed enemy (who is still running towards you) will end up walking on top of the trap and getting snared.
When you are sieging turrets with Caitlyn, a good idea is to put traps slightly behind where you are standing. Turrets have an attack range of 775, and Caitlyn has an attack range of 650. This means you have 125 units of space until you are out of turret range. Placing traps behind you is a good way to see the edge of turret range. This way, if an enemy uses a gap closer on you (say a Leona uses Zenith Blade while you are sieging her turret), you can E during the Zenith Blade animation, and she will be caught on your trap. Another way to think about is by using the range indicator of her W. Her traps have a range of 800, so that’s 25 units greater than a turret’s attack range.
When you are defending against a siege on your turret as Caitlyn, put your traps around the edge of the turret’s range. If you are afraid of getting dived under your turret, you can also put traps on top of where you are standing. This way, if someone dives on top of you, they’ll land on your trap and be snared.
Caitlyn’s traps also grant vision briefly when placed. With 800 range, you can use your trap to check brushes before entering. On purple side, you can also check the river brush by placing a trap on the corner wall, as shown by the picture.
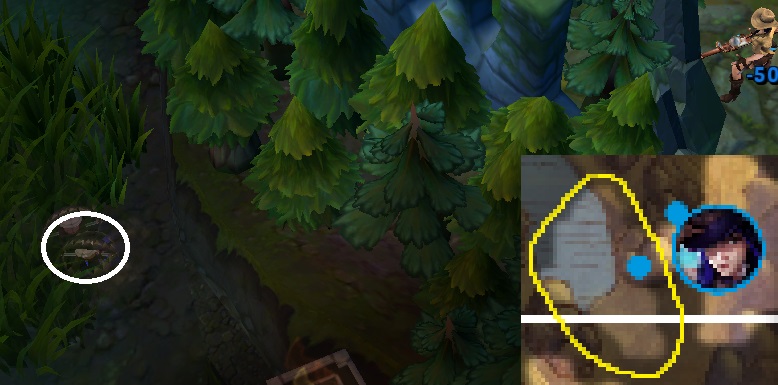
If you want to use traps defensively as Caitlyn, you want to focus on placing them near choke points and narrow exits. Placing traps on the edges of brush are also harder to spot.
Caitlyn’s Ace in the Hole (R) can hit like a truck – especially at later levels. Unfortunately, it can just be blocked and its stationary channel makes it inefficient to use in the middle of a team fight. When you are laning with Caitlyn, you can even force the enemy ADC or a squishy support to back off by ulting them. Later in the game, you can simply use Caitlyn’s ult on an isolated squishy target to chunk their health down. This is especially useful if you’re trying to siege a turret. By chunking the target’s health, they have to back off to heal or risk getting killed.
Draven
After leashing, you can have two axes early on in the lane by priming your first axe right before you enter the lane. Having two axes spinning by the time you hit level 2 gives you a huge spike in power. Draven is also the only champion I would ever consider taking a 1% crit chance rune on, because of how much an early crit from Draven can hurt.
Early in lane, squishy supports are a favorite of mine because they are easy targets to kill. Squishy supports who don’t take flat health seals and armor quints in their rune pages are basically like cannon minions at level 1. A few attacks can pop them in a matter of seconds. Vayne, Zyra, Zilean, Ezreal and Sona are especially easy to kill because of their weak level 1 stats. If your support is exceptionally tanky and/or deals any kind of damage, you can easily dominate the lane by getting level 2 first and pushing your enemies out.
Zyra has a long cooldown on her Grasping Roots so once she burns that, you can kill her or force her to use summoner spells. Vayne, Zilean, Sona and Ezreal will (commonly) take Q at level 1. These skills deal negligible damage compared to a spinning axe and you can easily walk up and chunk a fourth of their health with minimal trade backs. Just be sure not to take too much damage from minions, though.
The direction in which Draven’s spinning axes fall depends on what direction you are going at the very moment the axe hits its target. As a result, animation canceling his auto attacks makes it extremely easy to catch the falling axes and kite backwards or chase forward, especially since his Blood Rush (W) refreshes on each catch.
Before big fights, it is beneficial for you to start juggling a third axe. This way, if you drop an axe, you’ll still be able to maintain your maximum DPS until you drop another axe. An important thing to note is that your axes can make your movements very predictable. Enemies with skillshots will often try to aim their skills at where your axes land, in order to catch you out. You can use your Blood Rush to quickly catch the axe at the edge and use it again (because it resets) to quickly skim out of the skillshot’s hitbox. Or you can just not catch it.
Draven’s Stand Aside (E) can be extremely useful, especially as a champion with no blink/dash tools (W is not a dash, but more of an enhancer). Not only does it deal a decent amount of damage, but it’s also a very strong form of crowd control. You can use his E to cancel dashes and gap closers. Popular and relevant ones include Leona’s E, Lee Sin’s Q, Fiddlesticks’ ult, Thresh’s Q, Caitlyn’s E, Corki’s W, Lucian’s E, Grave’s E, Quinn’s E, Tristana’s W, Braum’s W and Alistar’s W. Some spells that are harder to cancel are Malzahar and Warwick’s ult. To cancel these, you basically have to use the Stand Aside right before the suppression spell is used. When done properly, the suppression will begin as the axes knock the enemy aside, stopping the channel.
The thing to remember about Draven’s ult is that it does not instantly spin back to you. It takes around half a second for you to be able to manually reactivate the ultimate (to make the axe decelerate), and it will take another half second for the ultimate to decelerate and spin back towards you.
Something I like to do with Draven is to use his E to ensure that your ult hits twice. To do this, you use your E after you use your ult. By using your E, you can temporarily stun/interrupt/slow your enemy, guaranteeing that your ult will hit on the first spin. And since the ult returns when it hits an enemy champion, it will spin right back, guaranteeing the second spin to hit as well. The tricky part about this, however, is that you need to aim your ult at the direction where your E will knock your enemy to.
In teamfights, try to use your ult to hit as many people as possible, especially when you have some AD items.
Graves
You can prevent Graves’ passive from expiring by canceling your auto attacks. The timer will reset each time. Graves’ passive makes him pretty tanky, and you can take advantage of this. Opting to trade with your passive fully stacked (10/20/30 bonus Armor & MR) can be beneficial because it means you can take a few more hits and still come out on top of a trade. The passive upgrades happen at level 7 and 13 – both pretty soon after you get your ult. Take advantage of this. With 20 bonus armor and MR and ult, you can rush at an enemy with a full combo and kill him faster than he can kill you.
Buckshot (Q) is nice and bursty, especially at close range. It does cost a good chunk of mana though, so don’t spam it. Occasionally, you can use it to harass if an enemy gets too close to you. A cheeky little way of harassing when an enemy comes up to hit a caster minion under turret is to use Q, auto and then Quickdraw (E) away from turret range. If done right, you won’t take any turret hits. But even if he does, his passive lets him take a turret hit or two without getting chunked too hard.
Graves’ Smoke Screen (W) is extremely useful if used correctly. In lane, you can smokescreen the support, harass the ADC with your support, and then back off (or vice versa). Denying the vision of someone else can act as a diversion as you hit the other person. You can also use it as a zoning tool in team fights in small, enclosed areas. Use the smokescreen on a narrow jungle entrance to zone an enemy while you hit someone else. Throwing a smokescreen on top of someone trying to chase a kill can also deny them the vision to hit that last auto attack or spell. There are a lot of similar uses between Smoke Screen and Caitlyn’s traps. You can also use the vision denial to juke enemies in brush. Place the smokescreen in between two brushes for maximum effect.
Graves’ ultimate has a total range of 1800. The first shell can travel a maximum of 1000 units, and the explosion has a range of cone range of 800. Use this range to your advantage to pick up stragglers on the map. Like Draven’s ult, you want to use the ult on as many people as you can. The first impact will hit one target, but the second explosion damage will hit everyone in that 800 range cone.
Jinx
Jinx is a champion that offers a high-risk, high reward playstyle. Her short attack range (with her mini gun) forces her to have to be extremely mindful of her positioning. However, as a late game carry, Jinx can ramp up to become extremely powerful at both long and close range. Getting a lead on Jinx to accelerate that path to that late game status will make her snowball into a powerhouse.
Jinx's laning is pretty strong. Her rocket launcher (Q) offers fast wave clear (particularly the caster minions), and it also doubles as a good way to harass. Due to the extended range her Q gives, she can easily weave in to harass and then out to safety at later levels. Though it’s not much at first, the rocket launcher can drain a good deal of mana over time, so be mindful of that. In a straight up 2v2 (and with the right runes), she can easily win trades and create kill pressure. Getting a BF Sword on the first back is extremely ideal for most ADCs, and Jinx is certainly no exception. Her Q and W both scale so well with that huge spike in AD that you can easily push an enemy out of lane with some heavy poke.
You can use your W to farm (if you’re getting zoned) or to harass. Once you get your BF Sword, the damage from your W will start to ramp up (especially if you can get in a rocket hit as well) and chunk squishy targets. If you hit an enemy with your W, you’ll usually be able to quickly switch to your rockets and get in an auto or two before the enemy can get in range to retaliate. One thing to keep in mind, however, is that your W does have a slight cast time and enemies with skillshots (Blitzcrank, Thresh, Morgana, Leona come to mind) can easily take advantage of that brief cast animation time to engage on you. Don’t tunnel on the idea that you have to harass with W, and just focus on using it when an enemy is out of position.
The long range and 10% AD boost from her Q is fantastic, because it essentially makes her a mini-Caitlyn at lv. 5 (Skill order: Q>E/W>W/E>Q>Q) because your range is 650 when your Q has three points in it. Also, Jinx's wave control is above average. Thanks to her Q, you can last hit caster minions under turret safely. You can also harass with the AoE on her Q, which is an added bonus. The AoE also lets you push out minion waves quickly. With that said, Jinx's lack of real escapes makes her extremely easy to gank - especially if her support can't provide her with any hard CC/protection. Even in a 2v2, if Jinx cannot maintain a respectable range leash, she will pop. However, what makes Jinx so fun to play is that you can turn around unfavorable situations very quickly with smart usage of your Flame Chompers (E).
Jinx’s Flamechompers (E), much like Caitlyn’s traps (W), are extremely useful when used properly. Sadly, Jinx’s traps only hang around for a few seconds, so you won’t really be able to stop a gank before it happens, but you can certainly delay the gank to either get away or kill an enemy and escape with your passive.
When you’re looking at where to position your traps, there are two places where you need to look at. You should first look at protecting yourself. Does the enemy team have single target/dive-heavy champions (like Master Yi, Warwick, Khazix, Pantheon, etc.)? If so, you want to keep the traps for when they do get on top of you. Remember that your traps take a moment to activate, so anticipate the enemy’s movements.
If the enemy team does not have that many dive-heavy champions, you may want to look to trap enemies who are not within optimal range of a teamfight. For example, if you see that an enemy Shyvana is trying to get in position to ult into your team, you can strategically trap her so that she can’t ult at the most optimal time. Similarly, if the enemy back line is primarily short ranged champions, you can choose to trap their backline in an attempt to delay the backline from entering the fight. This buys your team time to either kite away or to ignore the front line and go for the trapped backline.
Jinx’s ult is extremely powerful because it scales up with the projectile’s distance traveled and also deals bonus damage based on the target’s (or targets’) missing health. This is especially helpful in situations where you are not close enough to join a teamfight as it occurs. Using your ult to grab a kill or an assist will speed you up to get you to the fight faster.
To Be Continued
I’ll be covering some more ADCs in the next article.
Thanks for reading and stay tuned! If you’ve any comments or feedback, feel free to comment below or e-mail me at [email protected]