






Blogs
Teemo: The Devil Has Great Map Control

TheSunBro
Fri 7th Mar 2014 - 5:40pm

When I was learning to play I had two champions that I learned to fear, because they were almost always smurfs, Annie and...

I don't think you get it, this is nightmare fuel for me.
Teemo. Teemo was a character I came to fear in my low level experiences, and when I got past the level twenty mark he suddenly vanished along with a number of smurfs. With his recent debut in the North American LCS, he's started to see an increase in play, but what made a loved and hated champion who never saw professional play get locked into a game between North America's top two teams?
What Happened?
In season three it was fairly easy to learn to ward properly as a support in mid to late game. You bought Vision Wards, you bought oracle's, you continued doing that for fourty-five minutes. The extreme power of the Vision Ward over the Sight Ward and the presence of supports essentially being a roomba for other wards created a great amount of turmoil for any sort of stealth in the game, Teemo traps included. When the pre-season changes for season four rolled out there was a drastic change to how vision worked. Stealth Wards remained mostly unchanged outside of their name and the number you could put down, Vision Wards became visible but with infinite duration and five health, and oracle's elixer was removed completely from the rift.
Suddenly there was a shift in how to play, the support could now spend gold on himself a bit, the team would have to help the support ward (cough), and stealth mechanics became harder to counter. This was the big change that Teemo needed to happen, now that vision wards were limited and always visible and oracles removed from the map, his time had come. Countering a Teemo's map control has now become a chore, a great one at that, and requires the entire team to pitch in for vision in order to keep some amount of the map clear of traps as well as hold on to their sanity.
While Riot has responded to Teemo's map control with an ability power ratio nerf on his shrooms, this cuts down on their ability to completely zone a team out of an objective or get destroyed from half health by a late game mushroom, it does not, however, cut down on his ability to inform his team on what the enemy team is up to and make the enemy worry with what awaits with every step.
Trap Placement: Laning
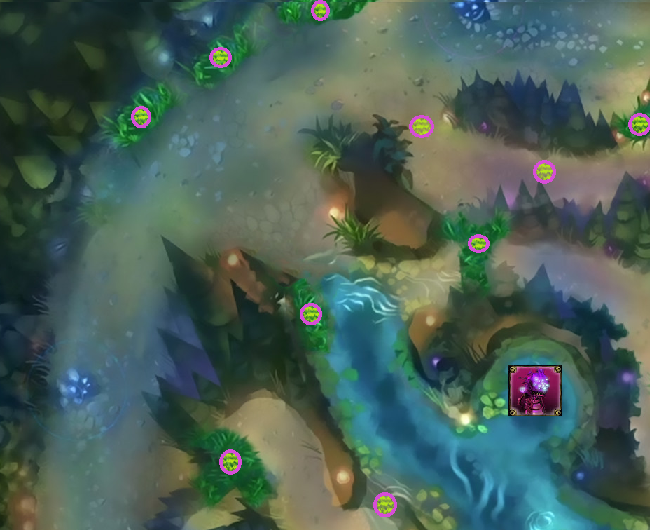
To start, let's look at traps you can begin placing in the laning phase, first a look at top lane.
Top Lane
10,000 hours MS Paint
The only thing more easily observable here than the fact that I need to get my hands on photoshop is a common pattern in mushroom placement that you'll see throughout this guide, and likely one you already know. Traps need to be placed in high traffic areas for the enemy team, and most importantly during your laning phase, the enemy jungler and mid laner. At level six you can begin placing your mushroom safety net. I always like to get my own mushrooms first into the entrance of the brush closest to the enemy turret, into the river, and into my tri-brush, regardless of which side I'm on.
Setting traps in the tri-brush on blue side may seem like a waste, but it can be the difference between whether the enemy jungler has the health to dive you along with your laning opponent. Keeping mushrooms placed in river brush is always a good idea. Even if the enemy jungler simply guesses they are there and runs straight into the gank, it gives your laning opponent less time to react to the jungler's presence and you can easily trap the river directly next to the brush. The trap in the lane bush serves the obvious purpose of trying to thwart in-lane ganks that many junglers will attempt against Teemo, rather than risk hitting mushrooms in jungle, and on purple side the mushrooms in the brush near golems and on the pathway can also thwart a dive or warn you at the least. Should you be worried about your opponent diving or attempting to proxy farm your lane, you can place mushrooms in the lane behind your turret, as they will not be activated by enemy minions with the turret still standing.
Mid Lane
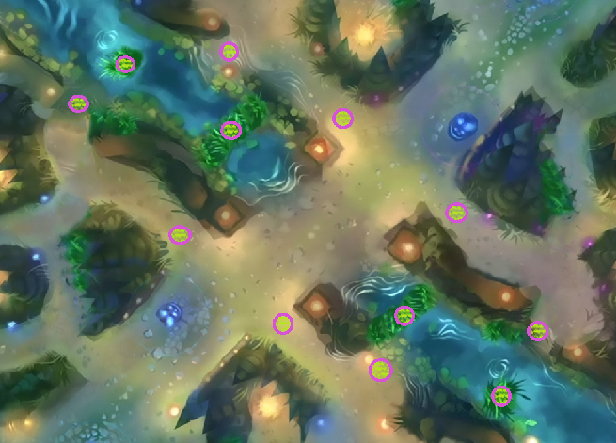
This is the most straight forward lane to trap as Teemo, and also the easiest to quickly become secure in. The obvious place to start with would be the two brushes at the end of river in top and bottom side, however, I'd suggest planting mushrooms at the lane's other four entrances directly after. Once you have these areas secured, place them into the jungle entrances in river, and if you fear you may be visited with a dive, in the two entrances behind your turret. As with top lane you can also place them behind your turret in the event that the enemy is dive happy, be sure to place them far enough behind the turret to avoid minions but still be in the turret's range if you do so.
Trap Placement: Baron Nashor and Dragon
Once laning phase begins to wind down and mid game approaches, Teemo can really start to crunch down on his map control. While I'm not covering build in this article, it's normal to have CDR coming out of laning phase, and Teemo really puts it to work here. Your job now as Teemo is to create havoc, but havoc with a method. You want the enemy team to be scared to walk into a bush, just to find out that you placed a mushroom right next to it as they lose a chunk of their health. What does this do for your team?, creates control, and most importantly, can help you create objective control.
Baron Nashor
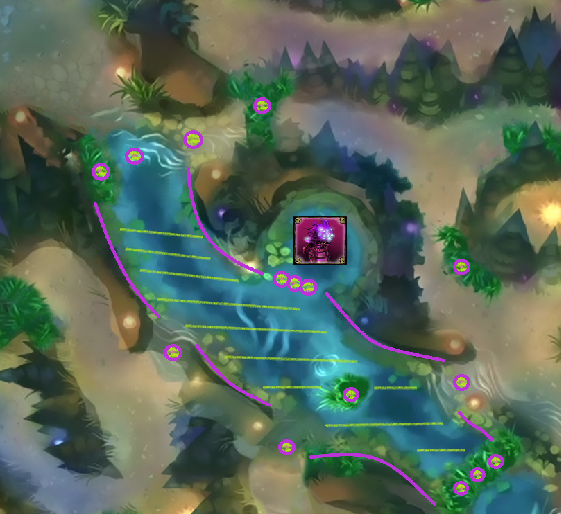
To start there's the obvious, get a trap inside of the Baron pit. It may be the mushroom that gives you the least amount of time to react to an enemy Baron attempt, but it's also the most likely to be set off. Afterwards there are the river entrances and the brushes. On blue side it is very important that you have a trap set up in both the top lane tri-brush and the area behind Nashor. These are both very common spots for the enemy team to gather in an attempt to steal or engage during a Baron attempt. If you find yourself with extra traps and your brushes covered, then look to trap closer to the enemy jungle camps in top side for greater map coverage, or place a number throughout river for added pressure and general frustration.
Dragon

There's not much to be said as far as placement for Dragon Pit control that wasn't said for Baron Nashor already. Plant traps in high traffic zones and places the enemy team may approach for their own attempt or steal. For a top lane Teemo this will be more difficult to create good control of earlier in the game, but a Teemo in the mid lane will be able to help secure it early with a trap placement near the pit entrance. This should be a much higher priority for Teemo early in the game if he finds himself mid, especially in the first fifteen minutes when Baron has not even spawned, as a well placed mushroom can thwart an early dragon attempt if the enemy is too low from a recent team fight.
Closing Thoughts
I've come to enjoy this aspect of Teemo's gameplay and find it to be an enjoyable and unique niche that the swift scout can fill. I've created this placement guide not only from games I played as Teemo for research but from many more where I found myself and my team being diverted from jungle objectives by a well placed trap. It was truly enjoyable playing Teemo with the map control mindset and I wish you the best of luck on the rift doing the same!