Blogs
Break Out the Artillery! Navigating Siege Situations

Until they start making the turrets out of paper mache, sieging the enemy base will be a huge part of winning any game of League of Legends. As with most parts of playing the game, a solid warding foundation as well as an understanding of what your team composition is trying to do are important when you've gotten to the enemy inhibitor turrets. The entire game is spent manipulating minions waves so I won't be covering that here, though you should have at least two of the lanes pushing in if you want opportunities for an effective base assault.
Warding Spots
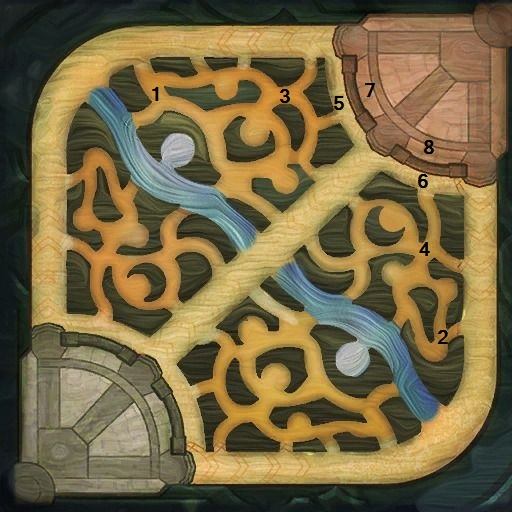
1 & 2: An important spot for defending teams, these spots serve as quality locations for teleport wards. The tribrushes become less traversed as the game progresses as it becomes preferable to be closer to the middle lane in a general sense. Middle-centric positioning allows for larger flexibility in plays, a valuable trait in any Solo Queue environment. What this means is that these bushes are less likely to be swept or contain a Control Ward by the time base siege scenarios break out. Teleporting behind the sieging team is one of the most effective ways to break their hold on the map. By sieging a side lane, the sieging team cuts off a route of attack, leaving only a head-on engagement, which is incredibly dangerous and telegraphed, a side flank, which any competent sieging team will have warded, or the teleport flank from behind, something that gets overlooked often as "ward lines" get pushed toward the enemy base.
3 & 4: These two spots are vital for both teams for knowing if and when the sieging team peels off for a Dragon or Baron or is rotating to another lane.
For the defending team, this is a necessary ward to keep track of enemy numbers. Often, you'll see one to two sieging champions peel away from the siege to take out a Dragon or Baron, thinking the defending team is unaware of their momentary numbers advantage, giving them an opening to strike.
As the sieging team, this is a great place for a Control Ward or a vision sweep. If you can deny the defenders knowledge of your movements, you'll have at least a few second lead on any play made, whether than means rushing back to an enemy tower after their team dissipates or recalling while losing very little pressure in the process.
5 & 6: More aggressive sieges will set up Control Wards here, just on the other side of the base wall. This can entice a greedy defender to get caught and die as well as shroud the shortest path between mid lane and the side lanes when sieging two lanes is an option. This will most often occur when an inhibitor is open or downed in middle lane or a side lane and the other lane still has at least an inhibitor turret.
7 & 8: Very similar to a reverse situation to the one presented with wards 5 & 6. The difference here is that the sieging team can't trespass through the base gate, meaning a Control Ward here will be much safer, but much less likely to lead to a pick. This is absolutely a necessary ward for both teams for a powerful siege or defense, though the defending team holds a big advantage here if the "ideal" situation plays out.
Teleport Wards
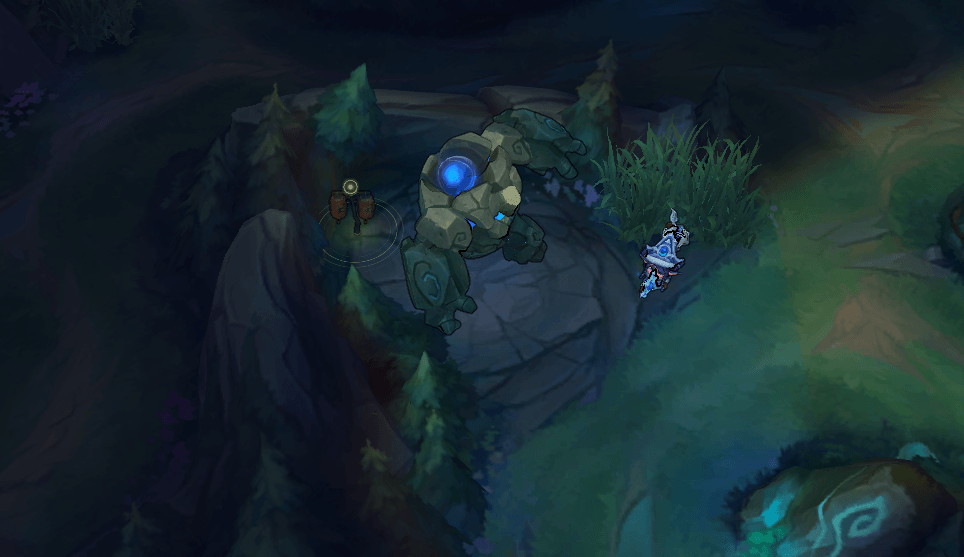
A few specific places for good teleport wards were mentioned above, but the important thing to take away from the location is that it is somewhat out of the way. The ward shown above is similar in that it is deep in the blue buff pit, a place that is sometimes neglected in trinket sweeps and may not be spotted by a Control Ward in the bush, given the reduced range (relative to Vision Wards) and desire to maximize vision at the intersection just to the right of the pit.
There's no perfect formula for placing great hidden wards, but a general rule would be to place them off of the "high-travel loops" in either side of the jungle. For blue buff side, this would be a path consisting of entering through the left jungle entrance, turning right between the Wolf and Blue Buff camps, and finally exiting down through the final camp. Red Buff side is similar, but you have to consider both sides of the Red Buff pit as, unlike Blue's camp, the camp wall doesn't run down to river.
Given these constraints, I think wards in the Krug or Wolf camps are good places to stick a ward if contemplating a teleport play. They won't grant efficient vision, but that's just a factor you have to deal with.
Know Your Team
Diving straight ahead into your enemies' tower doesn't seem like the optimal play, but, with a sufficient gold lead and a beefy front line, may be just that. Towers become smaller threats as the game progresses due to tank stats on front liners outstripping the towers' damage as items are purchased. Just be aware of who is taking tower aggro at any given moment. It is easy for your front line to drop aggro while chasing targets away from the tower being contested and leave a frail mid laner or AD to lose half of their health or more. While it is always ideal to dive a tower with your minions, the best opportunity may not present itself when your minions are present.
If you have a team that is either a pick composition or a team that prefers more open space to teamfight within, peeling from the actual siege early may be the best option when coupled with a strong team vision denial effort to feign a neutral objective take (or an actual take if the enemy team can't follow you). Remind your team to buy Control Wards beforehand if you're relying on picks to gain advantages.
While not terribly common, some team compositions can sit just outside the enemy base indefinitely and poke down the inhibitor turret over the course of many waves. This sort of team would feature very high sustain, strong disengage abilities, and long range. Caitlyn, Xerath, and Soraka would be a solid example core for a team like this. While sieging occurs in almost every game that isn't won in laning phase, this sort of team would be built to excel in those situations. However, this team would also be the most vulnerable to explosive flank plays, as they plan on staying in one location for an extended period of time. The longer they stay, the spottier their vision control will become.
Baron and Dragon Notes
Baron Nashor is the most important objective in the game for a reason. For sieging teams, the buff often forces a choice for the defending team between fighting or conceding a number of buildings. For defending teams, managing to sneak or steal a Baron locks your base down and makes it very difficult for the sieging team to do their thing without a numbers advantage or incredible show of misdirection.
It is important to note that a single Control Ward cannot cover the entire Baron pit like a Vision ward could last season. Putting one in front of Baron and one behind him should be able to shut down every enemy ward in the pit.
Finally, know what type of Dragons your team values. While not specifically a sieging concept, it applies here as well. Using the above examples, if your team is great at diving turrets, Infernal Drakes would be by far the most powerful of the four. If your team is a pick composition, you'd value Cloud and Mountain Drakes most highly, as they allow you to move quickly between the enemy base and neutral objectives and take whatever objective you settle on much more quickly. The true poke and siege composition would value Mountain and Ocean Drakes relatively highly. They want to be able to have a prolonged engagement at the enemy tower, but cutting the time down to complete the engagement (take the tower) is in no way a negative.
The constant tug and pull between objectives across the map is a delicate tightrope act. Every move your team makes leaves openings for the enemy. The trick lies in deceiving your enemies and manipulating their movements. Just remember that good map play is an art, not a science.
Like our content? Support us by getting our merchandise in our shop