Blogs
Countering the Counter Terrorist on de_Cache
Introduction
This will be a guide that teaches and helps you become a better Terrorist on de_Cache. I will cover signals that could show what setup the Counter-Terrorists are playing. Other things that will be covered in this article are basic ideas of being a Terrorist such as smokes and molotovs. The main focus will be on a strategy for each Bombsite. I will also cover stuff that you can do on a low economy buy.
Counter-Terrorist Positioning:
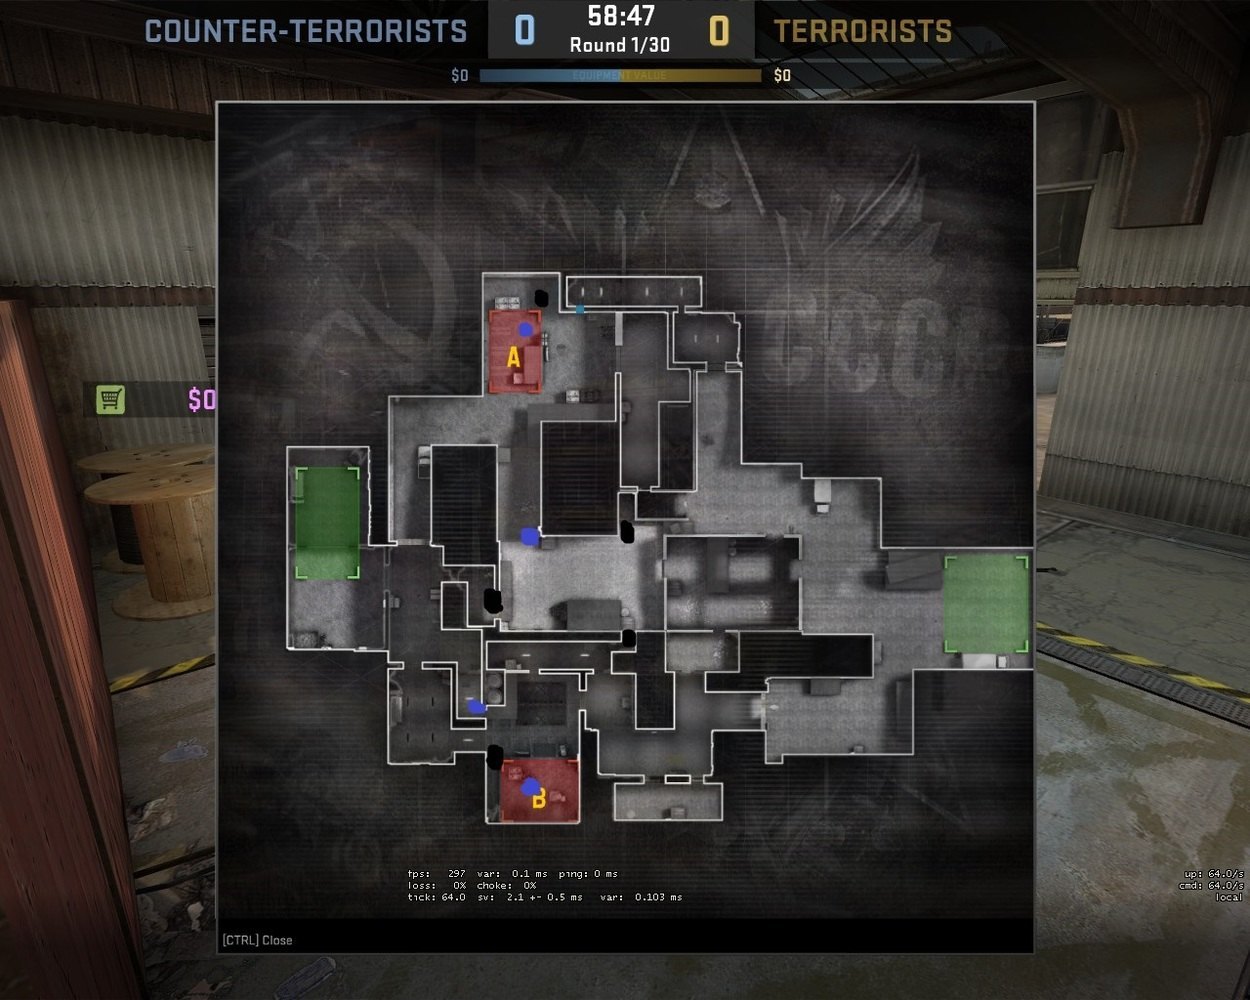
The first topic I will cover is Counter-Terrorist positioning. Counter-Terrorists have two primary setups on this map, the 2-1-2 and the 1-3-1. I will show signs of certain setups that will help you identify what your opponent is doing to know what to do and where to go. When looking to take Mid control look out for two things, a smoke blocking Mid Garage and a molotov on top of Boost. If these hit at the same time, then they have at least two people Mid. Counter-Terrorists use this to cut off a fast push from Terrorists so that one Counter-Terrorist can push and hold close or be in Vents. If these things do not happen then they could be playing a 2-1-2 setup. If they do smoke off Mid Garage then be careful there could be someone playing Vents, even in a 2-1-2 setup. Below is a picture of 1-3-1 positions in the black dots with different variations of those positions in the blue dots.
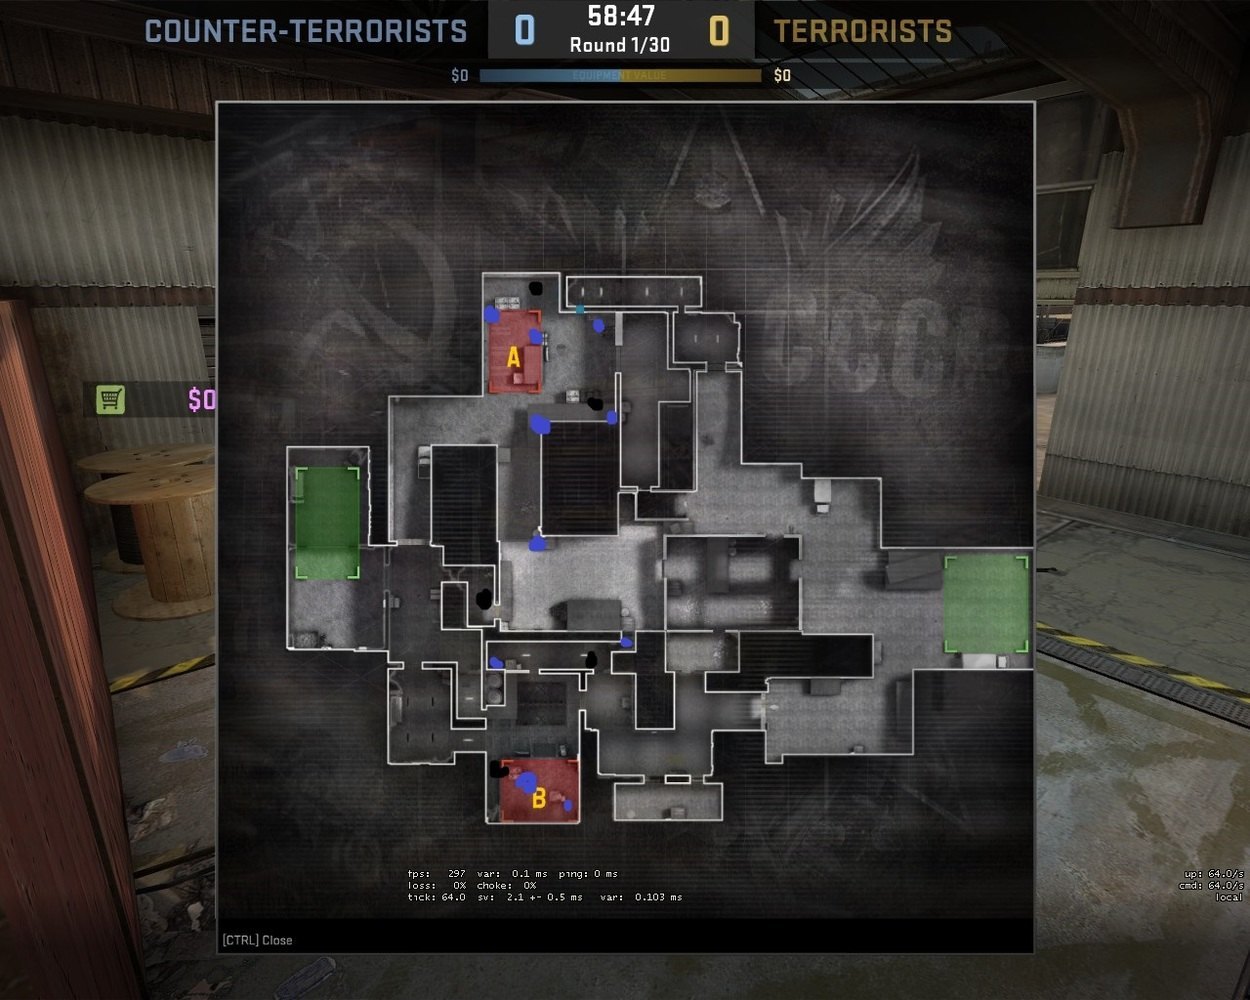
-Site Positions: For the two Bombsites the positions are relatively predictable. For the A Bombsite there will be a player that will be sitting Quad or close Fence. This player has many variations and can sit in the default bomb plant spot or back of Site. The Quad player may sometimes push Squeaky Aggressively just play safe knowing that is a possibility. The second player on the A Bombsite if there is one will be Forklift or Catwalk. If there is only one player on the A Bombsite just look out for Highway and Truck, since that is where Counter-Terrorists will rotate to. When there is a deep smoke thrown into A Main know that Counter-Terrorists can flash in and catch you off guard. The B Bombsite is a bit different. Players have more of a variety to hid in. There will be a Site player who could be Headshot or Triple. The second player could be sitting in Vents or in the back corner of Checkers. A deep smoke will allow them to get into the Vents position and a B Main smoke will allow them to get into the back corner of Checkers. Be aware of where they could be playing. If there is an AWP player on B then be knowledgeable of the Heaven position or peeking B Main from Checkers. Below is a picture similar to the one above except with the 2-1-2 positions and their variations.
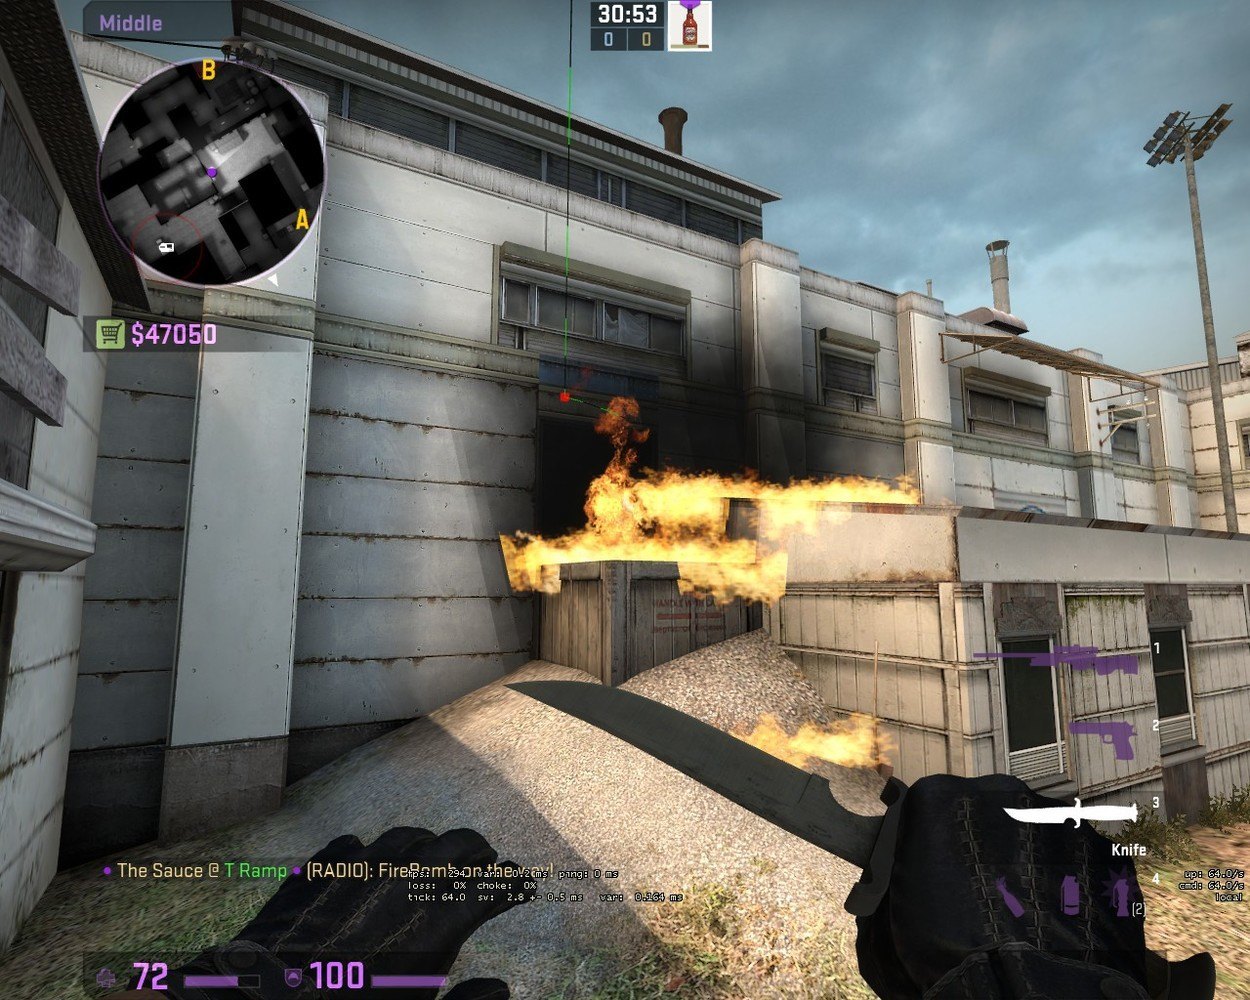
-Mid Positions: If you see signs of the Counter-Terrorists committing to a 1-3-1 and want to go to the A Bombsite, then you will want to flush the Vents player out and make him fall back. If you want to peek over Boost you have to be careful of someone playing close, or a counter boost. You can use two molotovs to punish these players positioning. What you are doing is locking these players in their place so that the rotations to the A Bombsite are slower. If you want Mid control have someone flash your team in to get an easy pick on burning Counter-Terrorists. This push will also give information on the setup of the Counter-Terrorists. If you see signs of a 2-1-2, then you can do the same thing, you never actually know where a Counter-Terrorist is playing until you have vision. Either way all strategies I have listed below work for both of the Counter-Terrorist setups. The first set of pictures is the Vents molotov, which I jump throw at the bottom of the slope outside A Main.
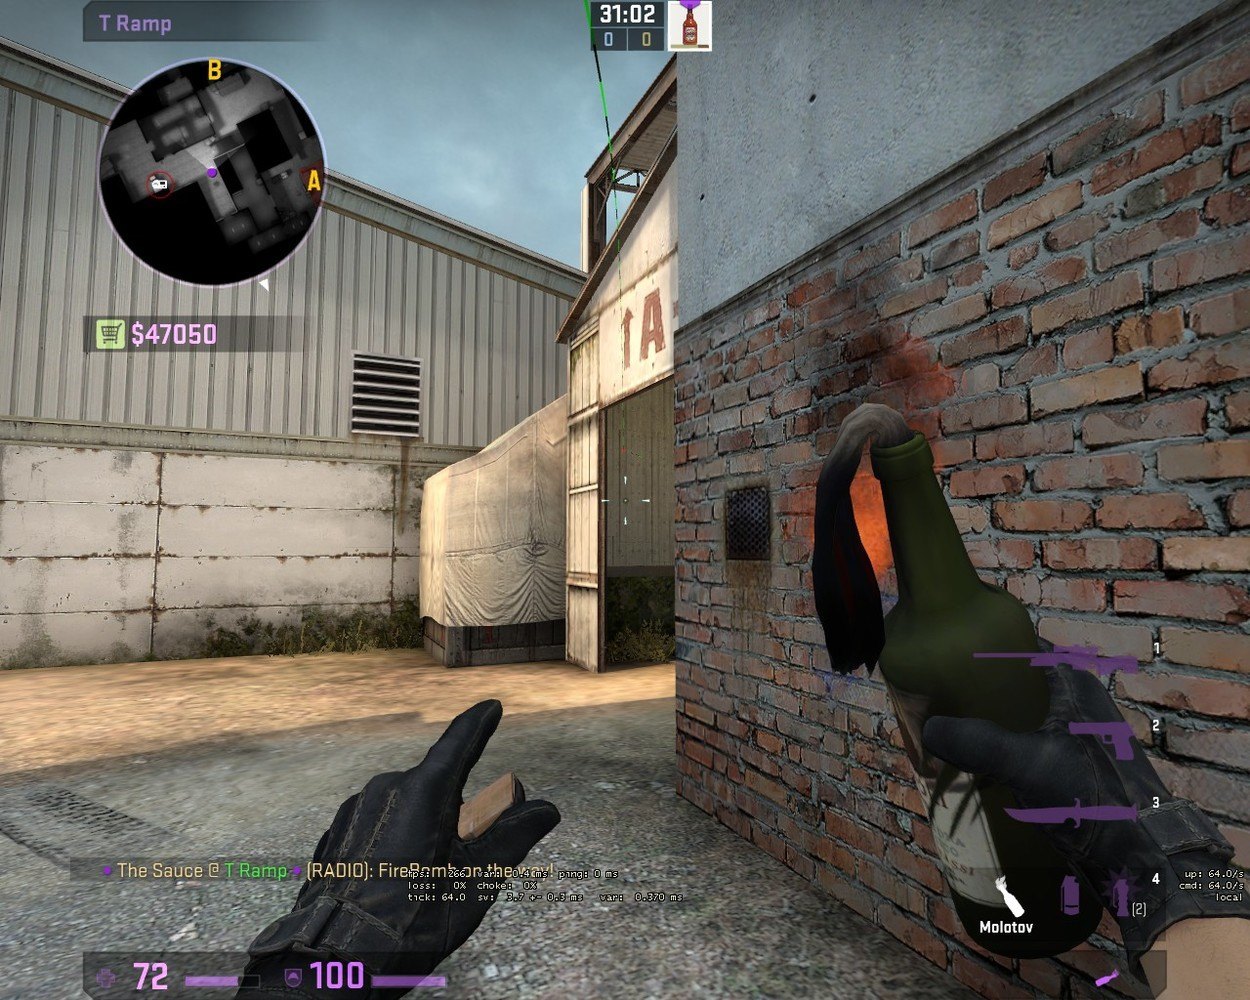
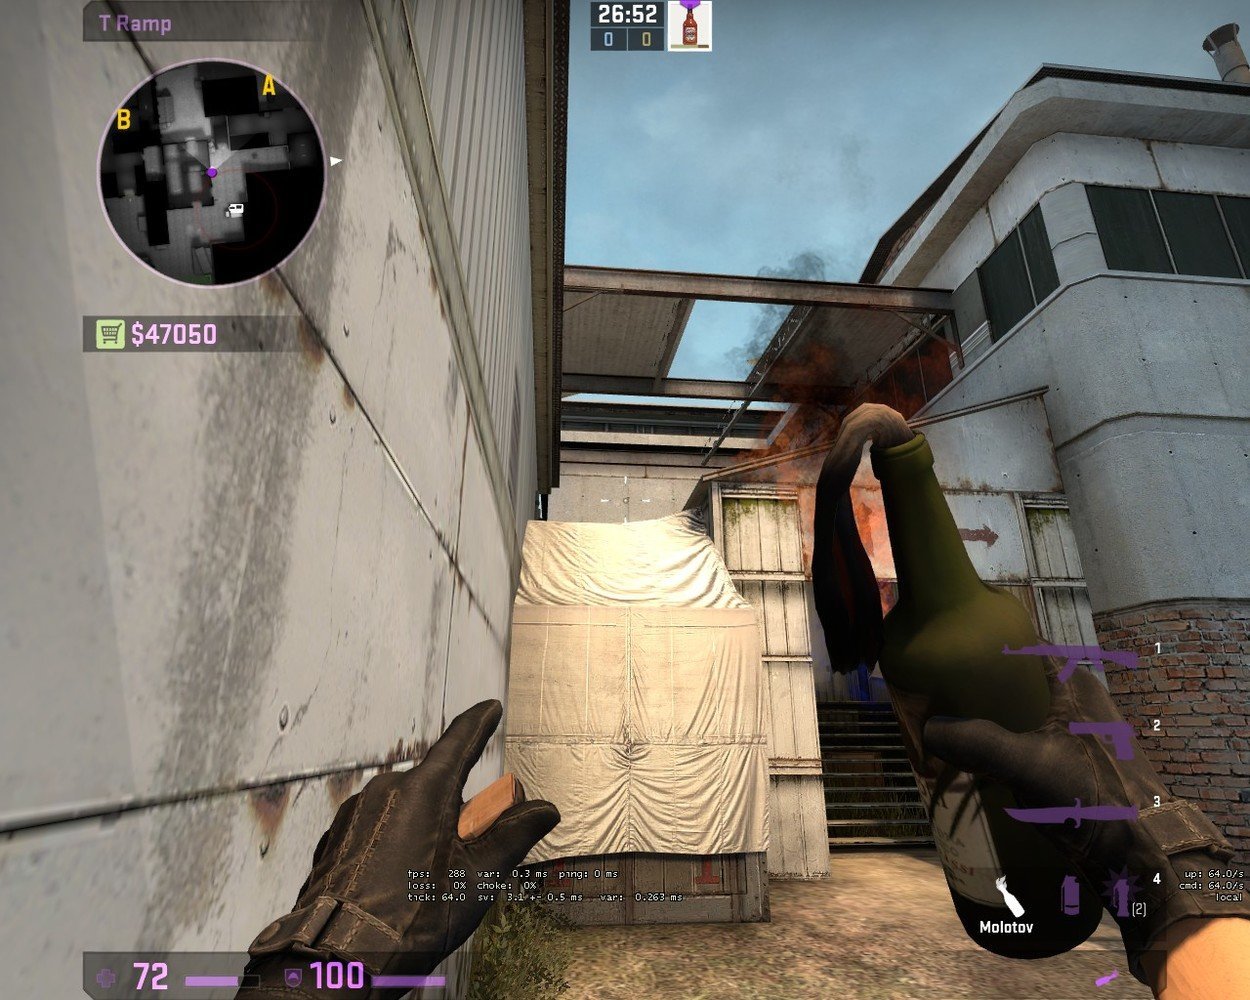
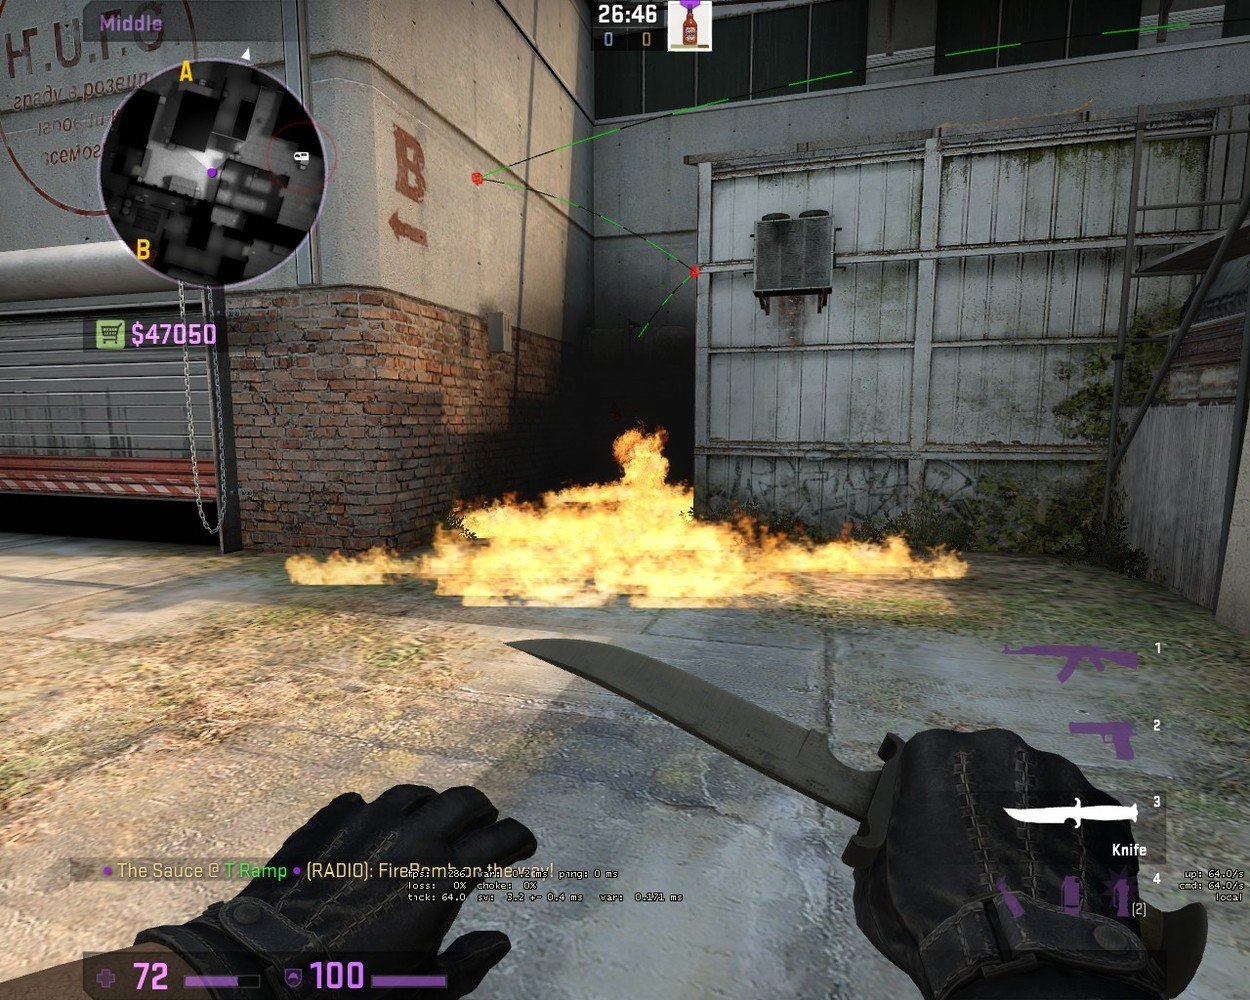
The second molotov is a simple left click and it falls right into place.
Mid Control:
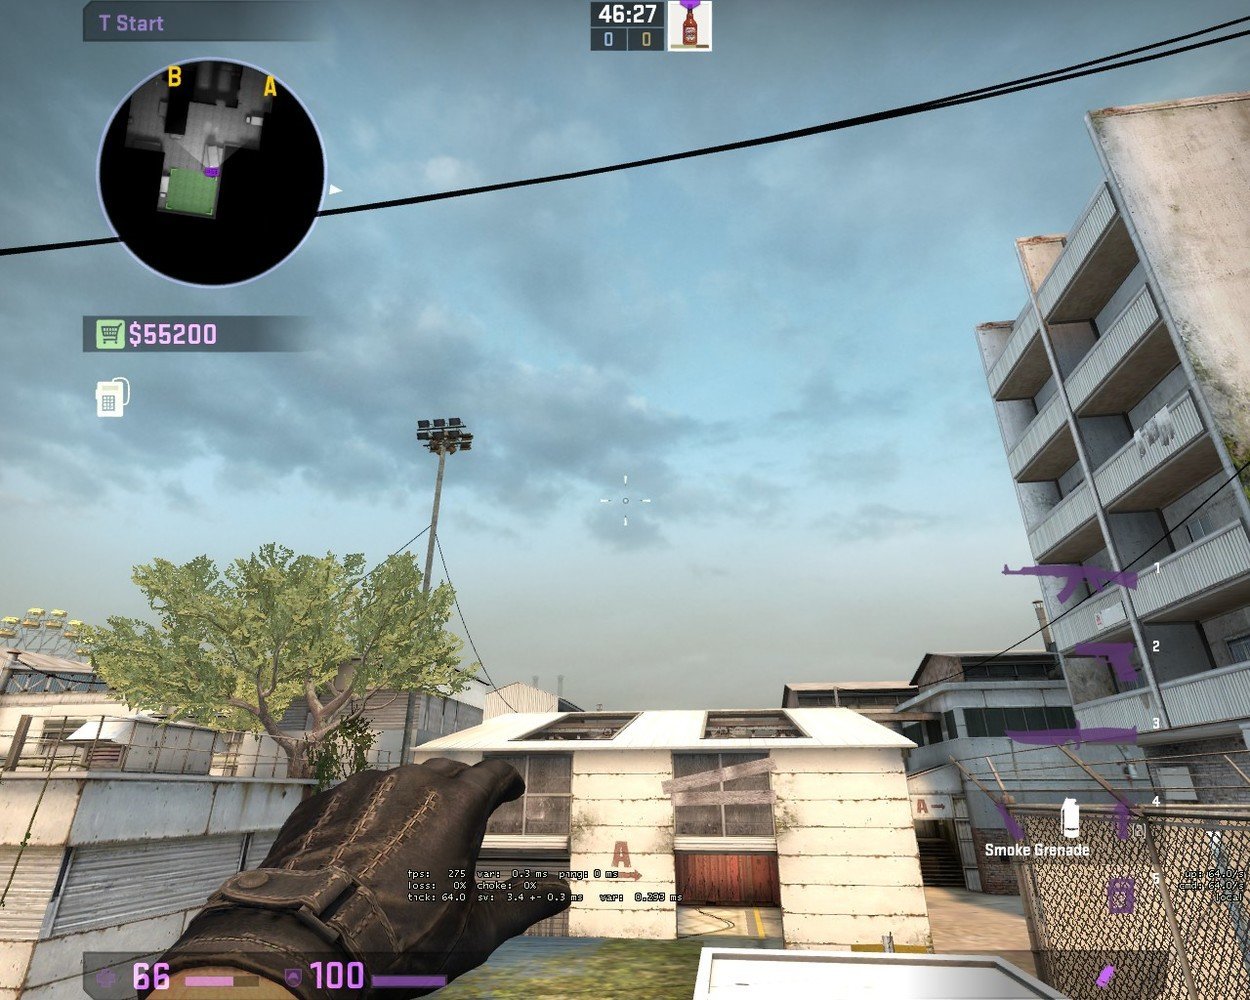
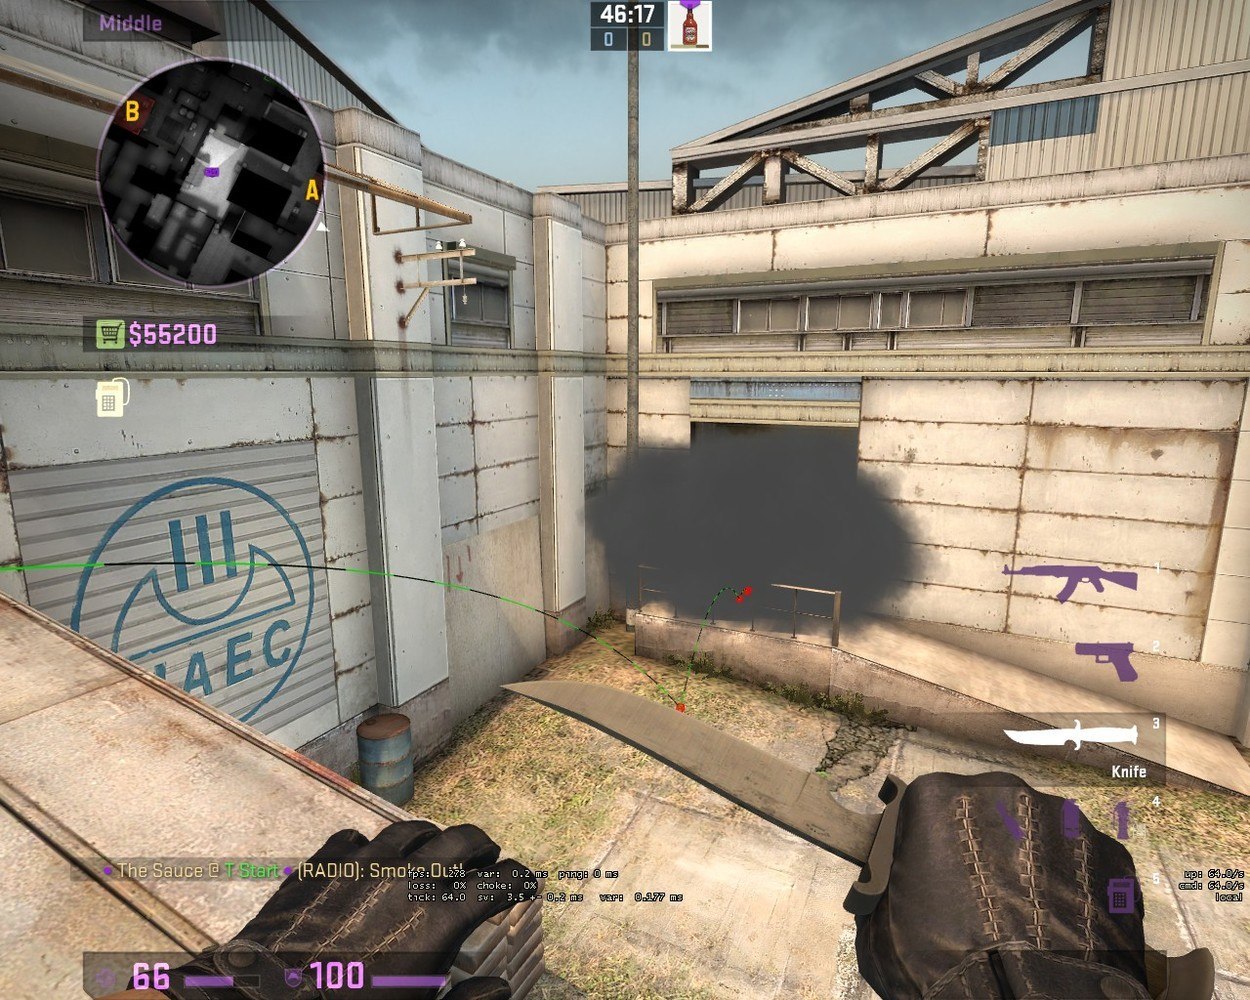
There are a few ways to take Mid control. The way I will show starts with smoking off Z Connector and White Box. The two main places the AWP player will hold in Mid is either of those two positions. These smokes will limit his positions and following up with flashbangs will force him to fall back. If you used the molotovs in the previous section you will have flushed out any close playing Counter-Terrorists. If your team plans to go Highway to A Bombsite, you will have to clear out Sandbags, which can be done with either another molotov, or double stacking grenades. Whether you plan to go to A or B do not send your whole team Mid because you will lose a lot of map pressure. If you plan on splitting A then have two go Mid and the other three go A Main and Squeaky. For the B Bombsite do the same thing except for three B Main and two into Vents to Checkers. Below is the Z Connector smoke which I throw on top of the white and blue bins in T Spawn. I start from the end of the bins in the center and run untill about halfway until the end of the bins which is where I let go of left click.
A-Split:
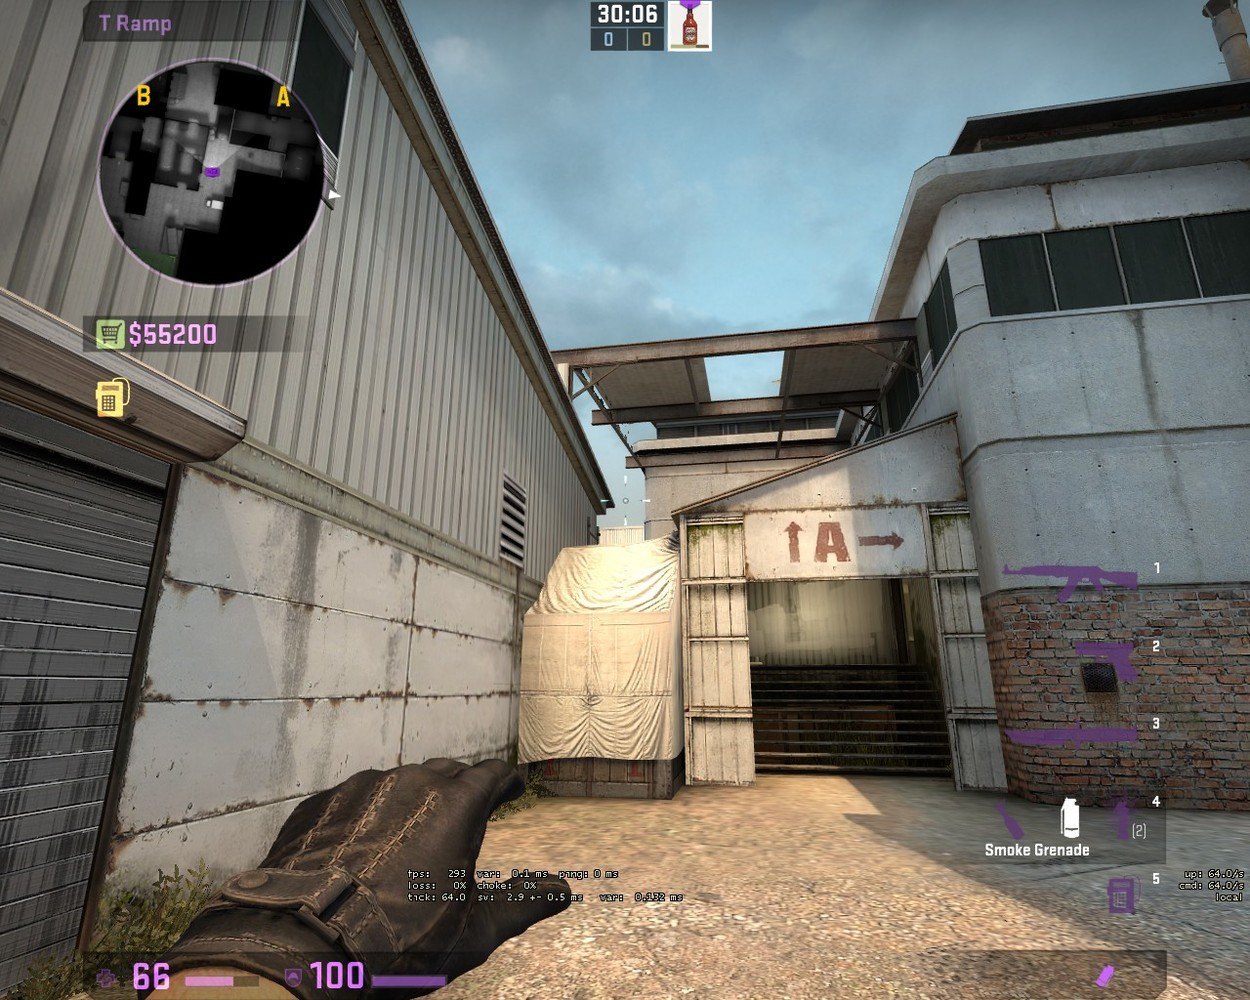
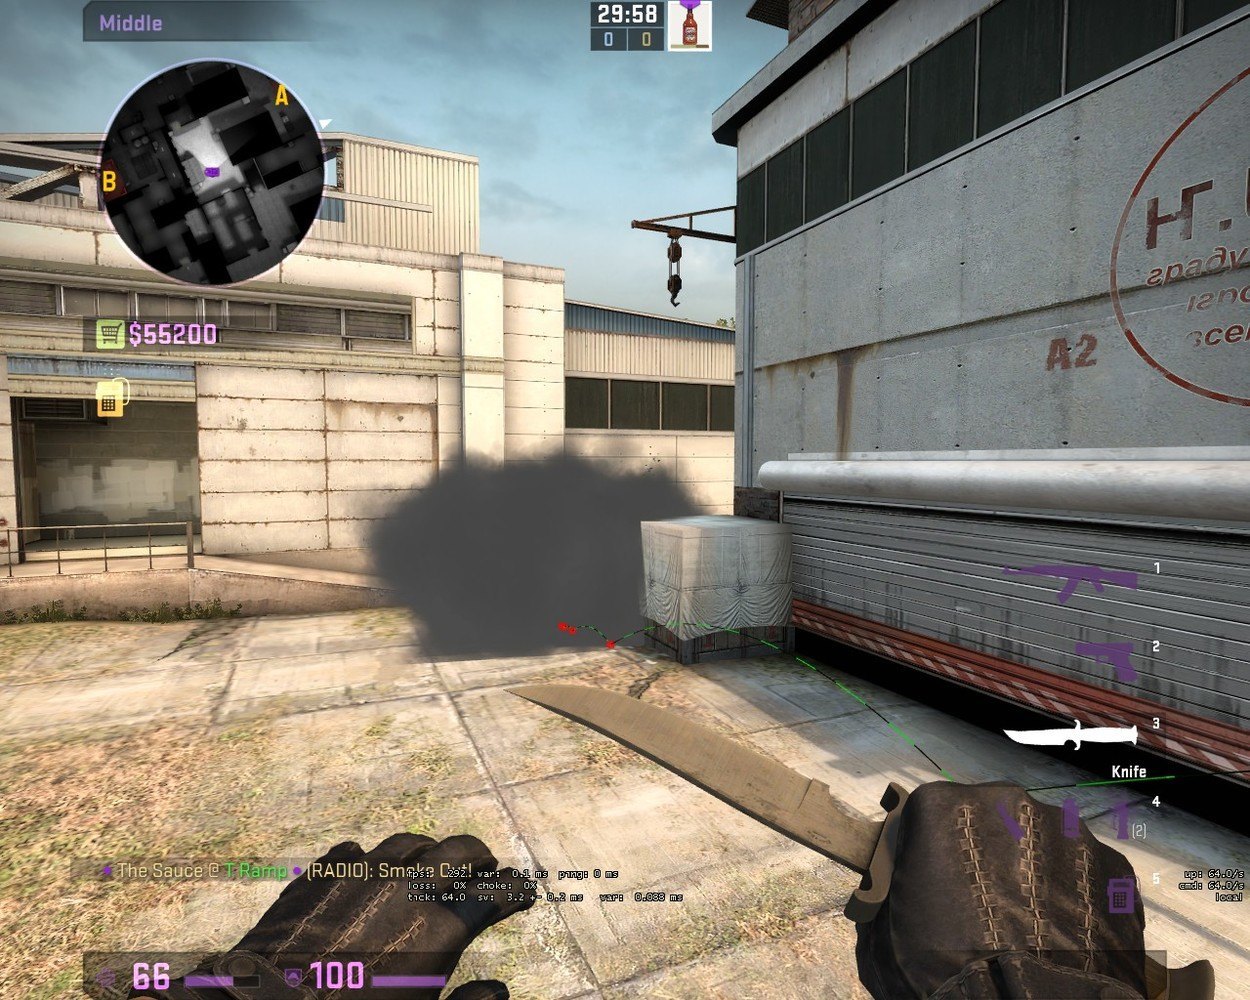
When committing people for Mid control, you only need two people. The reason to take two people is in case a Counter-Terrorist peeks one of you, so the other person can get a trade kill. While those two are getting Mid control have two go A Main and one go Squeaky. The advantage of this is you are surrounding the Counter-Terrorists from three different angles. Throw a deep smoke on Truck and have one of the players who went Mid to hold Z Connector to slow down rotations. After clearing A Bombsite plant in either Default or for A Main. This is because you have control over A Main and Highway, so the only threat lies from a big flank, which should be covered by the guy in A Main, or Counter-Terrorists coming from Truck. A flank from Squeaky will be covered by the person on Forklift, since the Quad and A Main player will be able to hear him unless he walks the whole way. If your team has a Lurker, or you yourself are a Lurker, probably hold off rotations in Z Connector, or if you can into the B Bombsite from Z and you can even go into CT Spawn to catch Counter-Terrorists off guard. A good after plant setup covers multiple angles and allows for your teammates to cover each other during an engagement with any Counter-Terrorists. Here I have the White Box smoke that covers the left side so you only have to pre aim the top of the box. It is a left click smoke.
The B Take:
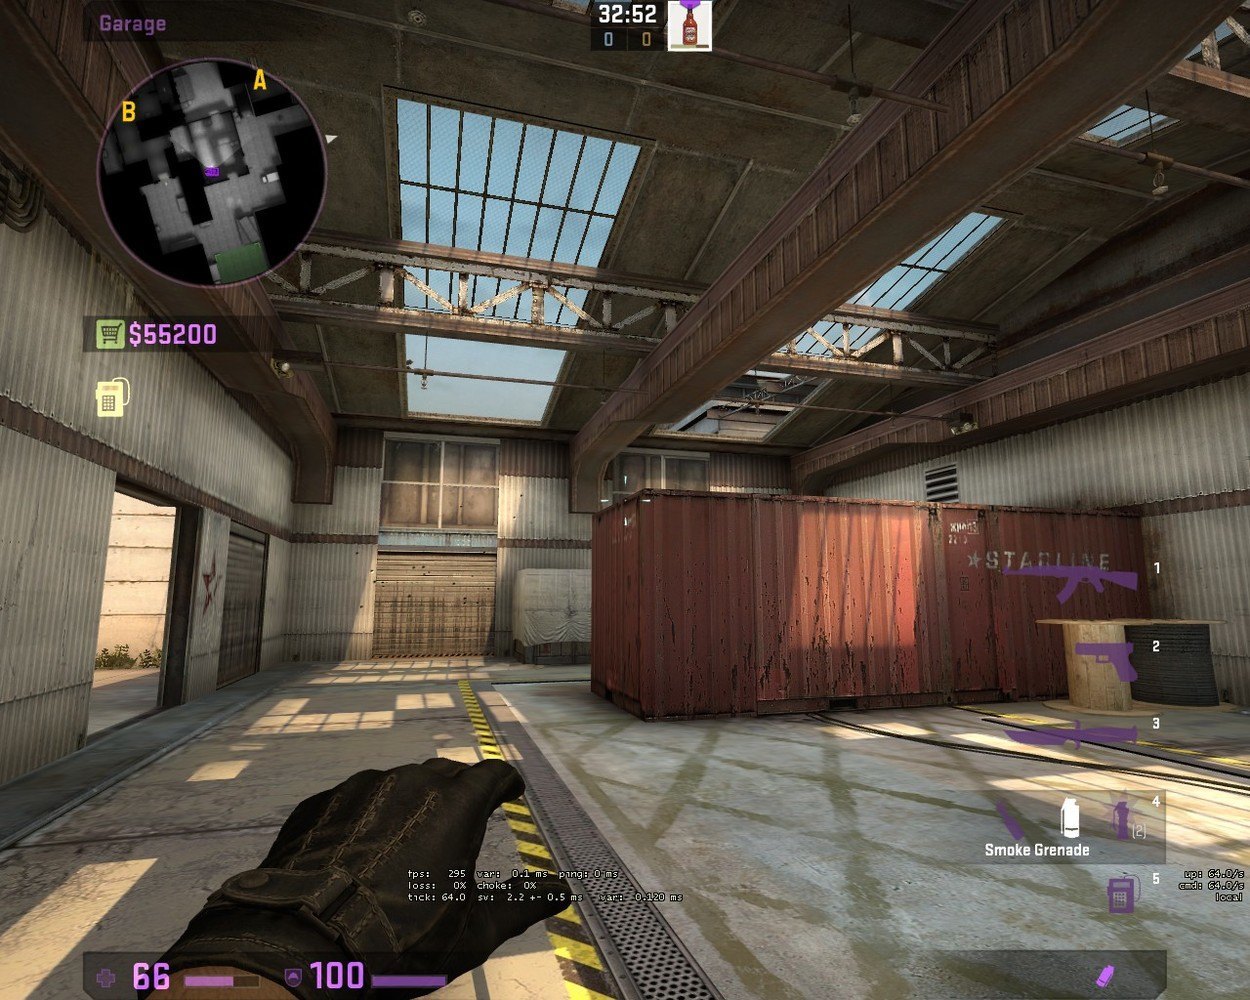
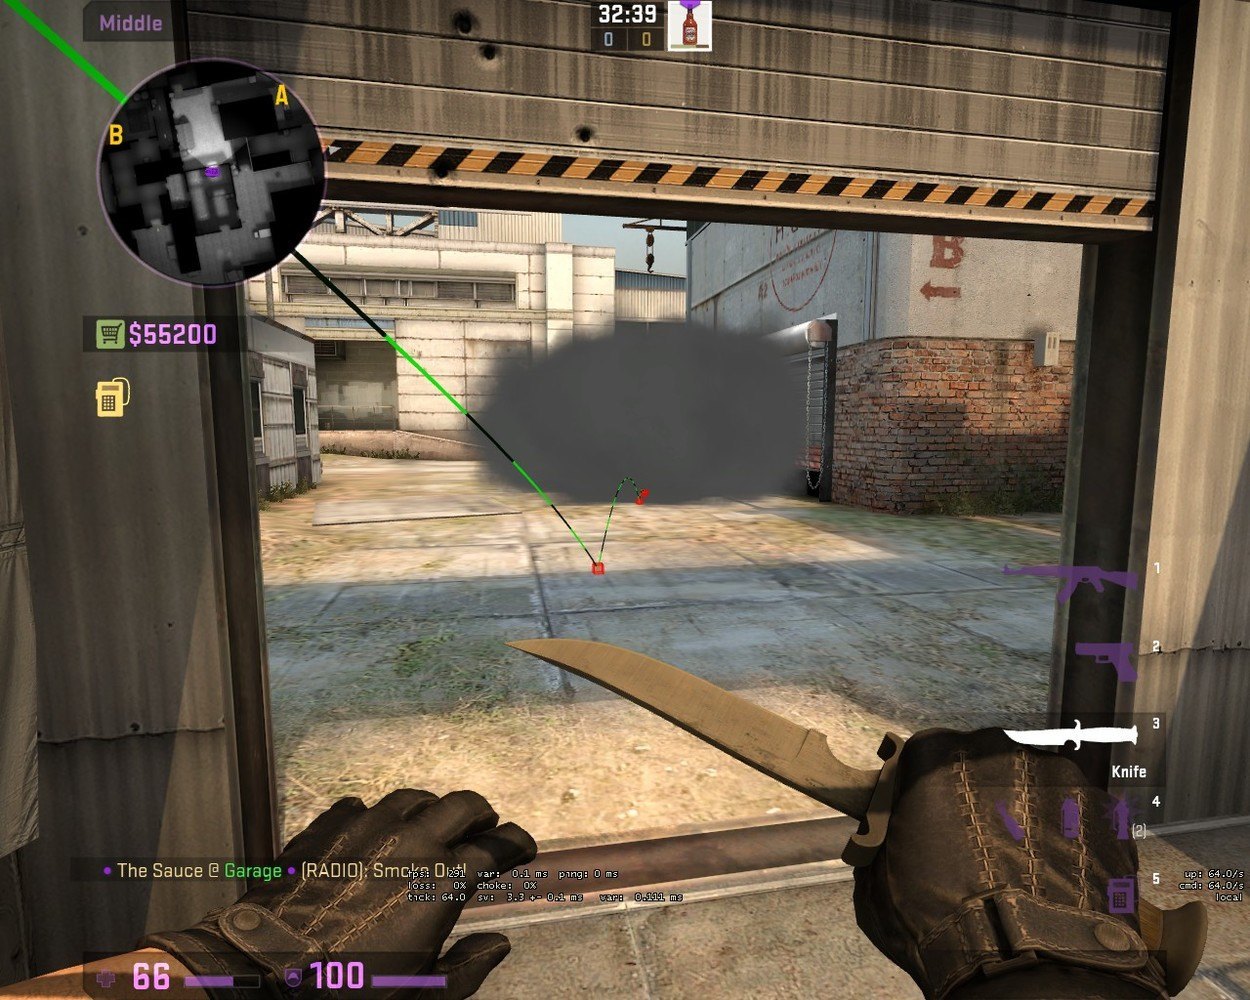
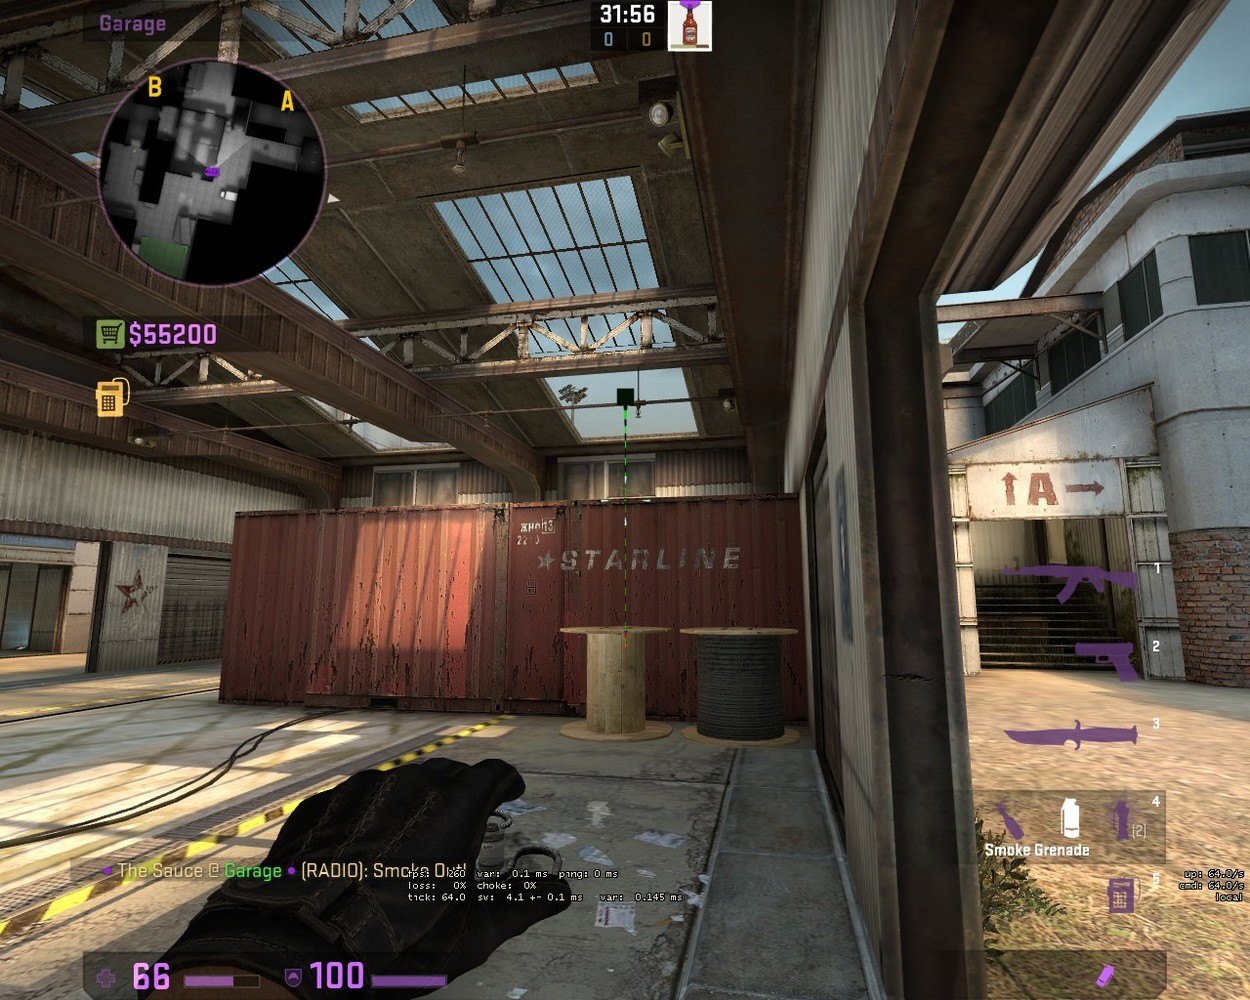
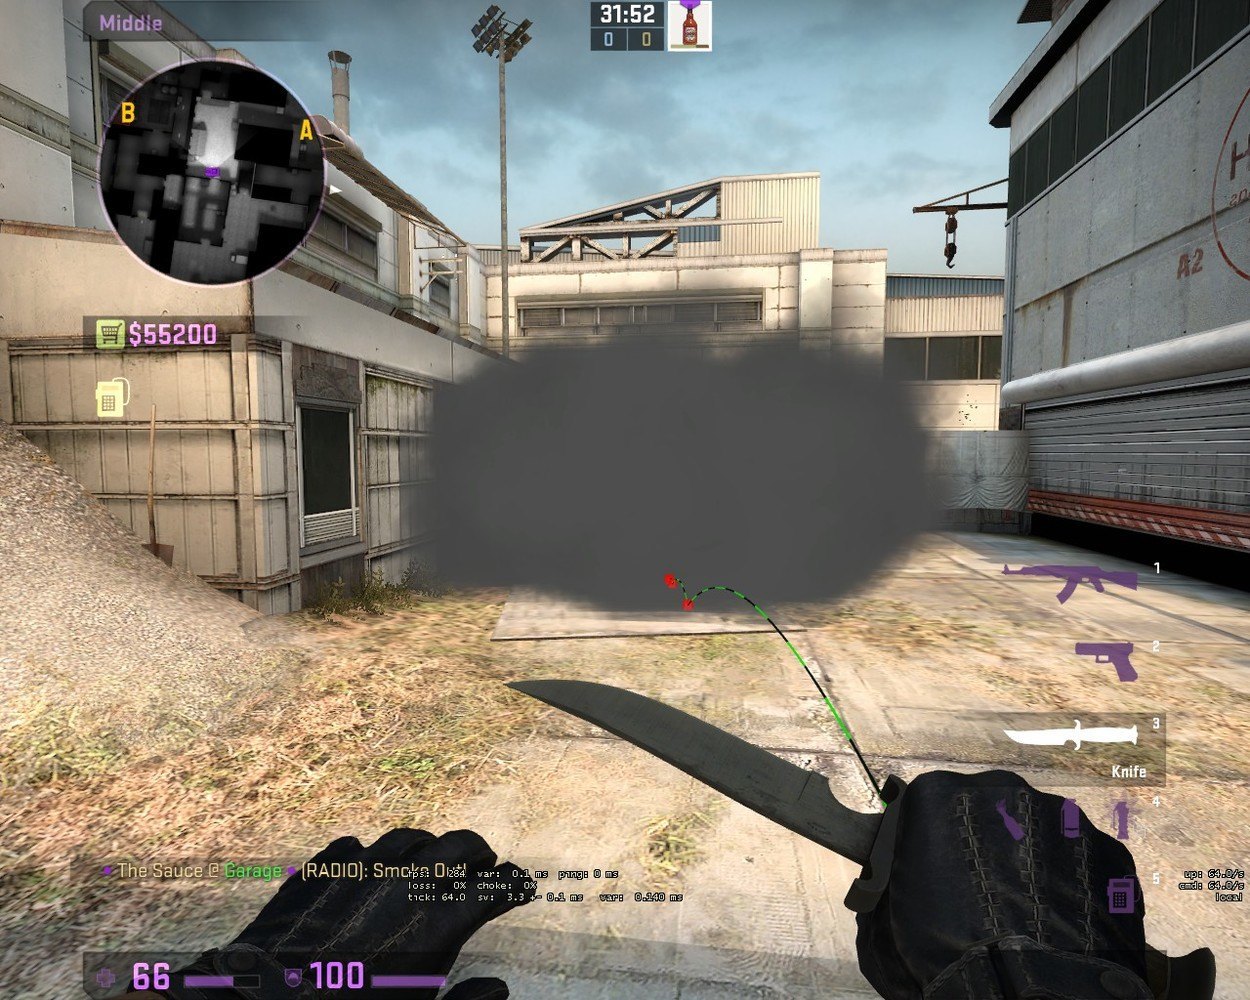
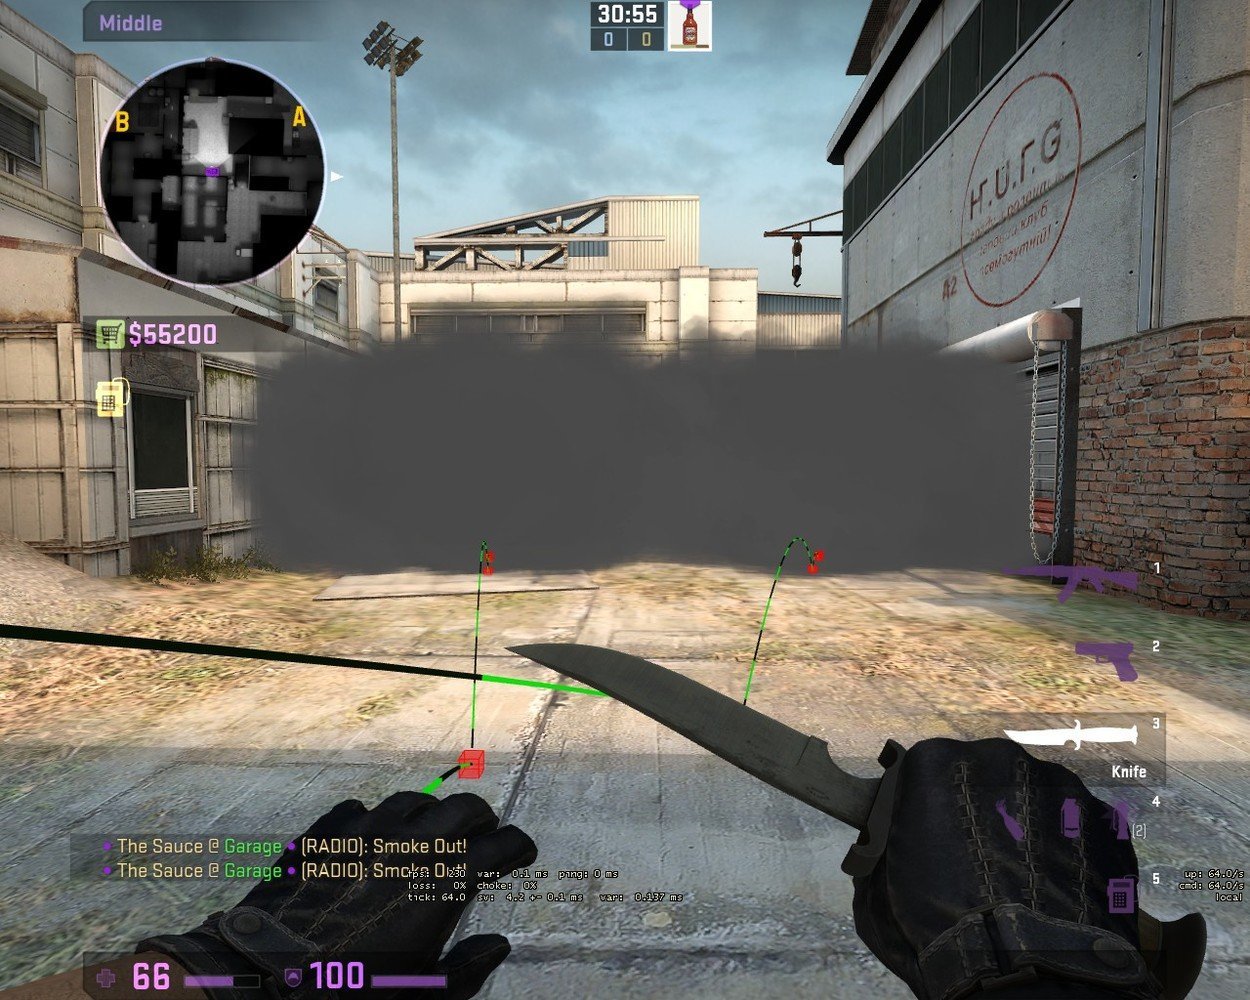
First I will start with criss-cross smokes that block Z Connector and White Box from seeing into Mid Garage. These smokes help you gain close Mid control and control over the Vents position. If there is any Counter-Terrorist playing close Mid they will be cut off from their teammates, so they will not be able to trade any kills and lose someone for nothing. While there are two people getting close Mid control, the other three should be entering the B Bombsite from B Main. The reason you get Vents and close Mid control is so it limits the amount of angles that the Counter-Terrorists can enter the B Bombsite from. When entering the Bombsite have everyone move together, remember that Terrorists out number Counter-Terrorists on the Bombsite. Enter the Bombsite from Headshot, so you only have to smoke off Tree Room and limit vision from Heaven. You have control over Vents and B Main so plant the bomb for either Checkers or B Main. Have one person stay back in B Main to cut off big flanks, one person in Checkers and the rest on the Bombsite. If you have a Lurker stay in Mid, and catch Counter-Terrorists off guard when they are trying to flank. Do not give away your position and do not worry if you die, you give your team an idea of where to look for incoming Counter-Terrorists. Both of the smokes are left click throws and the position for the first is taking steps back and to the left of the yellow and black stripe on the floor. The second set of images is the other side and is the exit from Mid Garage towards A Main behind it in the box on the floor.
Low Economy Rounds:
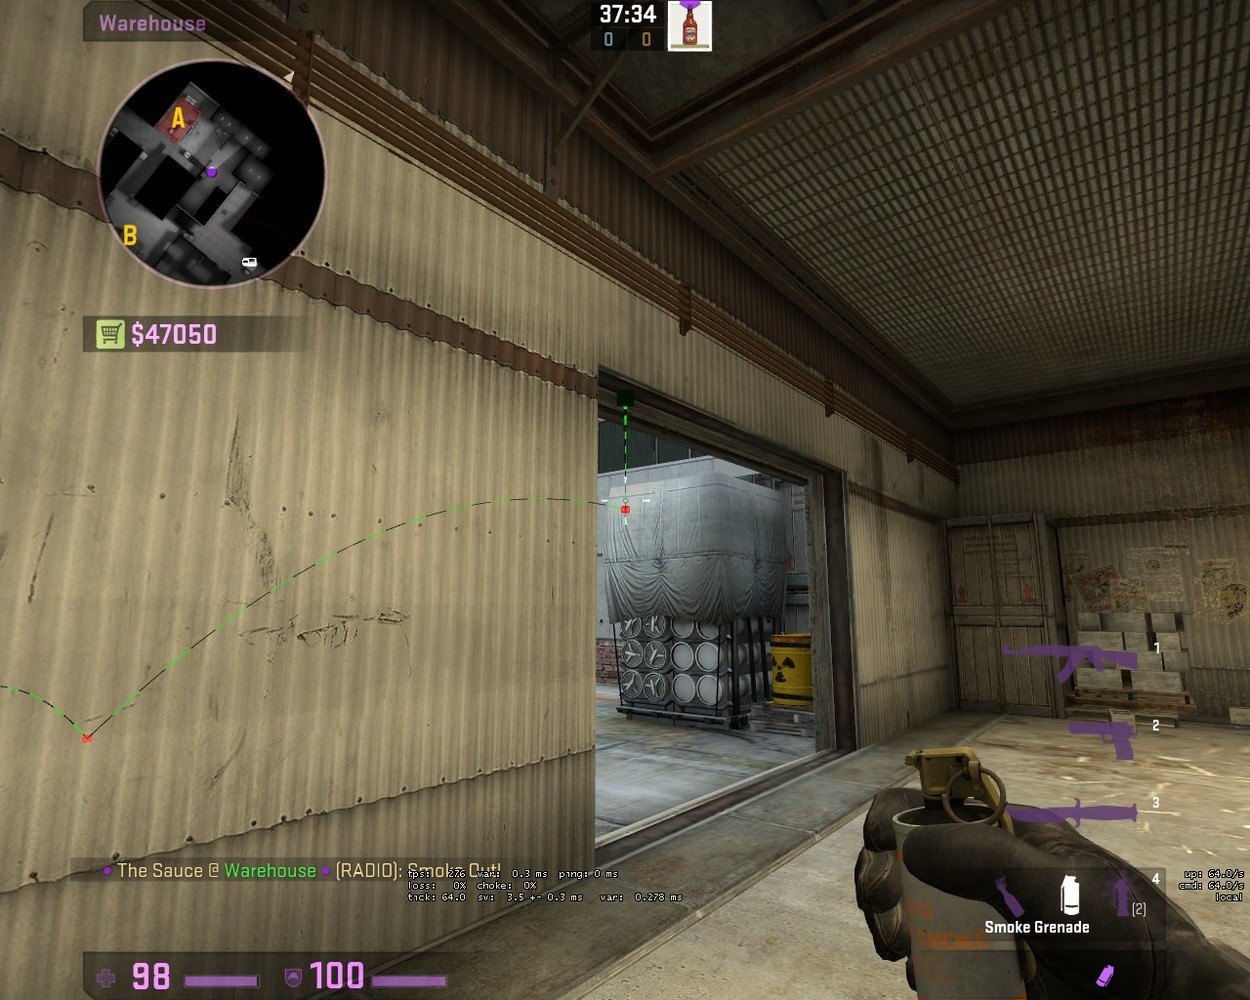
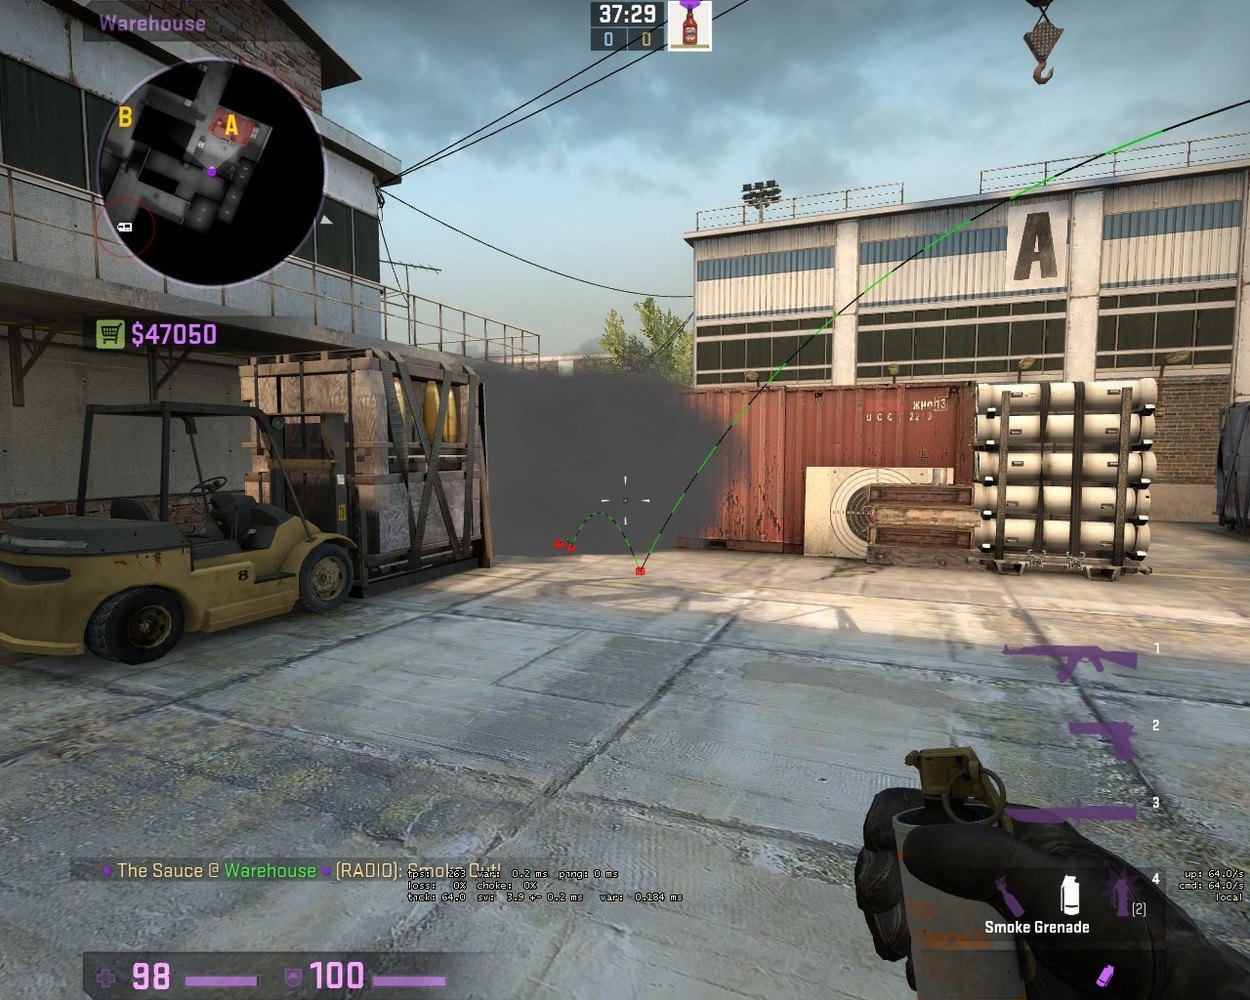
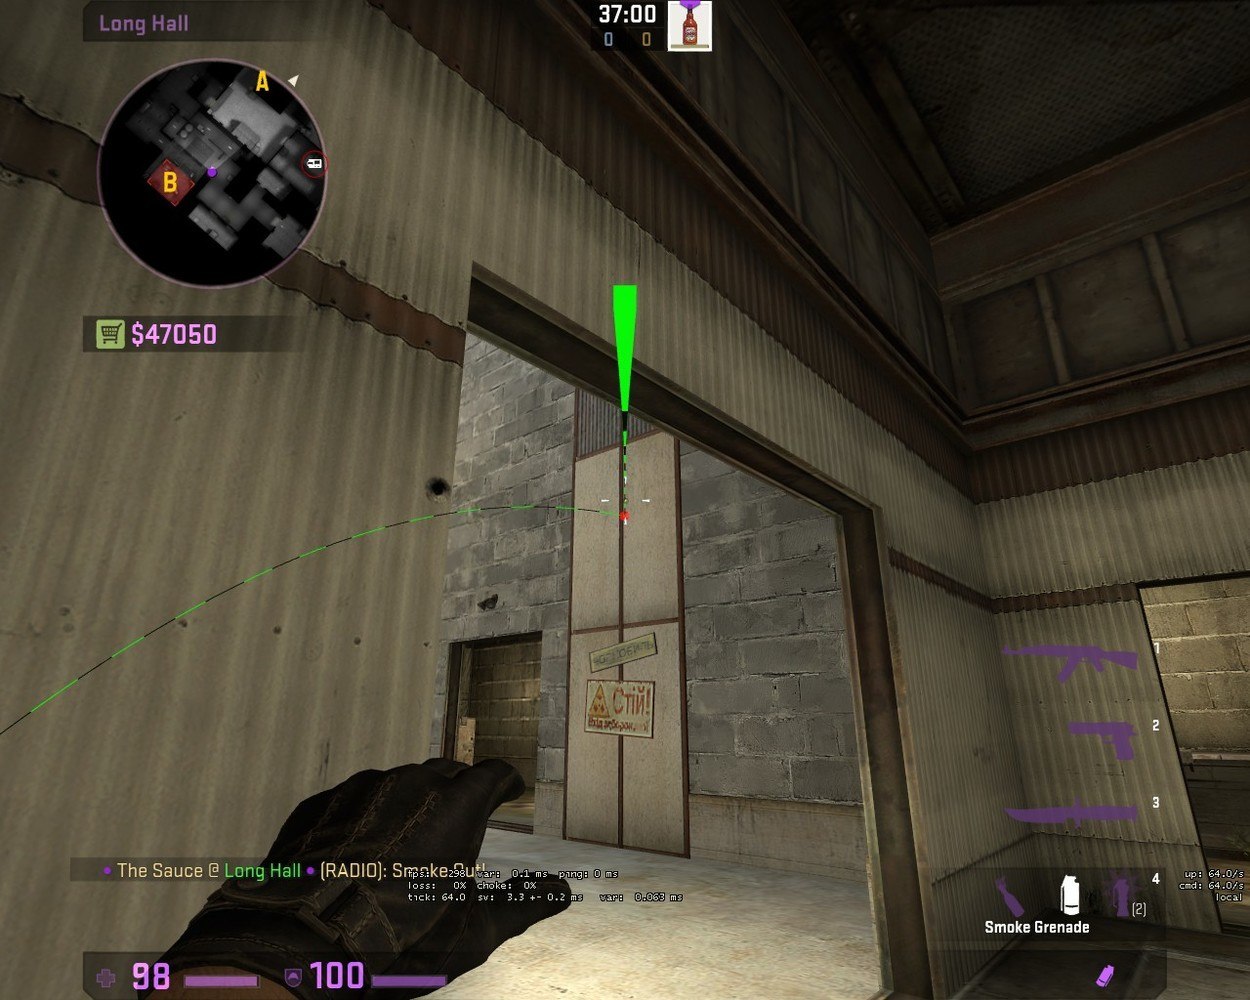
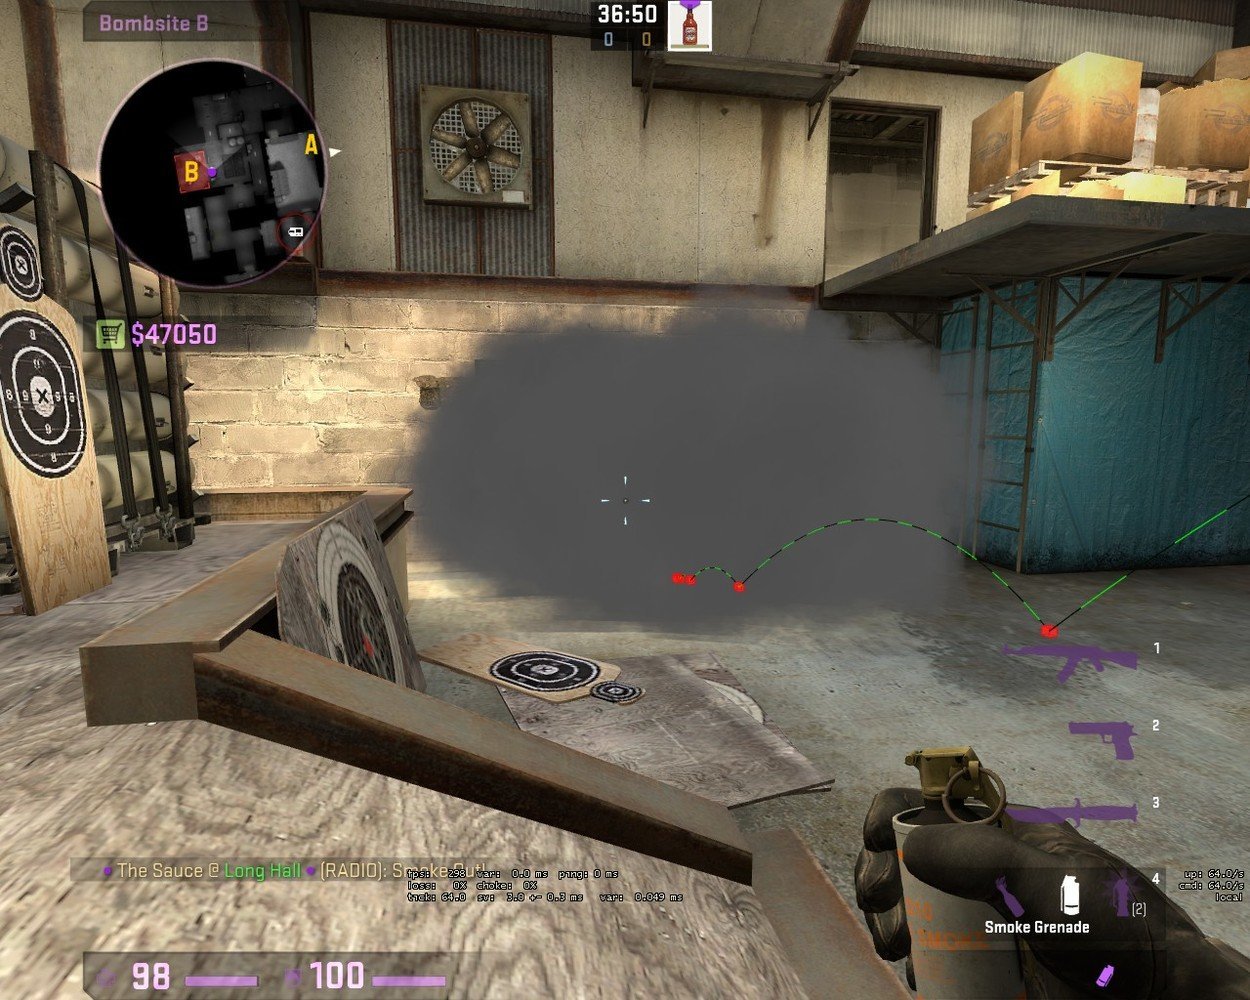
The top two strategies that I laid out are for full buy rounds or if you are desperate for a much needed win on a force buy. Let’s say you have lost pistol round and are feeling the Tech-9 Armor, then you will most likely rush either Bombsite. You want to rush with Tech-9’s because pistols have an advantage over rifles at close range. When doing these strategies there is not any less though, everything just moves quicker. Instead of gaining Mid control you will just be rushing through either B Main or A Main. There are smokes that can be thrown very quickly by one person while the rest rush out with flashbangs. Those two smokes are below, on the left we have the smoke covering Tree Room and on the right a smoke covering Truck and Highway. For the B Bombsite plant and after plant you would most likely plant safe behind the boxes or for B Main depending if you have people in Checkers or not. For the A Main plant and after plant, plant for A Main and Squeaky, since you will have A Main control and have your player who would play Highway play in Squeaky since you have not gained Highway control. Below are basic smokes everyone should learn, the top one is for A and the bottom for B.
Conclusion
Nothing I have written here is set in stone. You can change some things around and make it fit either you and a couple friends or your team. Remember that playing Terrorist is about taking map control without giving information to the Counter-Terrorists; you want them to be slow on the rotate. I hope this guide was helpful to you and/or your team. Have a good time countering the Counter-Terrorist on de_Cache.
Are you into fantasy leagues? Then check out AlphaDraft and put together your allstar lineup!