Blogs
Default setups and rotations for de_overpass

Introduction
For my last blog in my basic setups and execution series, we will be taking a look at one of the newer maps in the competitive map pool de_overpass. The meta is still evolving when it comes to how this map is played, but I’m going to break down some of the keys to success on this map. This map has been known for fast rotations, hard executes, and aggressive counter-terrorist play. We’ve already seen amazing things happen on this map in the few short years it’s been in competitive play. This map also has its share of interesting boost, spam, and smoke setups, which I will also be talking about, on top of some common setups that you tend to see on this map.
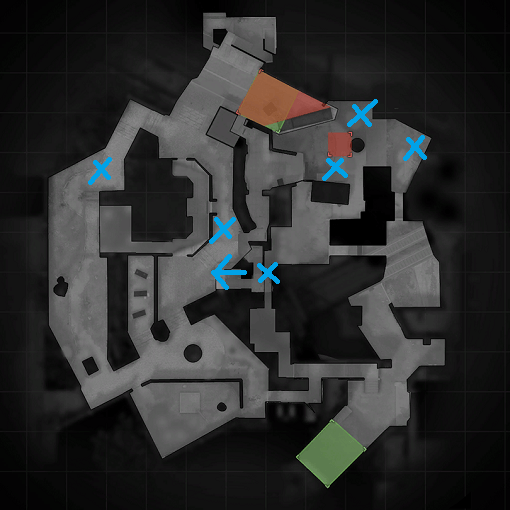
Aggressive counter-terrorism B stack
You will want to attempt this setup on a full buy round, preferably with an awper who will aggressively peak in connector. This is great for early information. Within the first 30 seconds of your awper being into position, he needs to fall back to the bathrooms and hold a deeper angle. The goal is to stop any aggression towards A and to sell the stack at the B bombsite. If no information is gathered within the first minute or so of the round, falling back and holding a passive default is your best bet, which I’ll break down shortly. In such a scenario, having a player rotate from B to the A bombsite is ideal. This strategy is great for making the terrorist team hesitate to push into connector, making it easier for you team to gain map control. Where they can rotate faster between the bombsites to catch the enemy team out of position.
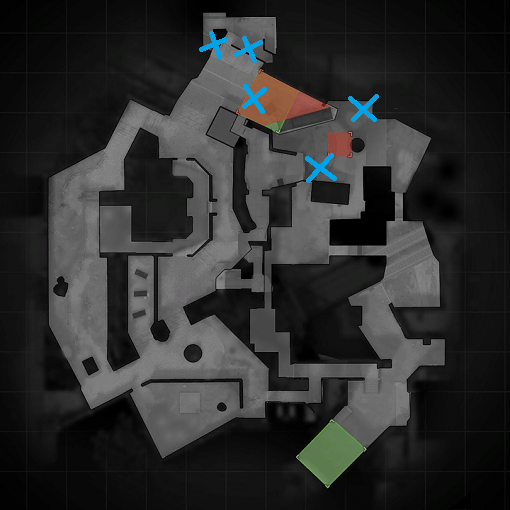
Passive counter-terrorist default
This tends to be the most basic and common setup on this map. Falling back to these positions mid-round after getting a pick is a wonderful way to shut down the terrorist side. You will see pro teams play the counter-terrorist side like this -- playing aggressively, hunting picks, and falling back into the sites using various crossfire setups. Doing this will also make the Terrorist side slowly check every corner and hopefully be forced to commit to one site or the other. If this happens and is identified you could attempt to flank through connector this has become commonplace you will see experienced terrorist sided teams stick their lurker in connector while they commit to a bombsite.
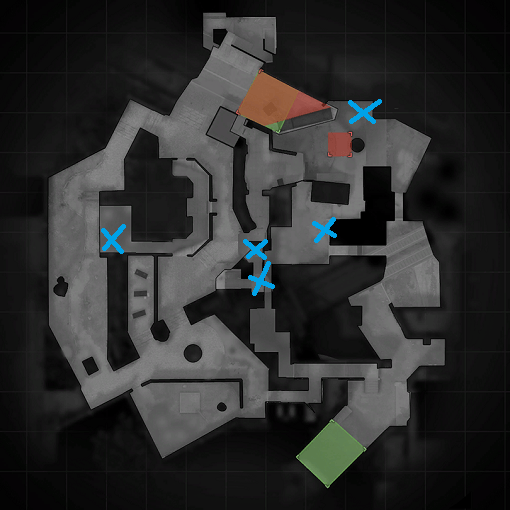
Aggressive connector and middle stack
Here’s another early round setup that can really stop an aggressive terrorist team from gaining any sort of map control early. Never forget that you can always fall back to a passive setup. One of the weaknesses of this setup would be the terrorist team pushing through, trying to gain control of party, and trapping two of your A players in connector. That’s why you want to stick your long player in bathroom, lurking, and trying to gather information for a possible long rush. If they happen to be working the B bombsite, your two connector players can push out and get the traders construction, and flank from bridge if need be.
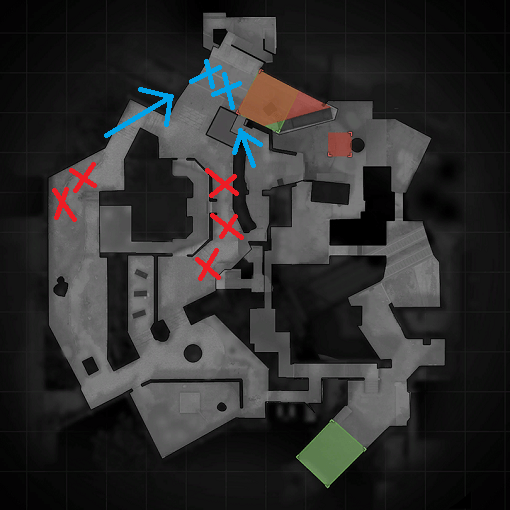
Standard terrorist side A bombsite setup
With this terrorist side attack, you will want to slowly work your way through upper park and party while clearing bathrooms. You can be aggressive or slow and methodical with setting up this bombsite take. Keep in mind that this overview is a few updates old, so bench and lower park no longer connected. So, your teammates will be cut off from each other while executing this split. The key to this strategy is to successfully hit the smokes to the left and right of the bomb boxes, which will cut off the counter-terrorist team completely, unless they want to push through the smokes or flank from connector. Remember to always have a teammate that watches your flank. You should be able to get the bomb down without actually securing the entire site and while holding the bomb from bench and lower park. Clearing the site is optional if executed correctly. You will see pro teams work this split quite often in one form or another.
Standard terrorist side B bombsite split
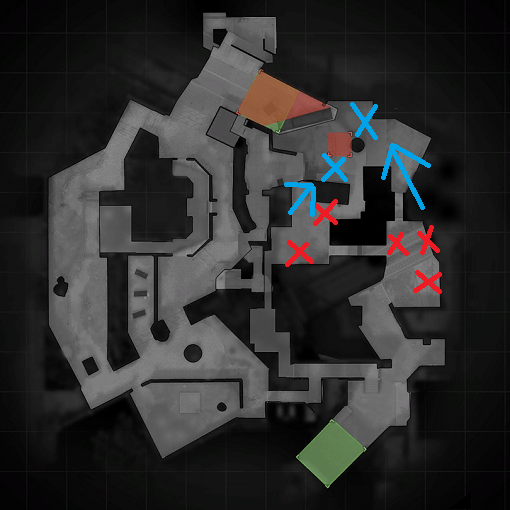
Now, this setup is like the A split. It really relies on cutting off toxic and bridge, or smoking off each side of the pillar to plant default. Having one of your construction players flashing into the back of the b bombsite helps a lot. This is another strategy, just like the A bombsite split, that doesn’t require fully clearing the site to get the bomb planted and get into after-plant positions. This is a very basic strategy that just comes down to clean execution and not landing your shots in a complicated manner. It can be really hard to deal with unless the counter-terrorist team is willing to stack 3 players at the B bombsite. If they do it, then rotating up through connector and forcing them to spread out by working the A split - as I mentioned earlier in the blog - could really throw them off.
What should I take from all of this?
de_overpass is a map that is open to a lot of creativity and meta changes, with it still being relatively new to the scene. Hopefully these really basic setups can help give you a few ideas to help your teams and pugs be successful on this map. You can always experiment and change the way you run these setups to suit your team's playstyle. I hope this small guide has been helpful.
Happy fragging :]
Are you into fantasy leagues? Then check out AlphaDraft and put together your allstar lineup!