






Blogs
The Death Screen and You


Most, if not all of the currently available guides and tutorials for new Counter-Strike: Global Offensive (CS:GO) players tend to skip over one of the games simplest features, the death screen. It is virtually guaranteed to play a part in every single game and as such it certainly shouldn’t be dismissed if you are looking to gain an edge. It can provide an invaluable amount of information for you and your teammates and if utilised correctly can even deny your opponents this very same info after a successful frag. In this article we will be looking at what you can learn about your opponents when you have just died and things to consider if you have just killed somebody yourself.
In CS:GO competitive servers the screen you see after dying is centred on where you fell and lasts roughly five and half seconds. It is not a freeze frame; therefore it offers a brief third person perspective on the activity taking place around your body for those five seconds. There are certain limitations that should be taken into consideration however. Because the camera angle is centred on where you die it can easily be obscured by the environment and does not always offer a good view of anything. The screenshot below gives an example of what you might be able to see with a good death screen after dying.
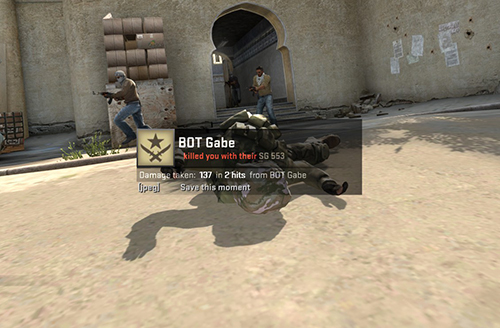
As you can see there is a lot of information that can be gathered and relayed to the team. First and foremost in a situaton like this you should call out to your team precisely how many enemies you see along with the location you fell and the position of your opponents if you can see them. This is the most important part as it allows your team to rotate, cover or prepare appropriately. Using the above example that would mean calling out three terrorists are running into B site from upper tunnels. The information does not stop there however; it is possible to pick out much finer details. In the example the box in the middle states that we were killed by an SG 553, we can clearly see that the other two terrorists have AK-47’s. In this scenario noticing the weapons and calling it means that the team does not have to watch for an AWP on site initially, if there is one it is currently elsewhere. Letting your team know what you were killed by, what weapons you can see in enemy hands and if anyone picked up or swapped guns is incredibly helpful for those left alive.
Above is a close up of the radar taken from the full size image of our example scenario. The bomb can be seen in red and in game this would be pulsating with red circles whilst in vision. Locating the bomb provides a good indicator of which site they are likely to plant on. It is a safe bet that the terrorists will plant on B in this situation, if they place it quickly the sound of the plant may even be heard before the death screen ends. All of this can be communicated to your team so they can react as quickly as possible. The box in the middle will also let you know how much damage, if any, you did to the opponent that killed you. This is great if you managed to get them low, knowing an opponent is low on health is a big confidence boost and advantage for the next person attempting to take them out.
It is worth keeping in mind that not all this information will be available every time you die. Sometimes it will be far less, for example if you are killed behind a box by an AWP that you didn’t see you may have next to no information to pass on other than where you died and what killed you. On the other hand it may also be more; you might die to a five man eco rush and know exactly where each of them has set up position on a bombsite. You should work with what you have available to you as every situation will be slightly different. Remember that relaying information no matter how small or insignificant you may think it is will always help your team in some way.
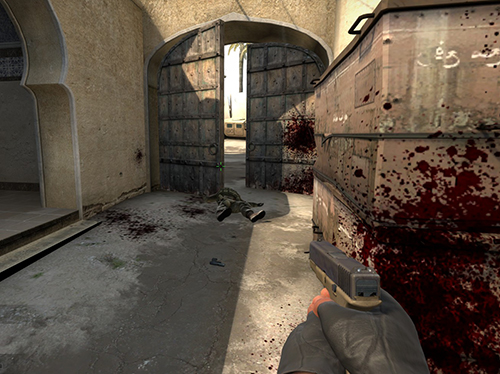
On the reverse side of things it is possible to try applying the understanding you have about what happens during a death screen to times when it is you who has claimed the kill. In the picture above a messy frag at mid-doors in the first round of the game has just been secured. I have the bomb and four viable options for movement available to me; I could push through mid-doors, enter lower tunnels, jump up onto xbox into cat or fall back up middle. Of course it depends on the team and our plan as to which is likely to happen or be the best option. However, knowing that for five seconds he will probably be able to see which of the paths is chosen and that this information will be passed on to his team can work in your favour. It is possible to try and hide your true intentions after a kill by heading in one of the directions available and then switching once you think your opponents death screen has passed. This may make them cautious of angles that you are not really holding or even force a rotate. It should be noted that this is nothing more than mental theory crafting and a mind game to play with your opponents; it is not worth worrying about or focusing on intently in the vast majority of situations as it is not only risky but can often prove pointless. Using it occasionally though may just help to keep your opposition on their toes and that is never a bad thing.
Hopefully this article has helped to explain the importance of the information that the death screen has to offer as well as get you thinking about ways in which you can use it against the opponents you face. When it comes down to it communication is at the core of all the benefits that the death screen has to offer, so always make sure to let your team know what you see and they will thank you for it later.