Blogs
The Ultimate Offense Guide on Cobblestone
Cobblestone, a map that was originally T-sided, still can tend quite heavily towards the T-side, if the Terrorists punish CT aggression, abuse their often favourable spawns on the right sides of the map, and execute correctly. In case you want to read the predecessor to this article, head over here to read the Ultimate CT-side Cobblestone guide!
Cobblestone is quite an exotic map compared to the more classically designed maps such as Mirage, Dust 2, and Cache, but this shouldn't stop you from trying to master it, as this design still allows for clearly defined meta gameplay and a decently balanced game. To let you know where to look for what, here's the content of this article:
- Map control and timings
- Defaults
- Abusing spawns
- Executes
- Lurking
- CT-utility and how to play around it
- A video of the most important grenade line-ups
- Conclusion
Map Control
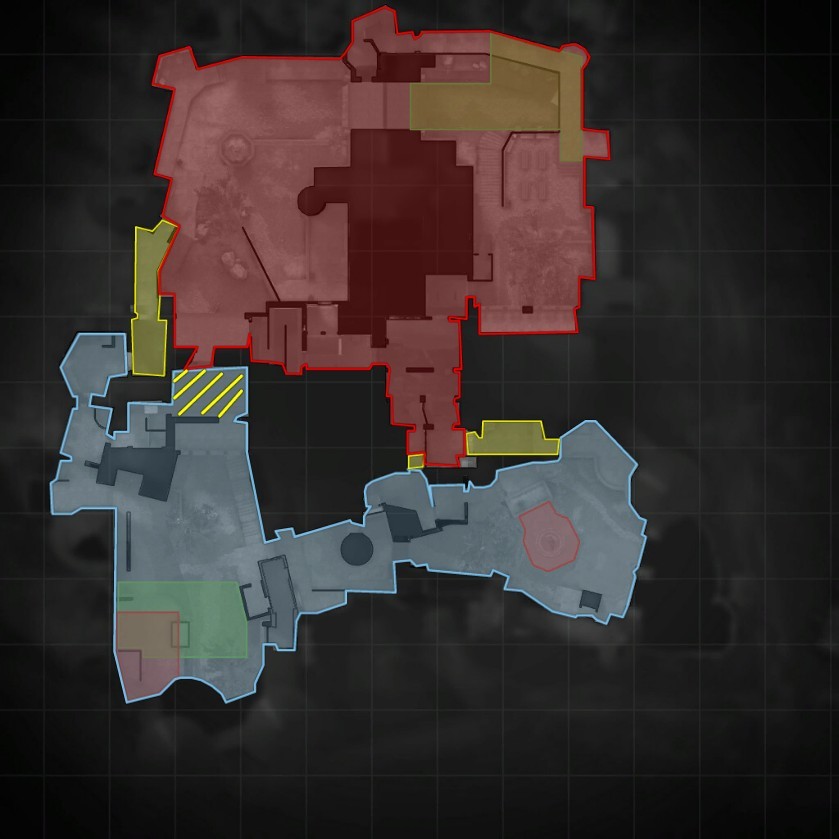
This graphic shows you the common initial CT and T map control, blue for CT-side and red for T-side. Yellow indicates most commonly contested areas. I chose to outline Mid blue, yet indicated with yellow stripes that this part of the map is more timing heavy than others and can often be given up from the CTs right from the start.
This graphic shows us that the Ts have a lot of breathing room, meaning that you can freely move from A to B and reposition as you like, according to expected aggression or a planned execute. Even more noteworthy is the fact that the CTs seem to be caged inside of their bombsites and Connector - They would have to face great risk in order to gain a bit of open map control, where a T could still be lurking in a corner they will not expect.
Now take a look at the ideal timings:
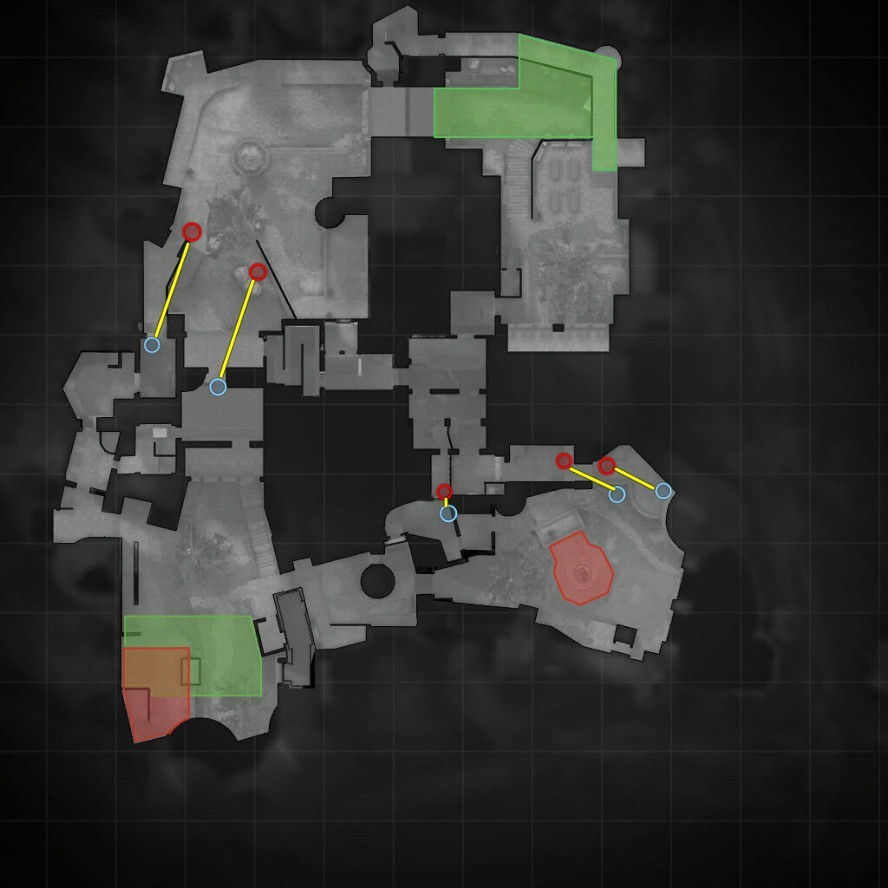
As you can see, with ideal spawns you will meet the CTs with ideal spawns themselves just as they try to get aggressive and take one of the contested parts of the map or more. If you plan to plant yourself in front of A-Long and Mid, you can get behind cover such as the Arch on A-Plat outside of A-Long and the stones in Slope before you will see CTs emerging from cover. In Drop, you may just find two CTs with really good spawns trying to boost up into Drop as you enter the last corridor, and on B-Long you can face a player peeking from Brokenwall or coming up the stairs as you enter B-Plat.
Defaults
Defaults are the initial set-up where Ts normally take a defensive positioning, looking for holes in the set-up of the CTs, often waiting a set amount of time for the CTs to push before advancing or harassing certain positions. In general, defaults are designed to allow the Ts to slowly gain map control, often while giving the CTs just enough rope to hang themselves in case they push. We will take a look at a few examples.
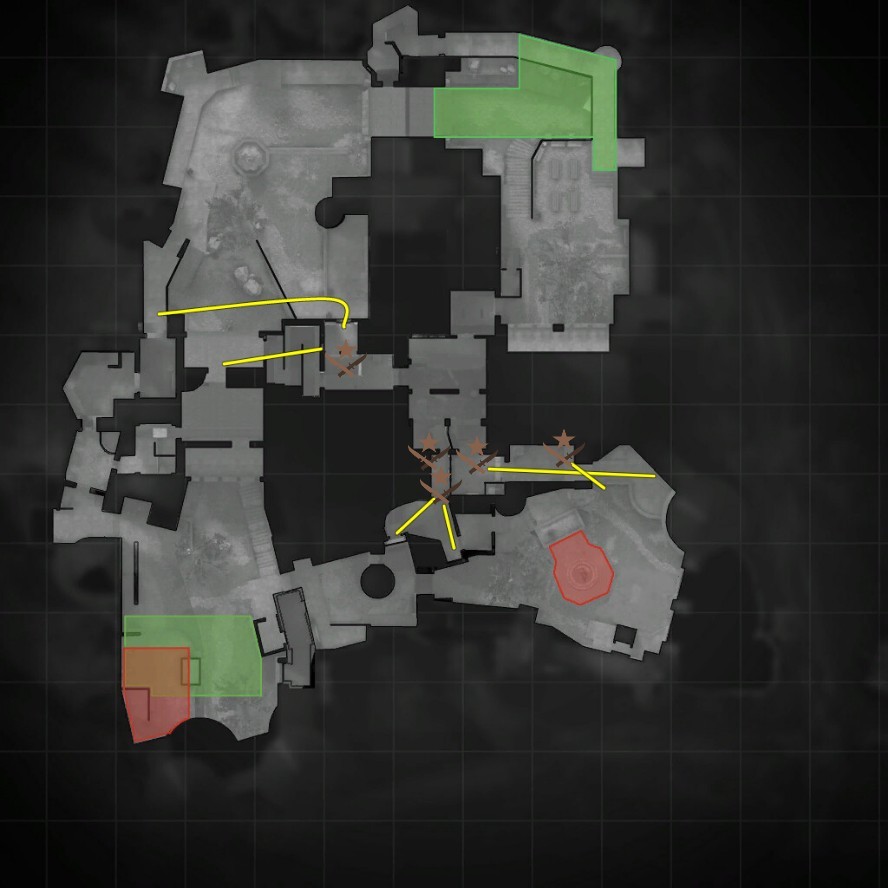 1 - 4
1 - 4
This set-up will concentrate on getting picks at B, meanwhile, a lurking player will hold behind, holding the exit from Mid through the window at Dragonlore and occasionally peeking out to check if someone has pushed through A-Long.
The intention of this default is to take safe jigglepeeks in Drop and bait out utility in a buddy system as a player supports the teammate advancing on B-Long by anchoring the B-Halls position, holding B-Plat/Stairs, allowing the teammate to fully concentrate on holding/clearing Brokenwall.
There are many things you can do with full B-Long control, like fall back after leaving one guy to fake on B and execute A, or simply wait a few seconds in case a CT will try to get a fast flank going after not hearing anyone A and not seeing anyone in his initial peeks, which will give you a free kill and thin out the defense. Be sure to not to make too much noise when rotating away.
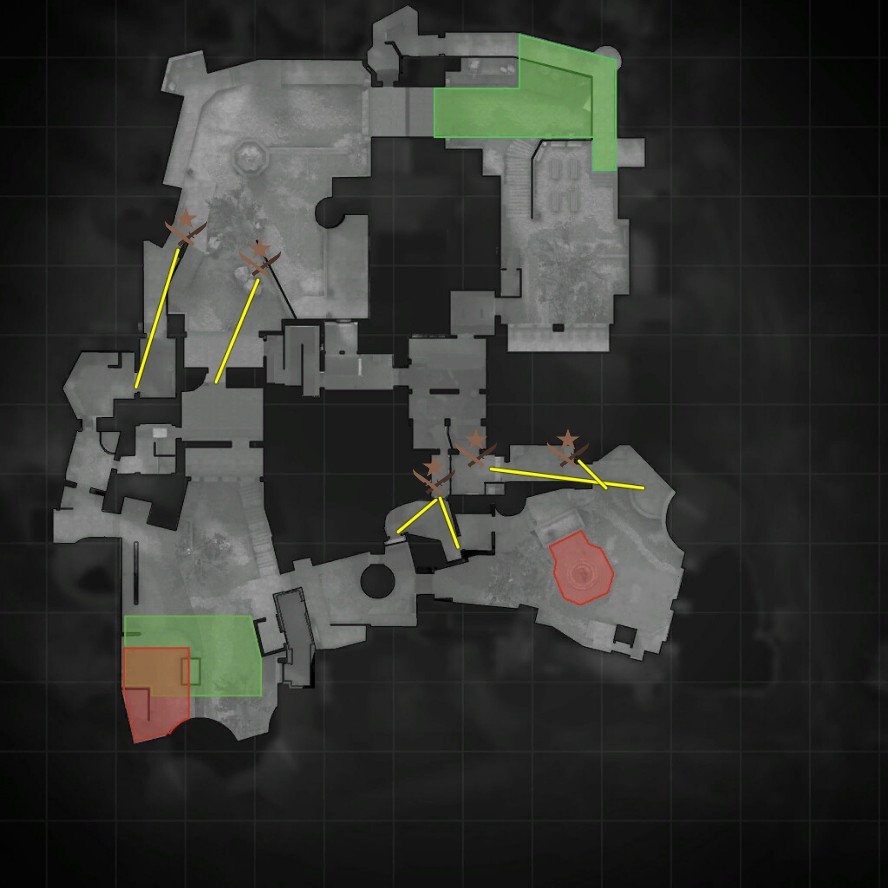
2 - 3
This default concentrates on a more evenly stretched chance of picks on both A and B. Basically, the Drop player will do the same he did with a partner in the 1-4 default but alone, and the B-Long players will also work their area the same way as noted above.
Now, however, the A players will try to hold their ground in case an AWP/rifler peeks out Mid or A-Long. This set-up is especially well suited against eco rounds from the CTs since people like to push through A-Long, Mid or both and hope for you to be setting up in front of B or at least running over the lone T playing lurk behind his team and stealing a weapon.
Even though this also puts two players at risk of being overrun, working the buddy system correctly will keep both rifles secure or at least allow you to guard the weapon once your teammate has fallen. For this, be sure to get back into cover when flashed and hold crossfires with the intention of splitting the CTs' attention when they push through just one of the two possible exits.
Furthermore, in this set-up you can abandon your secure positions in front of A and let your teammate popflash you in to get information and a possible pick A-Long or Mid relatively safely (if it's a good popflash, of which you will find a few in the grenade video close to the bottom of this article). If you have found holes in the defense on A or B, be sure to let your teammates rotate over to finally execute.
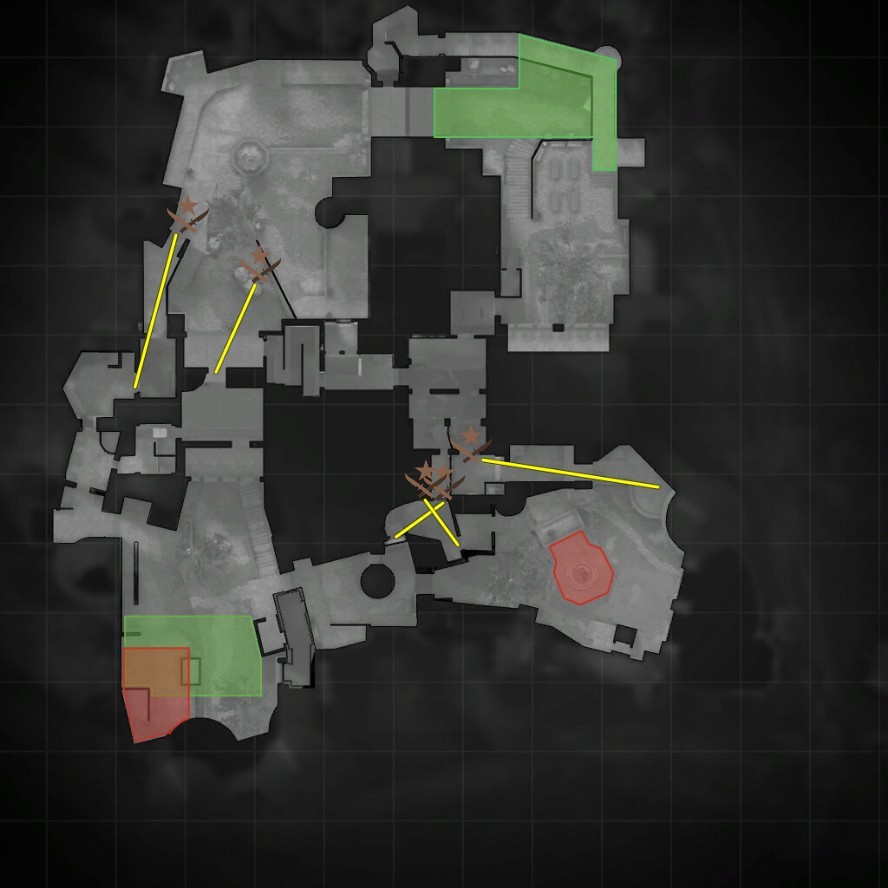 2 - 3 #2
This default can be played passively as well as aggressively. If you have good B spawns, you may try to get two people into Drop instead of just holding it, meanwhile, one player holds B-Long and keeps the CTs in check and off of Long, while the A players wait for CT aggression. Getting two people into Drop early will most likely give you a pick and open up the possibility of an A-split, as well as a B-take pretty early, leaving the CTs pressured to do something, like push on A or B-Long. Keep in mind that this kind of play may allow the CTs to trap you inside of Drop instead of giving you a kill if they play Drop from outside of both exits and are prepared for early Drop aggression. In that case, at least one of you will have to stay in Drop if you do not want to risk getting out of Drop through the window or the door in that case.
You can also just play passively in Drop again, baiting out utility. The important part is that the B-Long player does not try to get a fancy pick by pushing unless he is sure that B-Long is clear, since he will have no one to refrag him.
Abusing Spawns
As is indicated in the prior paragraphs, Cobblestone can be played by going for big openings with good spawns. This can turn into a bloodbath for you if you do not do it right, so in this paragraph, we will talk about calculated aggression and what causes this aggression to be successful.
1. Do not take fair fights
In CS:GO, it is a sin to willingly engage in a fair fight. Your intention shouldn't be to be the better aimer but to be the better player. If you know where a player is, be sure he is blind, in transition, and without cover or at low HP due to a nade or molotov before taking the fight. Also, taking 2v1 duels will skew the chances significantly in your favour if you count it from a team vs. team and not a player vs. player perspective.
2. Trade
If you go in first, be sure that you will not be going in alone with a significant distance to your teammates, which will allow the CTs to kill you without instant retaliation by your team. Just be sure that you are not too far ahead.
Also, if you are not the one going in first, be sure to avenge the death of the person actually going in first, since you will just give away your team's edge if you leave him to die.
3. Limiting CT positioning
Even though the first step to this is already taken by abusing good spawns to be there before the CTs can thoroughly prepare their defense/aggression, you can still limit the CTs positioning with fast utility usage, like throwing a right-click-flash while jumping, which goes above the roof on B-Long which will allow you to face at the same time the flash pops and blind everyone on B facing towards Brokenwall. There also are a few fast smoke line-ups, slowing you down just slightly or not at all while rushing towards any bombsite, or quick molotov line-ups, clearing out B-Stairs for example.
Example
Here we will take a look at a full B-site execute which abuses good spawns of at least two of the members, and acceptable spawns of the other two actively participating in it. The fifth player will play A passively, preferably from Dragonlore, to keep your backs clear and catch fast rotations.
Step 1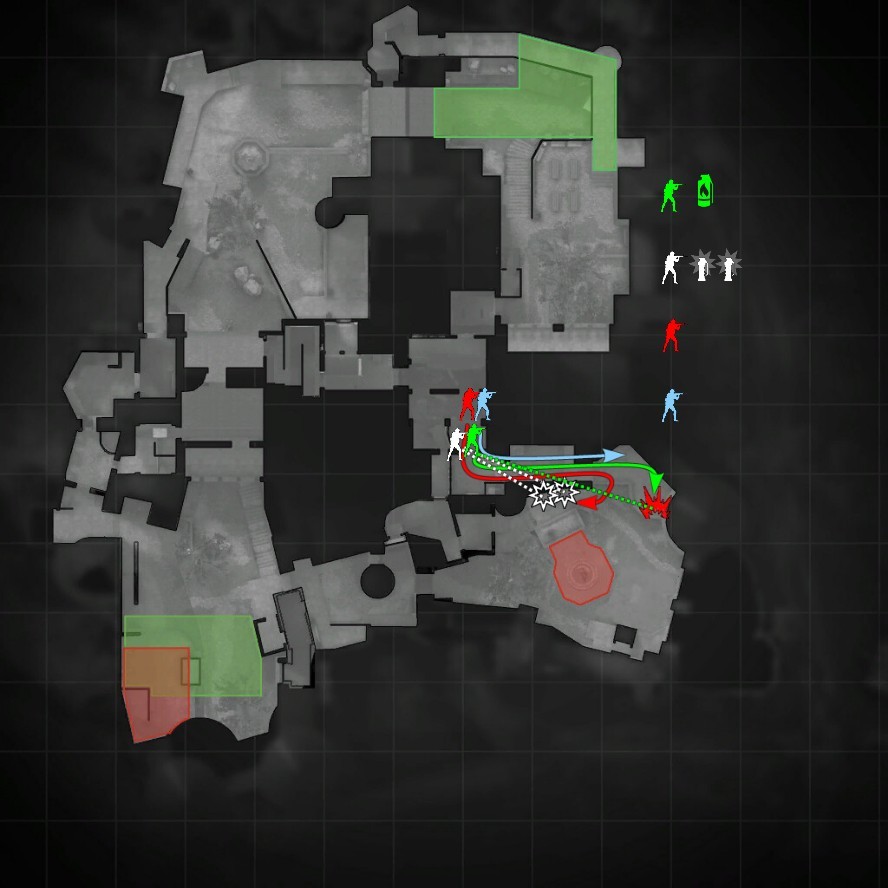
Legend and introduction: Green should have the best spawn, White the second best, then followed by Red and Blue, who has the bomb. However, all of these spawns should be quite close together, otherwise, the distance between the players will cause gaps and you will have problems trading. The grenades right next to the player icons on the right represent what utility that player needs to execute this part of the execute.
Now onto the actual execute. Green, the best spawn, should run out of B-Halls, right onto B-Long. He will, as soon as he enters B-Long, throw a molly to keep the CTs from going up the B-Stairs. White will place himself on the right side of the exit of B-Halls and throw to flashes, in as quick of a succession as he can, in order to blind CTs walking up speedway and trying to take positioning on B-Long. I chose to represent this by showing them pop over Speedway, but you can throw them more towards B-Stairs or Brokenwall, just be sure to call it out if Green runs the risk of getting blinded.
Red should be on Green's heels as much as he can be, running behind him ready to trade. Blue, the worst spawn that isn't watching A, will be behind Red. Green will go towards B-Plat or Stairs, Red will jump out at Brokenwall and Blue will stay on B-Plat for a few seconds, as he is able to help Red and Green from this position.
Step 2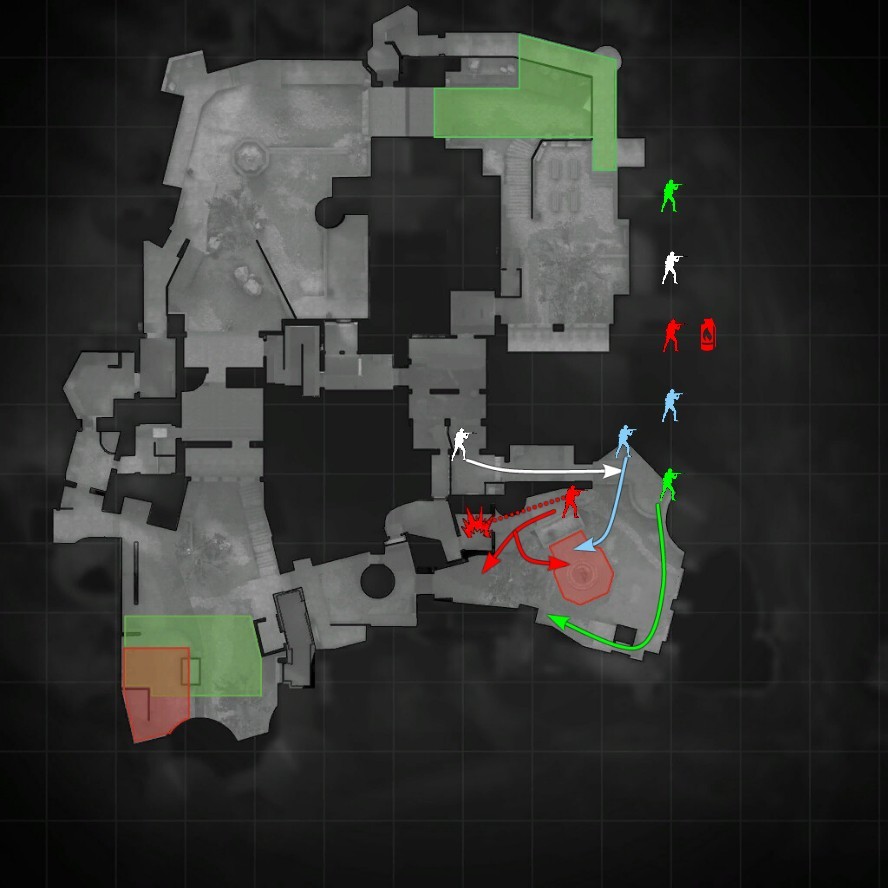
In this step, Red, once he has cleared out Speedway where Green will try to help him win the fight/trade from B-Stairs, will molotov the exit from Drop. During this, Green and Blue can concentrate on fighting CTs wrapping around the bombspot or trying to fight from Chicken Coop. White will try to get his running shoes on and help Blue as well as Green fight as well. Once Red has mollied Drop, he will start to move towards Door or Onspot. At the same time, green will cross from Stairs towards Chicken Coop and Blue from B-Plat to Onspot, which will split the attention of the CTs who are playing at Rock or Onspot. If Green successfully crossed, he will clear out Chicken Coop and go into the Ninja corner right next to the bombspot, marked with the arrow at the end of the green pathway.
From this position, he can watch Drop in an off-angle and help Red keep the bombsite clear for the plant from Blue.
Step 3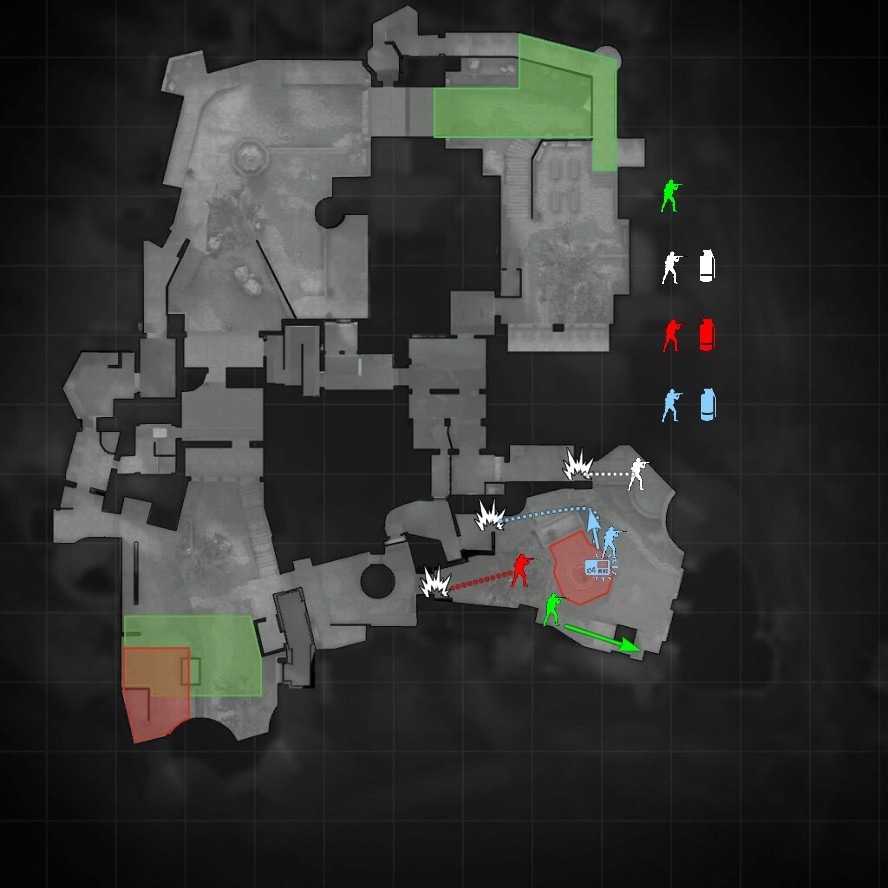
This last step will start with the plant from Blue, which will signal the usage of Smokes on B-Long, Drop and Door. Keep in mind that you do not need to smoke off B-Long when you still have a lurker keeping the back clear. Green may move back into Chicken Coop, to help Blue hold Drop and White hold B-Long, as well as stall once the retake comes in. Blue should hide behind Quad, peeking into Drop, with White if he does not need to take care of Long. Red will have a forward position behind the stones that can get supported by Green if he widepeeks a bit to distract his enemies that are coming from Door.
If you want to spice this up and keep the chances of a retake low while your Lurk is still alive, let him fall back up until the top of Drop and let him hold behind from there. As soon as the Smoke in Drop disappears, from which point onwards he will start to peek Drop and try to take it back if the CTs have taken it, in which case White will smoke B-Long to ensure that there won't be a late flank.
Executes
Executes do not need to be as fast and rushed as the example given above, where the good timings of your spawns is the strength of said execute. Especially on Cobble, you can try to keep the CTs on the opposite bombsites of where you will be going.
The key to such executes, which are shrouded in a cloud of mystery, is to take as much map control as you can. For this, you should set up specific defaults with mechanisms to take A-Long, Mid, and B-Long control, even Drop if you want. If you push the CTs back from their positions, they will get stressed and either fall back even more or start to fight for control, which is a battle you will most likely win if you play the numbers game correctly. Also, if you are currently asserting dominance over on A, be sure to keep the control of what you have at B with a Lurker playing at an off-angle for example, and vice versa.
Once you have established more map control and preferably have a man advantage, try to fake an execute on the other side of the map compared to where you go.
A brief example: If you want to go A, let two teammates rotate to A/take control of A-Long and Mid earlier and have three people still play B. Two will work on Drop, smoke off Window and the exit to the left of you. Flash one player into Drop and face from the top of Drop so that he is successfully inside Drop. Then the player on B-Long will smoke Door or a similar position on B, meanwhile the player in Drop sprays in 4-7 bullet bursts into the smokes, concealing the actual numbers of the players that jumped down as well as the footsteps from the players rotating from Drop and from B-Long to A. Once you have bunched up in front of A, stick together and trade the, most likely, only player on A.
Now you should be able to take A, plant and have a Lurk or at least a thorn in the side of the CTs with the player in Drop, who will slow them down significantly.
There is a key to throwing successful fakes, too. Make it realistic. Do not have two set of utility usage, one for actual executes and one for fakes, but rather use the same smokes for an actual B hit as you'd use for a fake, as the CTs may get an inkling of what you're up to if you show your hand subconsciously.
Lurking
Although lurking was more important in 2014 than it is today, a Lurker can still easily make or break a round. To put it briefly, a Lurk is responsible for catching rotations, slowing down the enemy and shrouding your actual intentions and keeping the map control you gathered before. Of course not all of this in every round, but rather according to the situation in the round and what the team plans on doing.
There are three big styles of lurks:
- The secret Lurk
- The aggressive Lurk
- The Flank
The secret Lurk is often used when the CTs rotate fast and you can catch them off-guard just by silently waiting in front of the opposite bombsite of where your team is making noise. His job is to catch aggressive rotations and open up the opposite side of the map by just being there. This playstyle is also often used when you have gathered map control, turned silent and gone back to a different part of the map. The Lurk will stay in the area you captured and will not let go of it, but he will not show himself and try to lure the CTs into believing that they can retake that part of the map.
The aggressive Lurk will play alone on the opposite side of the map compared to his team and aggressively and constantly harass the CTs, trying to get them to make a mistake and to stop them from rotating if a hit commences. Depending on the set-up, he will try to sneak behind the enemy forces and catch them from behind, which works especially well if someone is playing A alone and pretty far forward in either Mid or Long.
The Flank is a playstyle in which you will try to move up behind the retaking CTs, shooting them in the back when they least expect it. This works especially well with good map control on one side of the map, for example in Drop, and taking the opposite bombsite, which will cause the CTs to rotate to the attacked bombsite where then the Flank will come up behind them and preferably get multiple people or kill one and let his presence do the job of slowing down the retake significantly.
Of course, you shouldn't constantly only play one style of Lurk. You should adapt quickly and learn from the experiences of the prior rounds instead of running into a brick wall with your style in a futile attempt to overpower a whole CT-side set-up.
CT Utility
The CTs hope of winning the round is often limited to utility usage, both to get aggressive picks and delay the bombsite take, as well as the general advancing of the Ts. However, there are ways to not let utility stop you from winning your T half.
First of all, if you want to take a bombsite, leave around 40 seconds left when you try to execute. This will allow you to reassess the situation if the CTs played their utility well and smoked you out just as you wanted to execute. There often is no need to run through smokes. Alternatively, being active and taking map control will make the CTs feel forced to use utility to fight this. So, if you take map control and are harassing them in a calculated and tradeable manner, you will almost always gain something for your troubles, be it utility being wasted by the CTs, getting a pick, or at least map control. Showing your presence and being loud will often cause the CTs to use the first part of their utility, too. So be sure to incorporate this into your defaults.
Furthermore, using your utility and sound cues to bait out more utility from the CTs may bleed them dry. If you step in front of Drop and flash, the players will most likely deploy a bit of their utility, like a smoke, molly, or flash themselves, all just for the cost of $200. By throwing elaborate and well planned double fakes, you will leave the CTs with often nothing to fend off the last attempt at a bombsite take, too. Just be sure that you did not waste all of your smokes, flashes, and mollies. Again, a fake has to look just like an actual bombsite take in order to work and bait out a response.
Also, the most important aspect of all of this is called conditioning, a phenomenon that forms the expectations that an individual has towards a situation due to prior experiences. This, in CS:GO, refers to abusing the patterns the CTs show and baiting them in with false patterns yourself in order to abuse the found weakness round after round. For example, when you step in front of Drop and flash, the players will associate this with a Dropper rush. They have been conditioned by their experience in prior games and rounds to believe that many steps and a quick flash will be followed by four Terrorists pouring down and ploughing through the CT defense.
This also opens up a new way of playing around the utility. If they are used to you going in late, they will not deploy much, if any at all, utility early in the round. This may open up their defense to a fast rush or execute, not stopped by any utility. This also works the other way! If they are used to you going in early, make initial noise and fight at contact, but do not commit and let them waste their utility.
Grenade Video
Conclusion
If you are on the T-side, it is your half to lose. To get as many rounds as you can, you should abuse whatever you can: Timings, their utility usage and expectations, and your well-thought executes should leave no room for the CTs to go other than to their death. There is no need to be over aggressive in the first few seconds of the round unless you want to abuse timings, and you can always hope for an easy rotation kill if you do not show yourself on a part of the map. Changing pace mid-game will catch many people off-guard.
Like our content? Support us by getting our merchandise in our shop