Blogs
Terrorist Side Guide: Think like a Human Wallhack

Driftking
Fri 18th Nov 2016 - 12:20pm
Disclaimer: it's good to think like a human wallhack but you should never use a real wallhack or any other cheat. Cheaters are lame and you could permanently lose your account!
Introduction
Wouldn't it be incredible to perceive the positions of the enemy team? You must be thinking that's impossible without wallhacks. In fact, there is an established method to figure out the whereabouts of your opponents. Over the course of the article, this process will be dissected. Before long, you will transform into a human wallhack. However, there are prerequisites. Namely, knowing and understanding all the possible position types a Counter-Terrorist can play and the behavior associated with it.
Subconsciously, you may have already been employing this method. For example, you are pushing Bombsite A from short on de_dust2 and notice that the stairs are clear as well as the car area. A Molotov confirms that on site is empty, too. That leaves Goose. You carefully peek that spot. Enemy spotted! You swiftly dispatch your opponent with a precise headshot!
Similarly, you may use this approach to find something that you may have displaced in daily life.
Without further ado, here are all the possible Counter-Terrorist position types arranged in a visual aid.
All the position types of a Counter-Terrorist
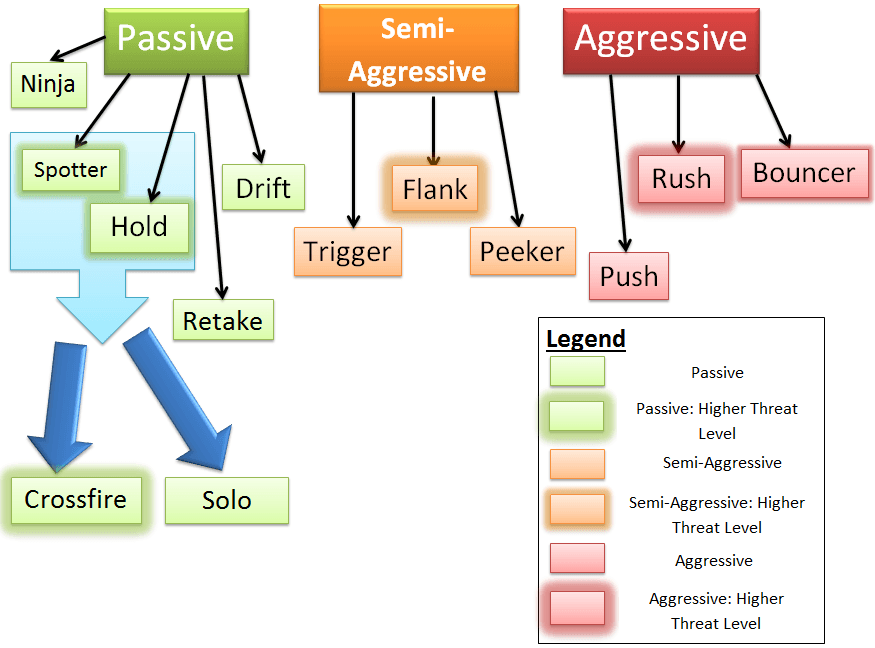
All the positions have been allocated to three main categories: Passive, Semi-Aggressive, and Aggressive. They were grouped based on how active of a stance the Counter-Terrorist adopts.
Passive Position Type
One characteristic common of passive positions is the systematic and modular approach. Generally, such a player would have a static playstyle. This means a fixed behavior along with being compact or confined to a certain area of the map.
The first component of this block is the Ninja. This type of player is one who sets up in stealthy spots to gain the element of surprise but relinquishes map control in the process.
A Spotter is one who initially sets up at a forward position but doesn't engage the enemy. His primary goal is to identify the execution and fall back instantly, usually with the help of grenades. This position is considered passive because the player doesn't challenge the Terrorists and is in no peril.
The Hold position is self-explanatory. However, there is a minute distinction. A Hold player sets up in such a way that he is not immediately visible from outside the bombsite and to the incoming Terrorists. He or she allows the Terrorists to have initial vision but mows them down as they enter the bombsite.
A Drift player is like a support player. This individual hovers between bombsites with the objective of anticipating the attack. This position type is most popularly used in de_inferno.
Last but not least, a Retake role is pretty straightforward. A Retake plays at an extremely passive angle. Upon spotting enemies, he or she falls back to safety while attempting to get one or two frags in the process. Then, as the name suggests, the regrouped team mounts a full retake.
Most of these positions can either be played solo or with teammates in a crossfire. Crossfires are much more dangerous. More on that later.
Semi-Aggressive (Passive-Aggressive)
The uniting aspect of this category is that all roles are both passive and aggressive. Thus, they lie somewhere in between. A prime example is the Trigger position. As the name implies, this is a trigger-based position where the player reacts to a stimulus. The stimuli could be sound queues such as footsteps or chucked grenades. Such a player starts out passively but transitions to aggressive as the enemy approaches. This is usually accomplished with the assistance of flashes in order to peek the Terrorists. The Trigger role is similar to Hold and Ninja playstyles, but the distinguishing feature is that map control is contested head on in this instance.
A Peeker sets up in a passive position, usually behind cover. At an approximately fixed interval, this Counter-Terrorist peeks out to check the chokepoint. A transition back and forth between passive and aggressive playstyles occurs.
As the name suggests, the Flank position type requires a Counter-Terrorist to push deep into the Terrorist half of the map to catch them off-guard as well as initiate an offense on two fronts. Usually, Flankers come into action in response to some Terrorist play. For example, the Terrorists pushed long in de_dust2 and your teammate relays the information. Accordingly, you decide to press towards the top of Middle from Short to flank the Terrorists.
Aggressive
Simply put, Aggressive players bring the fight to you.
Push and Rush are practically the same terms. Both employ the usage of grenades to gain ground. However, there is a fine lining between the two. Counter-terrorists who push do so in a calculated and deliberate fashion. They will set up camp in that forward position and wait until an opportunity for a flank arises. On the other hand, rush players will continue prodding until they encounter the enemy.
Notice how in the second and third clips, the players go out hunting for kills. They successfully caught their enemy unprepared.
Last of all the possible position types is the Bouncer. A Bouncer challenges map control by holding a chokepoint at an aggressive angle. In other words, they will be the very first point of contact. Such a position is usually played by AWPers. They will either stand their ground and try to shut down the assailing Terrorists or fall back after taking one or two shots. Then, they will reposition for another chance at taking down the enemies or prepare to retake the bombsite with their teammates.
Crossfires and Solo holds
Crossfires and Solo holds are not really positions. Instead, they are formations. More often than not, experienced players will attempt to coordinate crossfires, especially in crucial chokepoints. For instance: the long area in de_dust2 or Bombsite B in de_inferno. Crossfires are harder to deal with because they ensure a trade kill or more in most circumstances. Crossfires can be set up for any of the possible position types. Solo holds are not to be taken lightly either. A solo player will be highly skilled and capable.
The Human Wallhacking Method
Now, that the prerequisites have been satisfied, the application of this technique can be discussed. Basically, it is a modified process of elimination.
Remember these five simple steps:
1. Peek
2. Hold
3. Provoke
4. Isolate and Clear
5. Repeat
1) Peek
Peek the angle. You can either shoulder peek or pop-out instantly.
Don't detect anyone? That means your opponent is neither a Bouncer nor a Spotter.
2) Hold
Hold the angle for a while.
If nobody peeks, then the Counter-Terrorist in question is not a Peeker either.
3) Provoke
Provoke the enemy. This can be accomplished in a variety of ways. You can either make use of grenades by directly throwing a grenade at the suspected location or baiting out your opponent with the sound of footsteps or gunfire.
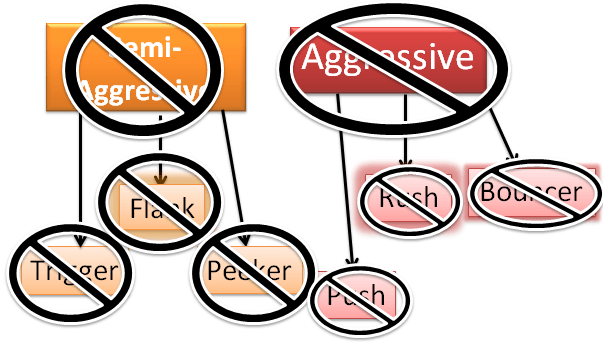
You could also run a distraction with your teammates attacking another chokepoint of the map. This might force the Counter-Terrorists to prematurely rotate out of their spots to provide support for their comrades. They might even attempt to push or rush the angle you are holding with the intention of a flank which you could easily shut down. Despite the stimulus, no reaction indicates that the Counter-Terrorist is not Trigger-based. With all these steps done and no encounter yet, the aggressive and semi-aggressive branches have been removed from the equation. There is no imminent threat from the opposition.
4) Repeat
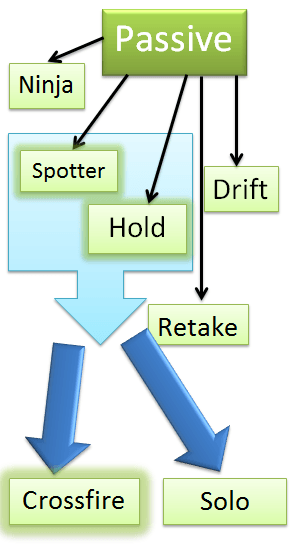 By this step, it is highly unlikely that you will be peeked as the Counter-Terrorist will either be playing a passive angle or not be present at the position in question. With that, you can safely direct your attention towards other spots that are within close proximity. Repeat the aforementioned steps to confirm the absence of an impending hazard for these points.
If you do come across anyone, you would most likely win the aim duel since you are mentally prepared and are pre-aiming that spot. However, you must be careful to not overextend and end up exposing yourself to more than one angle at a time. Otherwise, you might get caught in a crossfire where the best case scenario is trading yourself. As usual, proceed to check other spots.
5) Isolate and clear
You can begin to move into the bombsite when you have cleared out all immediate angles. For such positions that require you to move out into the open resulting in exposure to multiple angles, you have to isolate them. Grenades such as flashbangs, molotovs, and smoke grenades can be of assistance for this purpose.
Proceed to carefully check each obscure location until you have gained possession of the entire bombsite.
Here is another clip showcasing the entire process on Bombsite B in de_dust2
Conclusion
These five steps might seem tedious. However, they can easily be performed within a matter of few seconds. As mentioned earlier, you might have been employing this technique subconsciously. Nevertheless, this article taps into your brain and gives you a method to play with. Additionally, I wanted to showcase the deep philosophy involved in Counter-Strike. I hope I helped you achieve some sort of understanding. Frankly speaking, I could go much more in depth, but I tried to concise all the information within one article. This is my very first foray into this field, so apologies for any errors and I hope you got enlightened. Feedback is welcome and thoroughly appreciated!
Like our content? Support us by getting our merchandise in our shop